Woodworker's Journal 1983-7-3, страница 45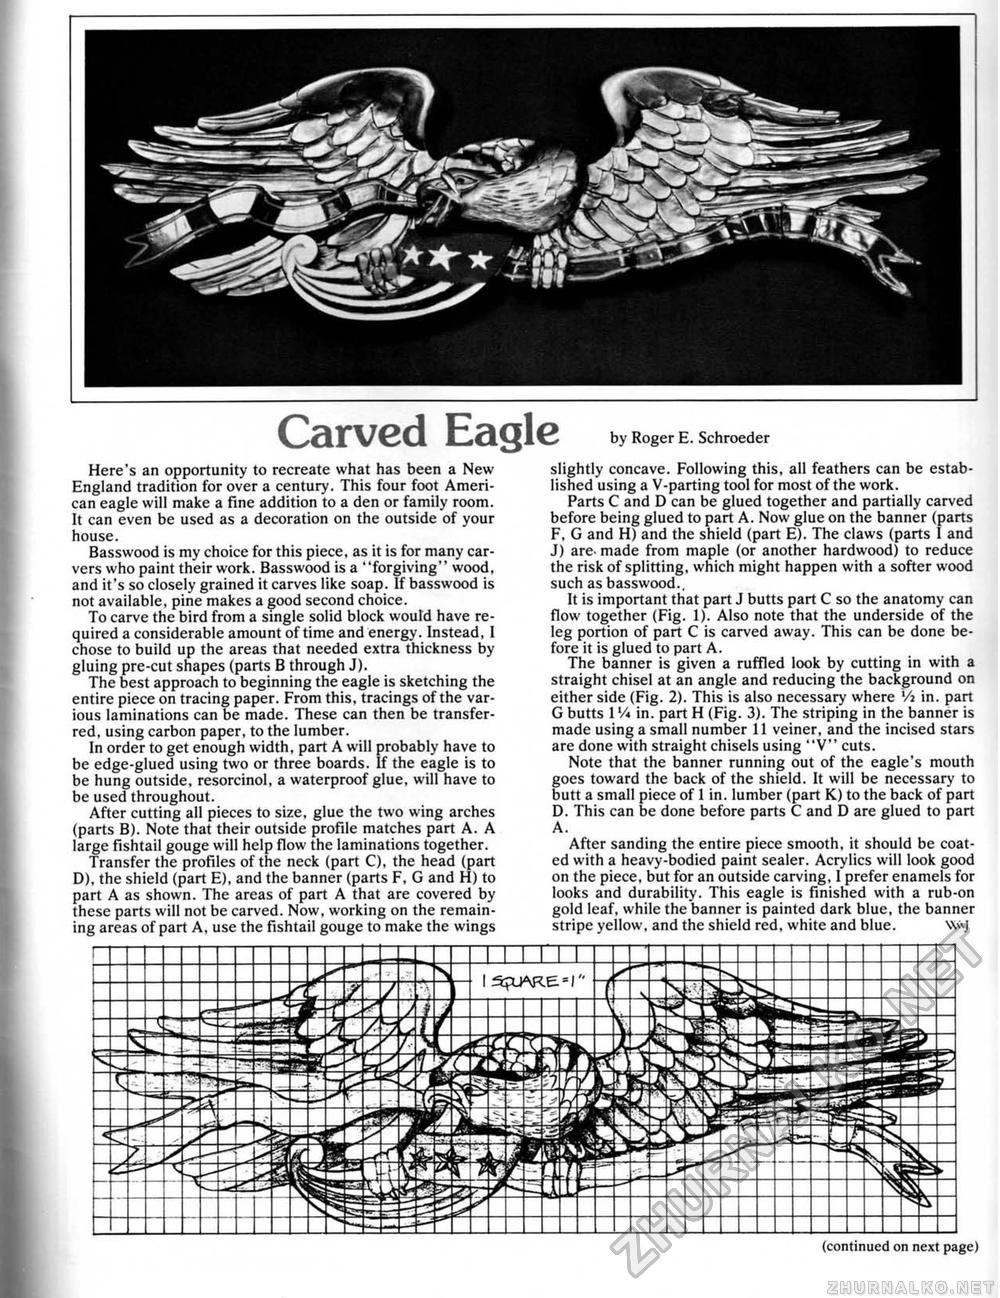
Carved Eagle by RogerE. Schroeder Here's an opportunity to recreate what has been a New England tradition for over a century. This four foot American eagle will make a fme addition to a den or family room. It can even be used as a decoration on the outside of your house. Basswood is my choice for this piece, as it is for many carvers who paint their work. Basswood is a "forgiving" wood, and it's so closely grained it carves like soap. If basswood is not available, pine makes a good second choice. To carve the bird from a single solid block would have required a considerable amount of time and energy. Instead, I chose to build up the areas that needed extra thickness by-gluing pre-cut shapes (parts B through J). The best approach to beginning the eagle is sketching the entire piece on tracing paper. From this, tracings of the various laminations can be made. These can then be transferred, using carbon paper, to the lumber. in order to get enough width, part A will probably have to be edge-glued using two or three boards. If the eagle is to be hung outside, resorcinol, a waterproof glue, will have to be used throughout. After cutting all pieces to size, glue the two wing arches (parts B). Note that their outside profile matches part A. A large fishtail gouge will help flow the laminations together. Transfer the profiles of the neck (part C), the head (part D), the shield (part E), and the banner (parts F, G and H) to part A as shown. The areas of part A that are covered by these parts will not be carved. Now, working on the remaining areas of part A, use the fishtail gouge to make the wings slightly concave. Following this, all feathers can be established using a V-parting tool for most of the work. Parts C and D can be glued together and partially carved before being glued to part A. Now glue on the banner (parts F. G and H) and the shield (part E). The claws (parts I and J) are. made from maple (or another hardwood) to reduce the risk of splitting, which might happen with a softer wood such as basswood,. It is important that part J butts part C so the anatomy can flow together (Fig. 1). Also note that the underside of the leg portion of part C is carved away. This can be done before it is glued to part A. The banner is given a ruffled look by cutting in with a straight chisel at an angle and reducing the background on either side (Fig. 2). This is also necessaiy where Vi in. pan G butts 1Vi in. part H (Fig. 3). The striping in the banner is made using a small number 13 veiner, and the incised stars are done with straight chisels using "V" cuts. Note that the banner running out of the eagle's mouth goes toward the back of the shield. It will be necessary to butt a small piece of 1 in. lumber (part K) to the back of part D. This can be done before parts C and D are glued to part A. After sanding the entire piece smooth, it should be coated with a heavy-bodied paint sealer. Acrylics will took good on the piece, but for an outside carving, I prefer enamels for looks and durability. This eagle is finished with a rub-on gold leaf, while the banner is painted dark blue, the banner stripe yellow, and the shield red. white and blue. \\<\j {continued on next page) |


