Woodworker's Journal 1983-7-4, страница 42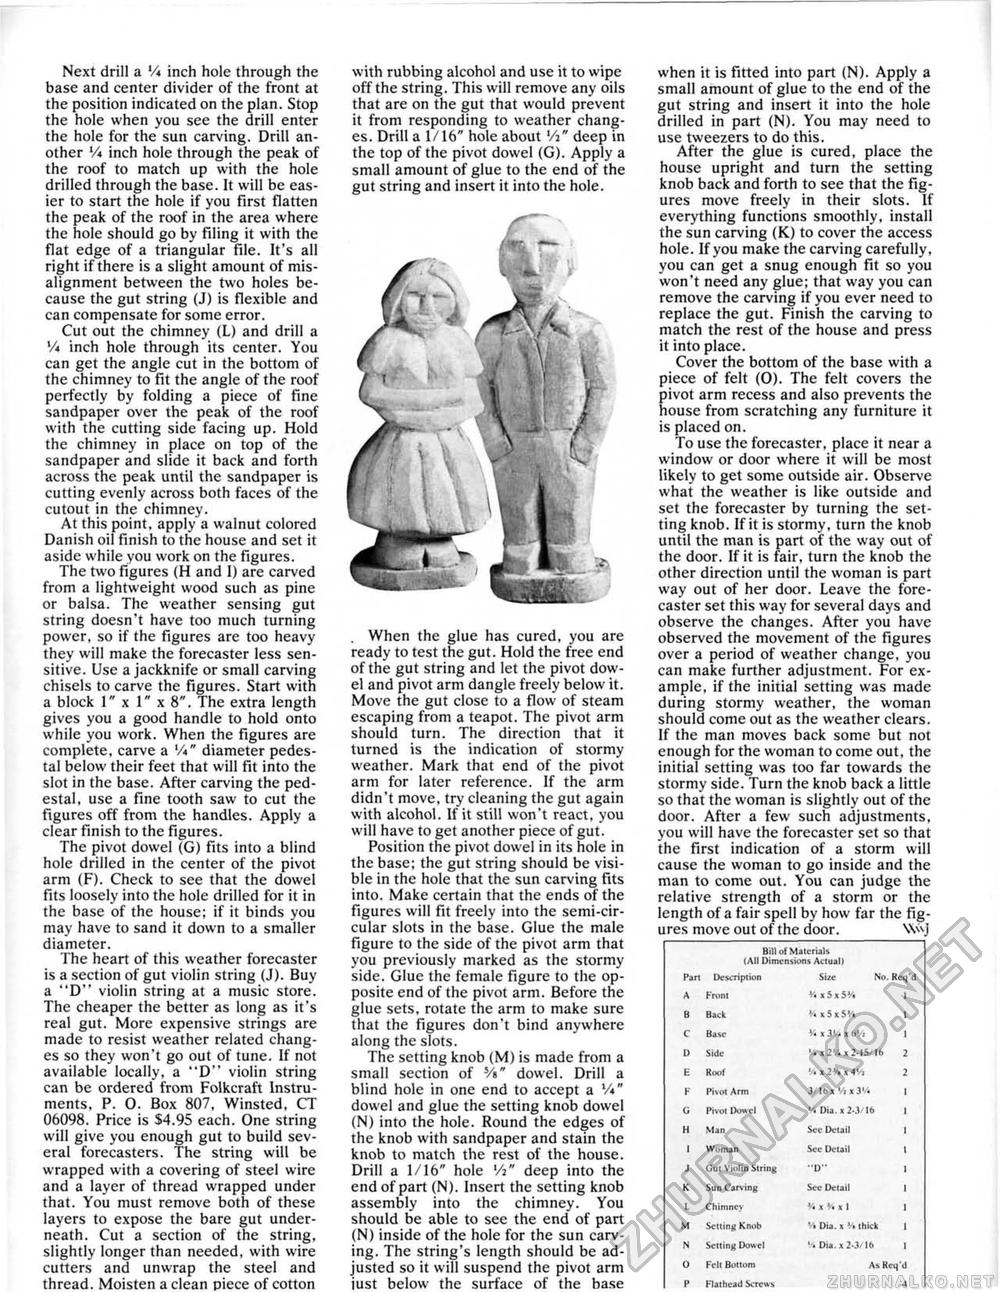
Next drill a V* inch hole through the base and center divider of the front at the position indicated on the plan. Stop the hole when you see the drill enter the hole for the sun carving. Drill another Vi inch hole through the peak of the roof to match up with the hole drilled through the base. It will be easier to start the hole if you first flatten the peak of the roof in the area where the hole should go by filing it with the flat edge of a triangular file. It's all right if there is a slight amount of misalignment between the two holes because the gut string (J) is flexible and can compensate for some error. Cut out the chimney (L) and drill a '/< inch hole through its center. You can get the angle cut in the bottom of the chimney to fit the angle of the roof perfectly by folding a piece of fine sandpaper over the peak of the roof with the cutting side facing up. Hold the chimney in place on top of the sandpaper and slide it back and forth across the peak until the sandpaper is cutting evenly across both faces of the cutout in the chimney, At this point, apply'a walnut colored Danish oil finish to the house and set it aside while you w:ork on the figures. The two figures (H and 1) are carved from a lightweight wood such as pine or balsa. The weather sensing gut string doesn't have too much turning power, so if the figures are too heavy they will make the forecaster less sensitive. Use a jackknife or small carving chisels to carve the figures. Start with a block 1" x 1" x 8". The extra length gives you a good handle to hold onto while you work. When the figures are complete, carve a Vi" diameter pedestal below their feet that will fit into the slot in the base. After carving the pedestal, use a fine tooth saw to cut the figures off from the handles. Apply a clear finish to the figures. The pivot dowel (G) fits into a blind hole drilled in the center of the pivot arm (F). Check to see that the dowel fits loosely into the hole drilled for it in the base of the house; if it binds you may have to sand it down to a smaller diameter. The heart of this weather forecaster is a section of gut violin string (J). Buy a "D" violin string at a music store. The cheaper the better as long as it's real gut. More expensive strings are made to resist weather related changes so they won't go out of tune. If not available locally, a "D" violin string can be ordered from Folkcraft Instruments, P. O. Box 807, Winsted, CT 06098. Price is $4.95 each. One string will give you enough gut to build several forecasters. The string will be wrapped with a covering of steel wire and a layer of thread wrapped under that. You must remove both of these layers to expose the bare gut underneath. Cut a section of the string, slightly longer than needed, with wire cutters and unwrap the steel and thread. Moisten a clean piece of cotton with rubbing aicohol and use it to wipe off the string. This will remove any oils that are on the gut that would prevent it from responding to weather changes. Drill a 1/16" hole about deep in the top of the pivot dowel (G). Apply a small amount of glue to the end of the gut string and insert it into the hole. When the glue has cured, you are ready to test the gut. Hold the free end of the gut string and let the pivot dowel and pivot arm dangle freely below it. Move the gut close to a flow of steam escaping from a teapot. The pivot arm should turn. The direction that it turned is the indication of stormy weather. Mark that end of the pivot arm for later reference. If the arm didn't move, try cleaning the gut again with alcohol. If it still won't react, you will have to get another piece of gut. Position the pivot dowel in its hole in the base; the gut string should be visible in the hole that the sun carving fits into. Make certain that the ends of the figures will fit freely into the semi-ctr-cular slots in the base. Glue the male figure to the side of the pivot arm that you previously marked as the stormy side. Glue the female figure to the opposite end of the pivot arm. Before the glue sets, rotate the arm to make sure that the figures don't bind anywhere along the slots. The setting knob (M) is made from a small section of s/»" dowel. Drill a blind hole in one end to accept a Vi" dowel and glue the setting knob dowel (N) into the hole. Round the edges of the knob with sandpaper and stain the knob to match the rest of the house. Drill a 1/16" hole Vi" deep into the end of part (N). Insert the setting knob assembly into the chimney. You should be able to sec the end of part (N) inside of the hole for the sun carving. The string's length should be adjusted so it will suspend the pivot arm iust below the surface of the base when it is fitted into part (N), Apply a small amount of glue to the end of the gut string and insert it into the hole drilled in part (N). You may need to use tweezers to do this. After the glue is cured, place the house upright and turn the setting knob back and forth to see that the figures move freely in their slots. If everything functions smoothly, install the sun carving (K) to cover the access hole. If you make the carving carefully, you can get a snug enough fit so you won't need any glue; that way you can remove the carving if you ever need to replace the gut. Finish the carving to match the rest of the house and press it into place. Cover the bottom of the base with a piece of felt (0), The felt covers the pivot arm recess and also prevents the house from scratching any furniture it is placed on. To use the forecaster, place it near a window or door where it will be most likely to get some outside air. Observe what the weather is like outside and set the forecaster by turning the setting knob. If it is stormy, turn the knob until the man is part of the way out of the door. If it is fair, turn the knob the other direction until the woman is part way out of her door. Leave the forecaster set this way for several days and observe the changes. After you have observed the movement of the figures over a period of weather change, you can make further adjustment. For example, if the initial setting was made during stormy weather, the woman should come out as the weather clears. If the man moves back some but not enough for the woman to come out, the initial setting was too far towards the stormy side. Turn the knob back a little so that the woman is slightly out of the door. After a few such adjustments, you will have the forecaster set so that the first indication of a storm will cause the woman to go inside and the man to come out. You can judge the relative strength of a storm or the length of a fair spell by how far the figures move out of the door. W\ Bill «f Materials I All Dimension* Actual I Bill «f Materials I All Dimension* Actual I
|


