Woodworker's Journal 1984-8-5, страница 33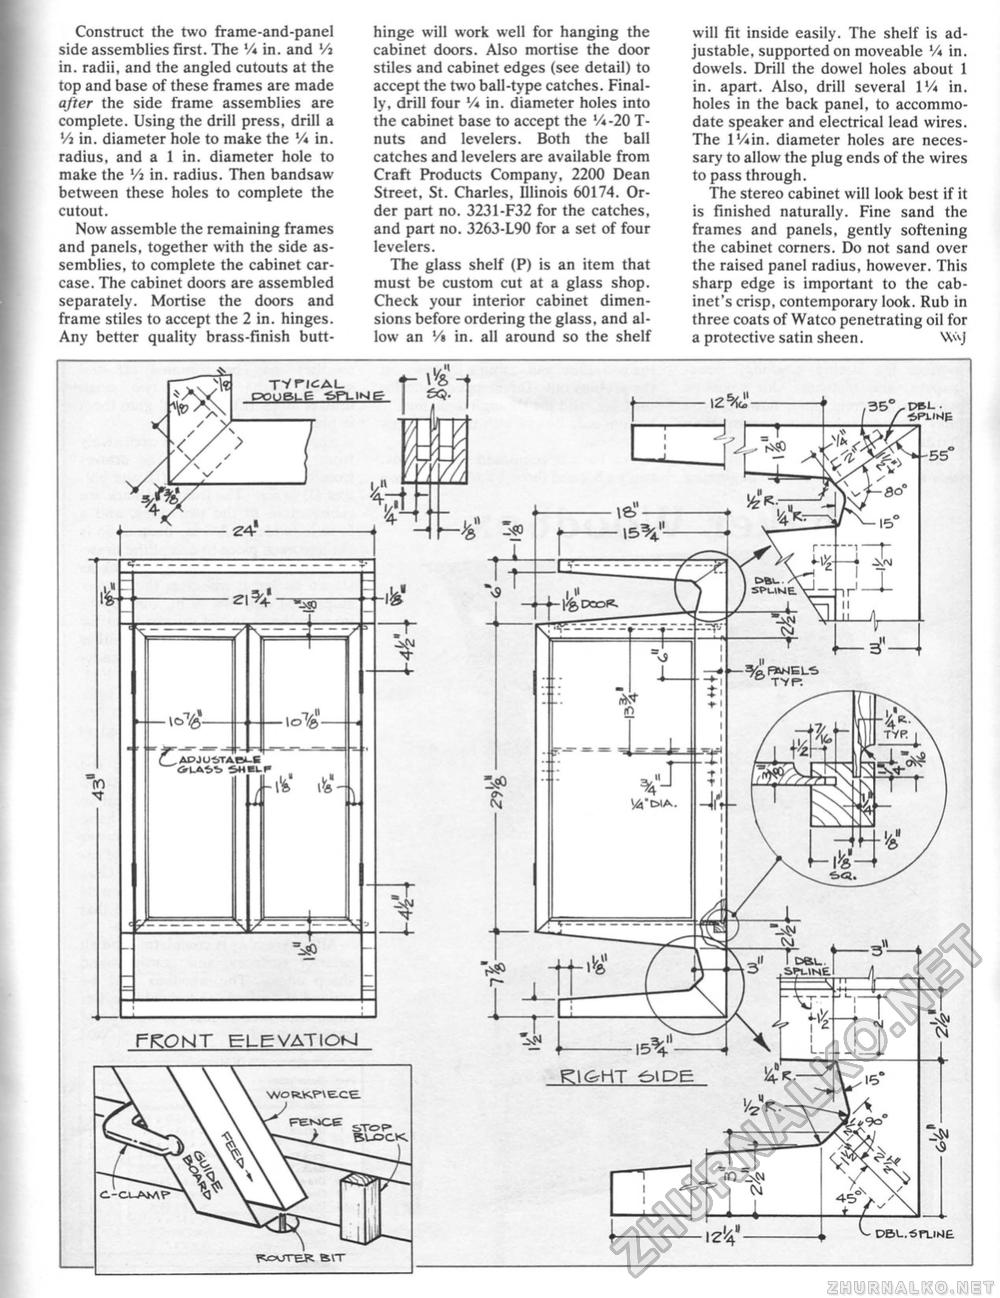
Construct the two frame-and-panel side assemblies first. The '/«in. and Vi in. radii, and the angled cutouts at the top and base of these frames are made after the side frame assemblies are complete. Using the drill press, drill a Vi in. diameter hole to make the '/* in. radius, and a 1 in. diameter hole to make the Vi in. radius. Then bandsaw between these holes to complete the cutout. Now assemble the remaining frames and panels, together with the side assemblies, to complete the cabinet carcase. The cabinet doors are assembled separately. Mortise the doors and frame stiles to accept the 2 in. hinges. Any better quality brass-finish butt- hinge will work well for hanging the cabinet doors. Also mortise the door stiles and cabinet edges (see detail) to accept the two ball-type catches. Finally, drill four V* in. diameter holes into the cabinet base to accept the Vi-20 T-nuts and levelers. Both the ball catches and levelers are available from Craft Products Company, 2200 Dean Street, St. Charles, Illinois 60174. Order part no. 3231-F32 for the catches, and part no. 3263-L90 for a set of four levelers. The glass shelf (P) is an item that must be custom cut at a glass shop. Check your interior cabinet dimensions before ordering the glass, and allow an '/a in. all around so the shelf will fit inside easily. The shelf is adjustable, supported on moveable % in. dowels. Drill the dowel holes about 1 in. apart. Also, drill several IVi in. holes in the back panel, to accommodate speaker and electrical lead wires. The IViin. diameter holes are necessary to allow the plug ends of the wires to pass through. The stereo cabinet will look best if it is finished naturally. Fine sand the frames and panels, gently softening the cabinet corners. Do not sand over the raised panel radius, however. This sharp edge is important to the cabinet's crisp, contemporary look. Rub in three coats of Watco penetrating oil for a protective satin sheen. W\J FRONT ELEVATIOM |


