Woodworker's Journal 1985-9-2, страница 24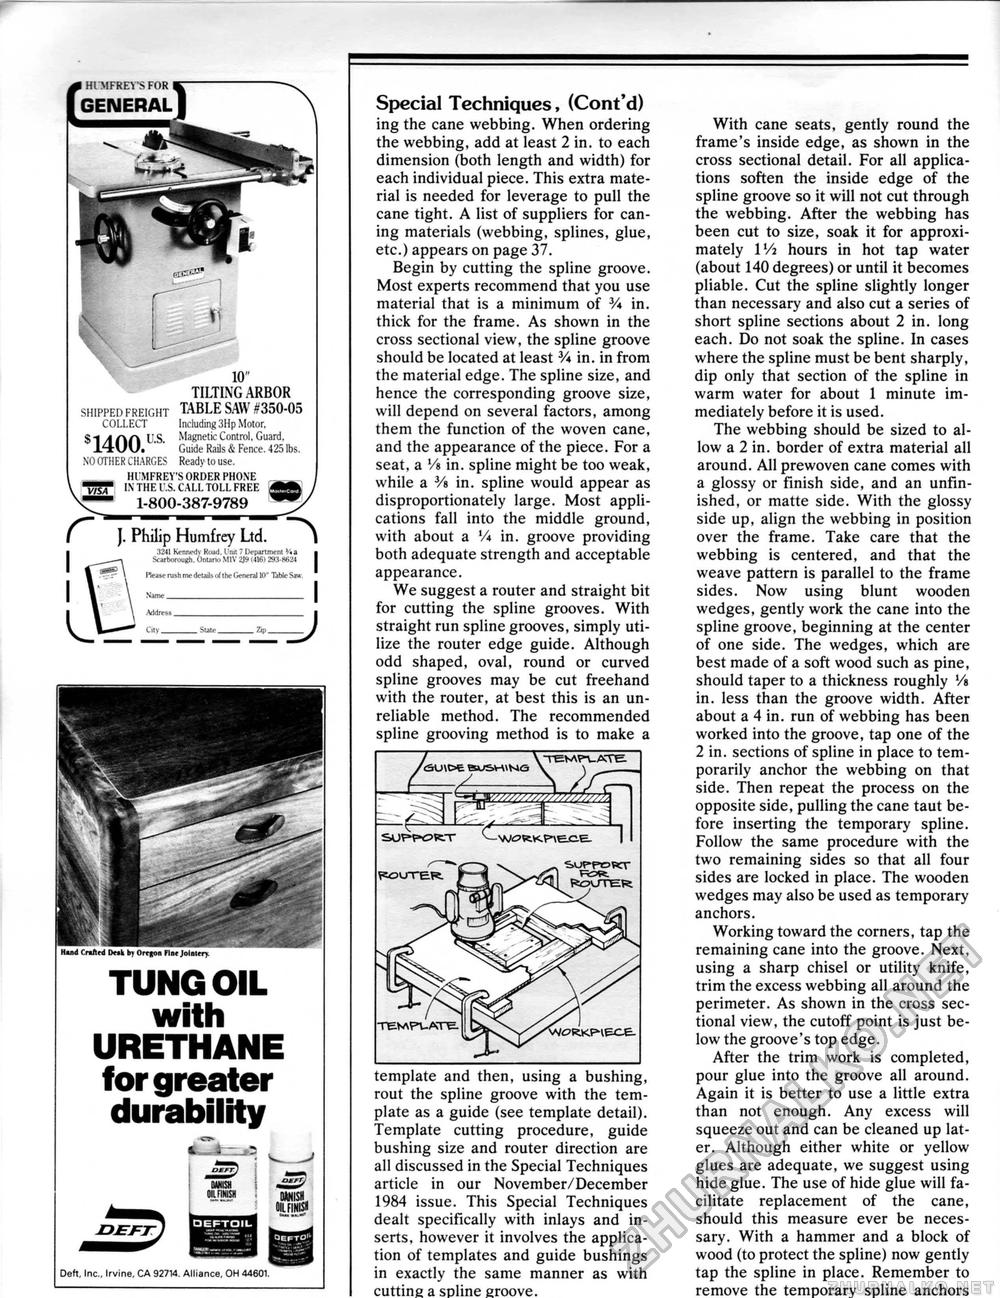
TUNG OIL with URETHANE for greater 1 i DBFT HKKISH _ «l« • DANISH OIL FINISH DEFTQIL Deft. Inc., Irvine, CA 92714. Alliance. OH 44601. SHIPPED FREIGHT COLLECT s1400u.s. NO OTHER CHARGES 10" TILTING ARBOR TABLE SAW #350-05 Including 3Hp Motor. Magnetic Control, Guard. Guide Rails & Fence. 425 lbs. Readv to use. VISA HI MFREY'S ORDER PHONE IN THE l'.S. CALL TOLL FREE 1-800-387-9789 r J. Philip Humfrey Ltd. 3241 Kennedy Koad. I nn 7 Department Via Scarborough. Ontario MIV 2J9 (416) 293-8624 (lease rush me details o( the General 10" Table Saw. Special Techniques, (Cont'd) ing the cane webbing. When ordering the webbing, add at least 2 in. to each dimension (both length and width) for each individual piece. This extra material is needed for leverage to pull the cane tight. A list of suppliers for caning materials (webbing, splines, glue, etc.) appears on page 37. Begin by cutting the spline groove. Most experts recommend that you use material that is a minimum of V* in. thick for the frame. As shown in the cross sectional view, the spline groove should be located at least V* in. in from the material edge. The spline size, and hence the corresponding groove size, will depend on several factors, among them the function of the woven cane, and the appearance of the piece. For a seat, a */« in. spline might be too weak, while a 3/s in. spline would appear as disproportionately large. Most applications fall into the middle ground, with about a V* in. groove providing both adequate strength and acceptable appearance. We suggest a router and straight bit for cutting the spline grooves. With straight run spline grooves, simply utilize the router edge guide. Although odd shaped, oval, round or curved spline grooves may be cut freehand with the router, at best this is an unreliable method. The recommended spline grooving method is to make a template and then, using a bushing, rout the spline groove with the template as a guide (see template detail). Template cutting procedure, guide bushing size and router direction are all discussed in the Special Techniques article in our November/December 1984 issue. This Special Techniques dealt specifically with inlays and inserts, however it involves the application of templates and guide bushings in exactly the same manner as with cutting a spline groove. With cane seats, gently round the frame's inside edge, as shown in the cross sectional detail. For all applications soften the inside edge of the spline groove so it will not cut through the webbing. After the webbing has been cut to size, soak it for approximately 1 Vi hours in hot tap water (about 140 degrees) or until it becomes pliable. Cut the spline slightly longer than necessary and also cut a series of short spline sections about 2 in. long each. Do not soak the spline. In cases where the spline must be bent sharply, dip only that section of the spline in warm water for about 1 minute immediately before it is used. The webbing should be sized to allow a 2 in. border of extra material all around. All prewoven cane comes with a glossy or finish side, and an unfinished, or matte side. With the glossy side up, align the webbing in position over the frame. Take care that the webbing is centered, and that the weave pattern is parallel to the frame sides. Now using blunt wooden wedges, gently work the cane into the spline groove, beginning at the center of one side. The wedges, which are best made of a soft wood such as pine, should taper to a thickness roughly V» in. less than the groove width. After about a 4 in. run of webbing has been worked into the groove, tap one of the 2 in. sections of spline in place to temporarily anchor the webbing on that side. Then repeat the process on the opposite side, pulling the cane taut before inserting the temporary spline. Follow the same procedure with the two remaining sides so that all four sides are locked in place. The wooden wedges may also be used as temporary anchors. Working toward the corners, tap the remaining cane into the groove. Next, using a sharp chisel or utility knife, trim the excess webbing all around the perimeter. As shown in the cross sectional view, the cutoff point is just below the groove's top edge. After the trim work is completed, pour glue into the groove all around. Again it is better to use a little extra than not enough. Any excess will squeeze out and can be cleaned up later. Although either white or yellow glues are adequate, we suggest using hide glue. The use of hide glue will facilitate replacement of the cane, should this measure ever be necessary. With a hammer and a block of wood (to protect the spline) now gently tap the spline in place. Remember to remove the temporary spline anchors POUTER TEMPUATE |


