Woodworker's Journal 1985-9-2, страница 39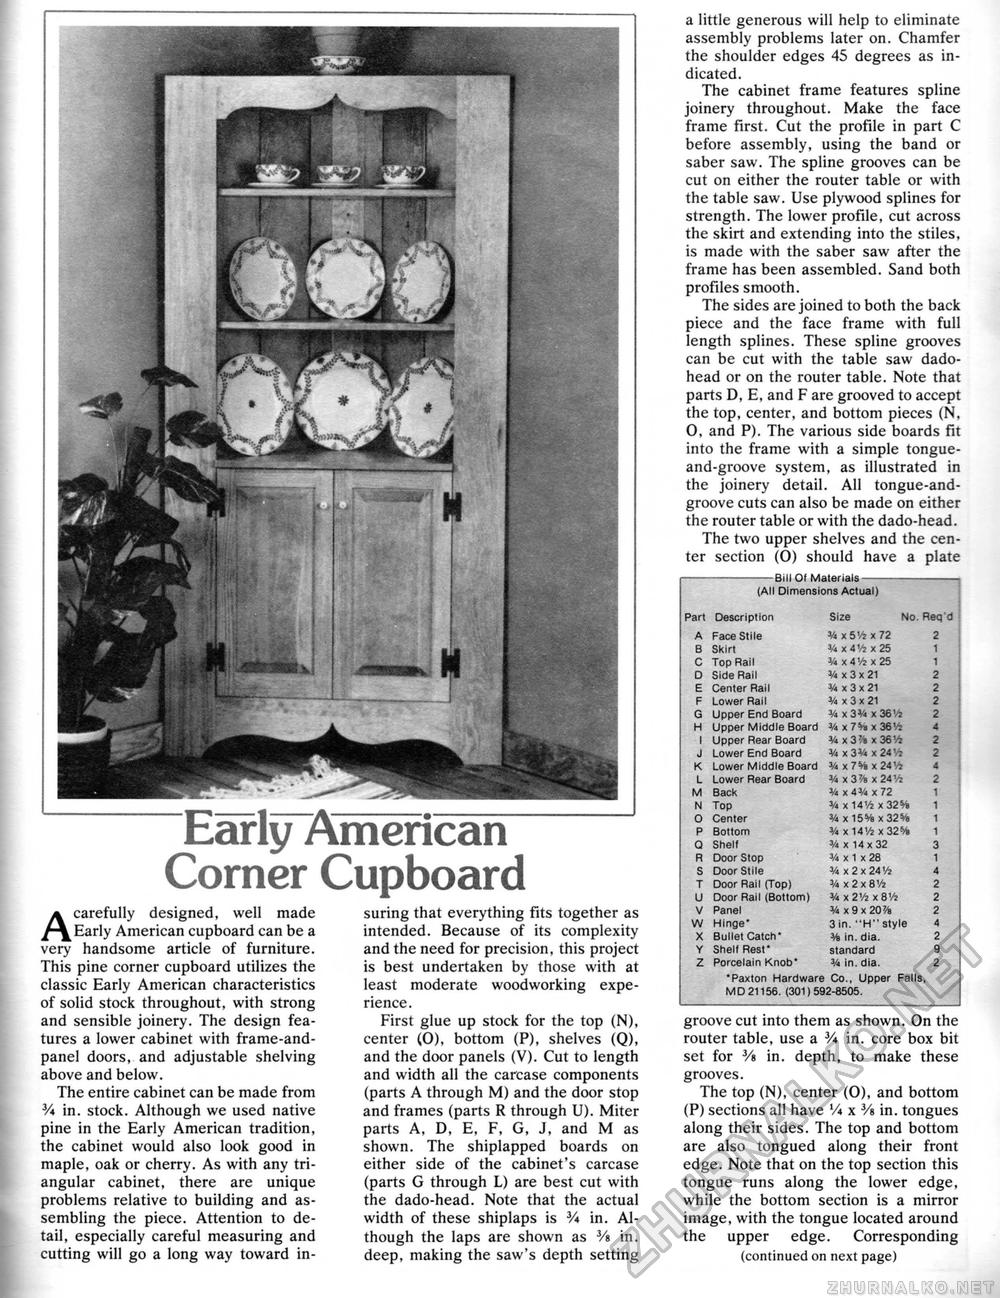
Early American Corner CupboardA carefully designed, well made Early American cupboard can be a very handsome article of furniture. This pine corner cupboard utilizes the classic Early American characteristics of solid stock throughout, with strong and sensible joinery. The design features a lower cabinet with frame-and-panel doors, and adjustable shelving above and below. The entire cabinet can be made from Va in. stock. Although we used native pine in the Early American tradition, the cabinet would also look good in maple, oak or cherry. As with any triangular cabinet, there are unique problems relative to building and assembling the piece. Attention to detail, especially careful measuring and cutting will go a long way toward in suring that everything fits together as intended. Because of its complexity and the need for precision, this project is best undertaken by those with at least moderate woodworking experience. First glue up stock for the top (N), center (0), bottom (P), shelves (Q), and the door panels (V). Cut to length and width all the carcase components (parts A through M) and the door stop and frames (parts R through U). Miter parts A, D, E, F, G, J, and M as shown. The shiplapped boards on either side of the cabinet's carcase (parts G through L) are best cut with the dado-head. Note that the actual width of these shiplaps is V* in. Although the laps are shown as Vs in. deep, making the saw's depth setting a little generous will help to eliminate assembly problems later on. Chamfer the shoulder edges 45 degrees as indicated. The cabinet frame features spline joinery throughout. Make the face frame first. Cut the profile in part C before assembly, using the band or saber saw. The spline grooves can be cut on either the router table or with the table saw. Use plywood splines for strength. The lower profile, cut across the skirt and extending into the stiles, is made with the saber saw after the frame has been assembled. Sand both profiles smooth. The sides are joined to both the back piece and the face frame with full length splines. These spline grooves can be cut with the table saw dado-head or on the router table. Note that parts D, E, and F are grooved to accept the top, center, and bottom pieces (N, 0, and P). The various side boards fit into the frame with a simple tongue-and-groove system, as illustrated in the joinery detail. All tongue-and-groove cuts can also be made on either the router table or with the dado-head. The two upper shelves and the center section (O) should have a plate -Bill Of Materials-> (All Dimensions Actual)
MD 21156. (301)592-8505. MD 21156. (301)592-8505. groove cut into them as shown. On the router table, use a V* in. core box bit set for Vi in. depth, to make these grooves. The top (N), center (O), and bottom (P) sections all have V* x Vi in. tongues along their sides. The top and bottom are also tongued along their front edge. Note that on the top section this tongue runs along the lower edge, while the bottom section is a mirror image, with the tongue located around the upper edge. Corresponding (continued on next page) |
||||||||||||||||||||||||||||||||||||||||||||||||||||||||||||||||||||||||||||||||||||||||||||||||||||||||||||||||


