Woodworker's Journal 1985-9-2, страница 41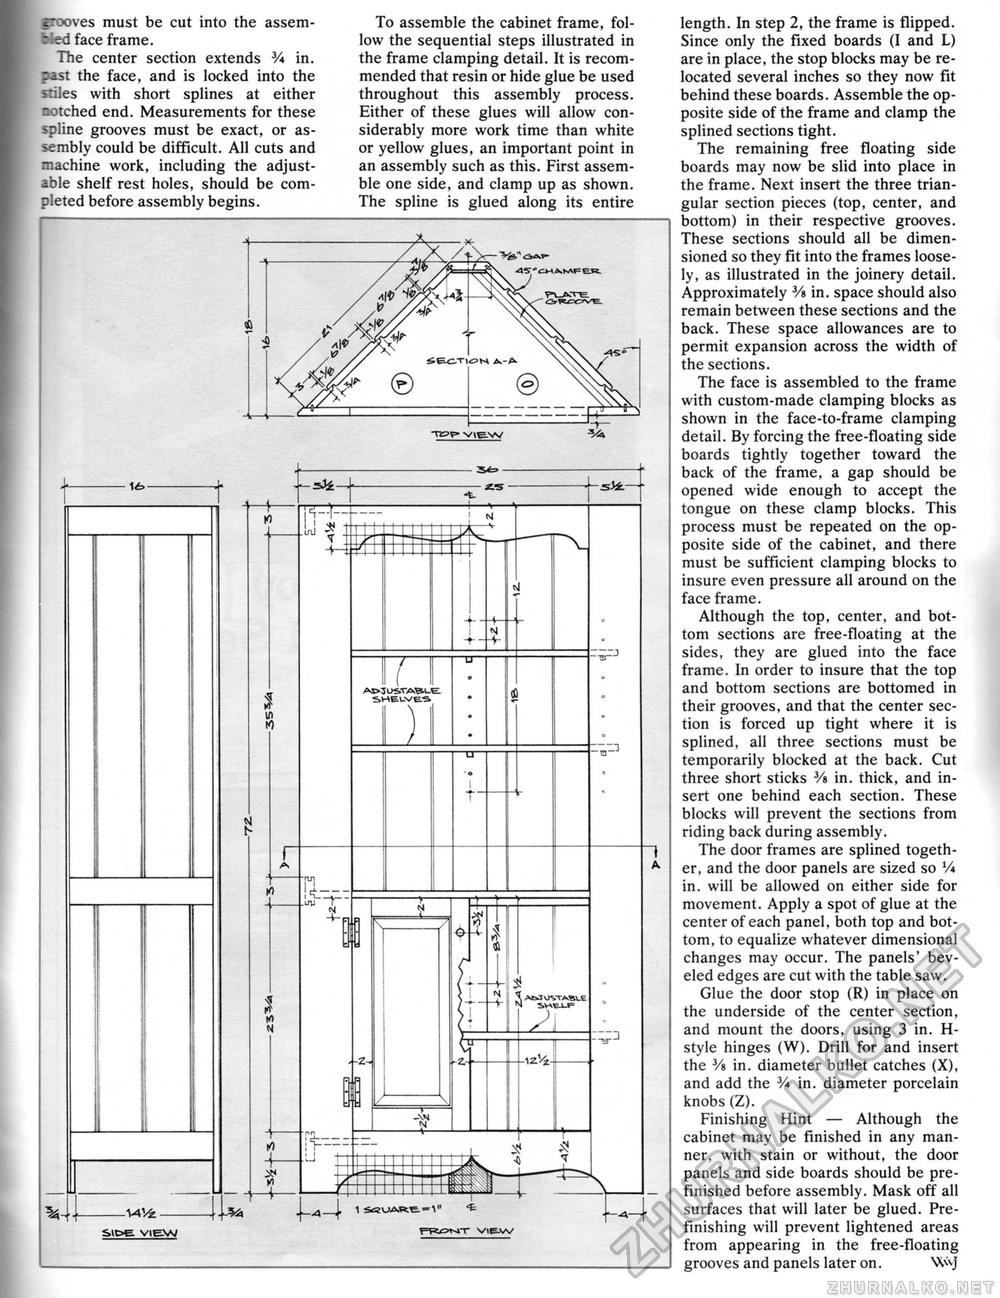
grooves must be cut into the assem-- led face frame. The center section extends % in. past the face, and is locked into the stiles with short splines at either notched end. Measurements for these spline grooves must be exact, or assembly could be difficult. All cuts and machine work, including the adjustable shelf rest holes, should be completed before assembly begins. To assemble the cabinet frame, follow the sequential steps illustrated in the frame clamping detail. It is recommended that resin or hide glue be used throughout this assembly process. Either of these glues will allow considerably more work time than white or yellow glues, an important point in an assembly such as this. First assemble one side, and clamp up as shown. The spline is glued along its entire length. In step 2, the frame is flipped. Since only the fixed boards (I and L) are in place, the stop blocks may be relocated several inches so they now fit behind these boards. Assemble the opposite side of the frame and clamp the splined sections tight. The remaining free floating side boards may now be slid into place in the frame. Next insert the three triangular section pieces (top, center, and bottom) in their respective grooves. These sections should all be dimensioned so they fit into the frames loosely, as illustrated in the joinery detail. Approximately Vs in. space should also remain between these sections and the back. These space allowances are to permit expansion across the width of the sections. The face is assembled to the frame with custom-made clamping blocks as shown in the face-to-frame clamping detail. By forcing the free-floating side boards tightly together toward the back of the frame, a gap should be opened wide enough to accept the tongue on these clamp blocks. This process must be repeated on the opposite side of the cabinet, and there must be sufficient clamping blocks to insure even pressure all around on the face frame. Although the top, center, and bottom sections are free-floating at the sides, they are glued into the face frame. In order to insure that the top and bottom sections are bottomed in their grooves, and that the center section is forced up tight where it is splined, all three sections must be temporarily blocked at the back. Cut three short sticks V» in. thick, and insert one behind each section. These blocks will prevent the sections from riding back during assembly. The door frames are splined together, and the door panels are sized so V* in. will be allowed on either side for movement. Apply a spot of glue at the center of each panel, both top and bottom, to equalize whatever dimensional changes may occur. The panels' beveled edges are cut with the table saw. Glue the door stop (R) in place on the underside of the center section, and mount the doors, using 3 in. H-style hinges (W). Drill for and insert the 3/s in. diameter bullet catches (X), and add the V* in. diameter porcelain knobs (Z). Finishing Hint — Although the cabinet may be finished in any manner, with stain or without, the door panels and side boards should be pre-finished before assembly. Mask off all surfaces that will later be glued. Pre-finishing will prevent lightened areas from appearing in the free-floating grooves and panels later on. WvJ |


