Woodworker's Journal 1985-9-4, страница 20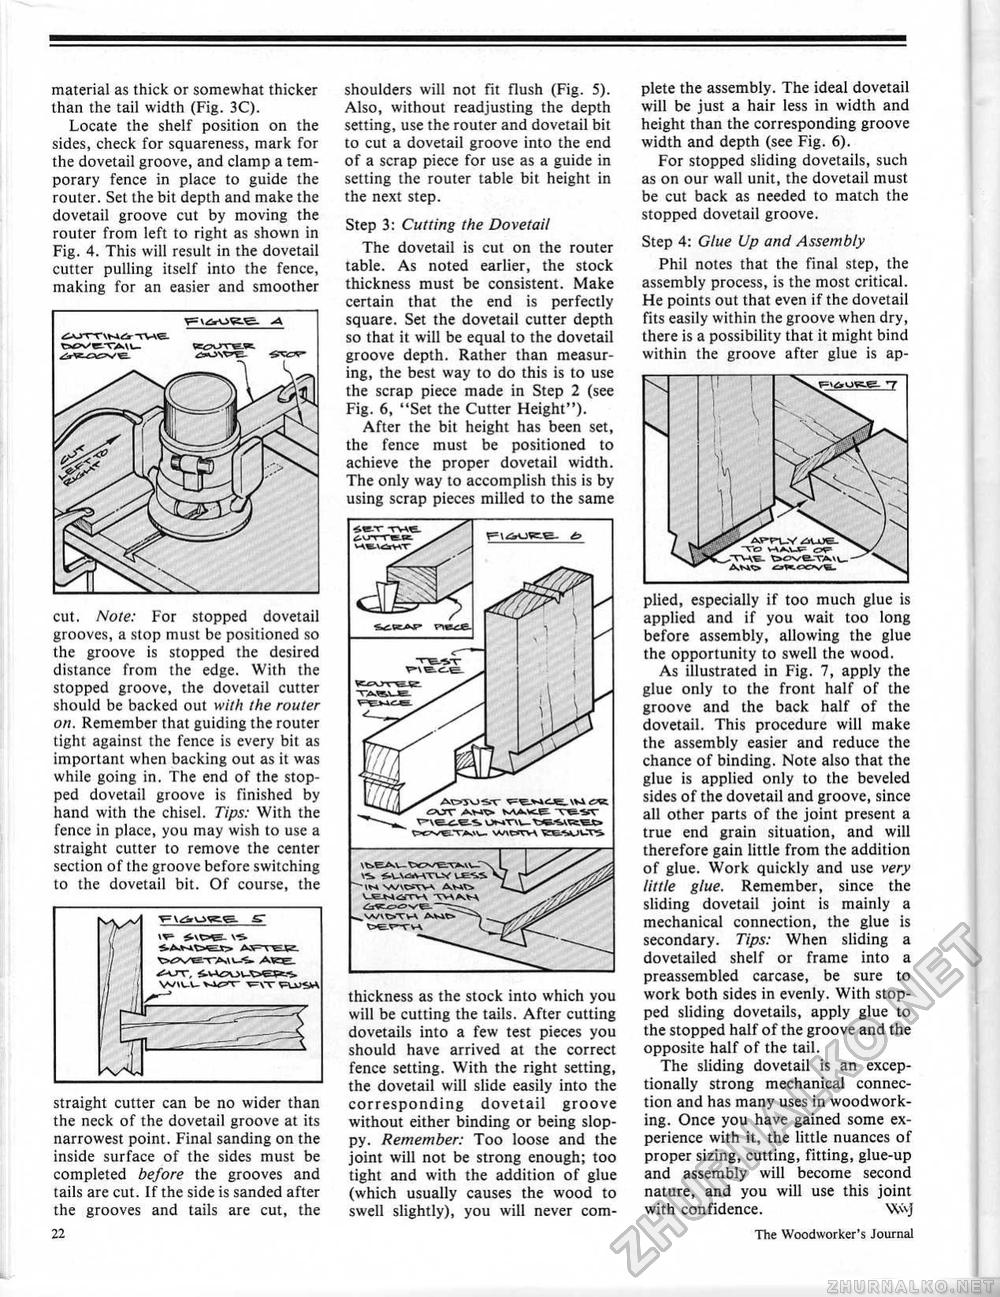
material as thick or somewhat thicker than the tail width (Fig. 3C). Locate the shelf position on the sides, check for squareness, mark for the dovetail groove, and clamp a temporary fence in place to guide the router. Set the bit depth and make the dovetail groove cut by moving the router from left to right as shown in Fig, 4. This will result in the dovetail cutter pulling itself into the fence, making for an easier and smoother cut, Note: For stopped dovetail grooves, a stop must be positioned so the groove is stopped the desired distance from the edge. With the stopped groove, the dovetail cutter should be backed out with the router on. Remember that guiding the router tight against the fence is every bit as important when backing out as it was while going in. The end of the stopped dovetail groove is finished by hand with the chisel. Tips: With the fence in place, you may wish to use a straight cutter to remove the center section of the groove before switching to the dovetail bit. Of course, the txiver/Ki straight cutter can be no wider than the neck of the dovetail groove at its narrowest point. Final sanding on the inside surface of the sides must be completed before the grooves and tails are cut. If the side is sanded after the grooves and tails are cut, the shoulders will not fit flush (Fig. 5). Also, without readjusting the depth setting, use the router and dovetail bit to cut a dovetail groove into the end of a scrap piece for use as a guide in setting the router table bit height in the next step. Step 3: Cutting the Dovetail The dovetail is cut on the router table. As noted earlier, the stock thickness must be consistent. Make certain that the end is perfectly square. Set the dovetail cutter depth so that it will be equal to the dovetail groove depth. Rather than measuring, the best way to do this is to use the scrap piece made in Step 2 (see Fig. 6, "Set the Cutter Height"). After the bit height has been set, the fence must be positioned to achieve the proper dovetail width. The only way to accomplish this is by using scrap pieces milled to the same cur AW MA^e WvtSTV\ VEWUTS Li SS thickness as the stock into which you will be cutting the tails. After cutting dovetails into a few test pieces you should have arrived at the correct fence setting. With the right setting, the dovetail will slide easily into the corresponding dovetail groove without either binding or being sloppy. Remember: Too loose and the joint will not be strong enough; too tight and with the addition of glue {which usually causes the wood to swell slightly), you will never com plete the assembly. The ideal dovetail will be just a hair less in width and height than the corresponding groove width and depth (see Fig. 6). For stopped sliding dovetails, such as on our wall unit, the dovetail must be cut back as needed to match the stopped dovetail groove. Step 4: Glue Up and Assembly Phil notes that the final step, the assembly process, is the most critical. He points out that even if the dovetail fits easily within the groove when dry, there is a possibility that it might bind within the groove after glue is ap plied, especially if too much glue is applied and if you wait too long before assembly, allowing the glue the opportunity to swell the wood. As illustrated in Fig. 7, apply the glue only to the front half of the groove and the back half of the dovetail. This procedure will make the assembly easier and reduce the chance of binding. Note also that the glue is applied only to the beveled sides of the dovetail and groove, since all other parts of the joint present a true end grain situation, and will therefore gain little from the addition of glue. Work quickly and use very little glue. Remember, since the sliding dovetail joint is mainly a mechanical connection, the glue is secondary. Tips: When sliding a dovetailed shelf or frame into a preassembled carcase, be sure to work both sides in evenly. With stopped sliding dovetails, apply glue to the stopped half of the groove and the opposite half of the tail. The sliding dovetail is an exceptionally strong mechanical connection and has many uses in woodworking. Once you have gained some experience with it, the little nuances of proper sizing, cutting, fitting, glue-up and assembly will become second nature, and you will use this joint with confidence. W\j 22 The Woodworker's Journal |


