Woodworker's Journal 1985-9-5, страница 36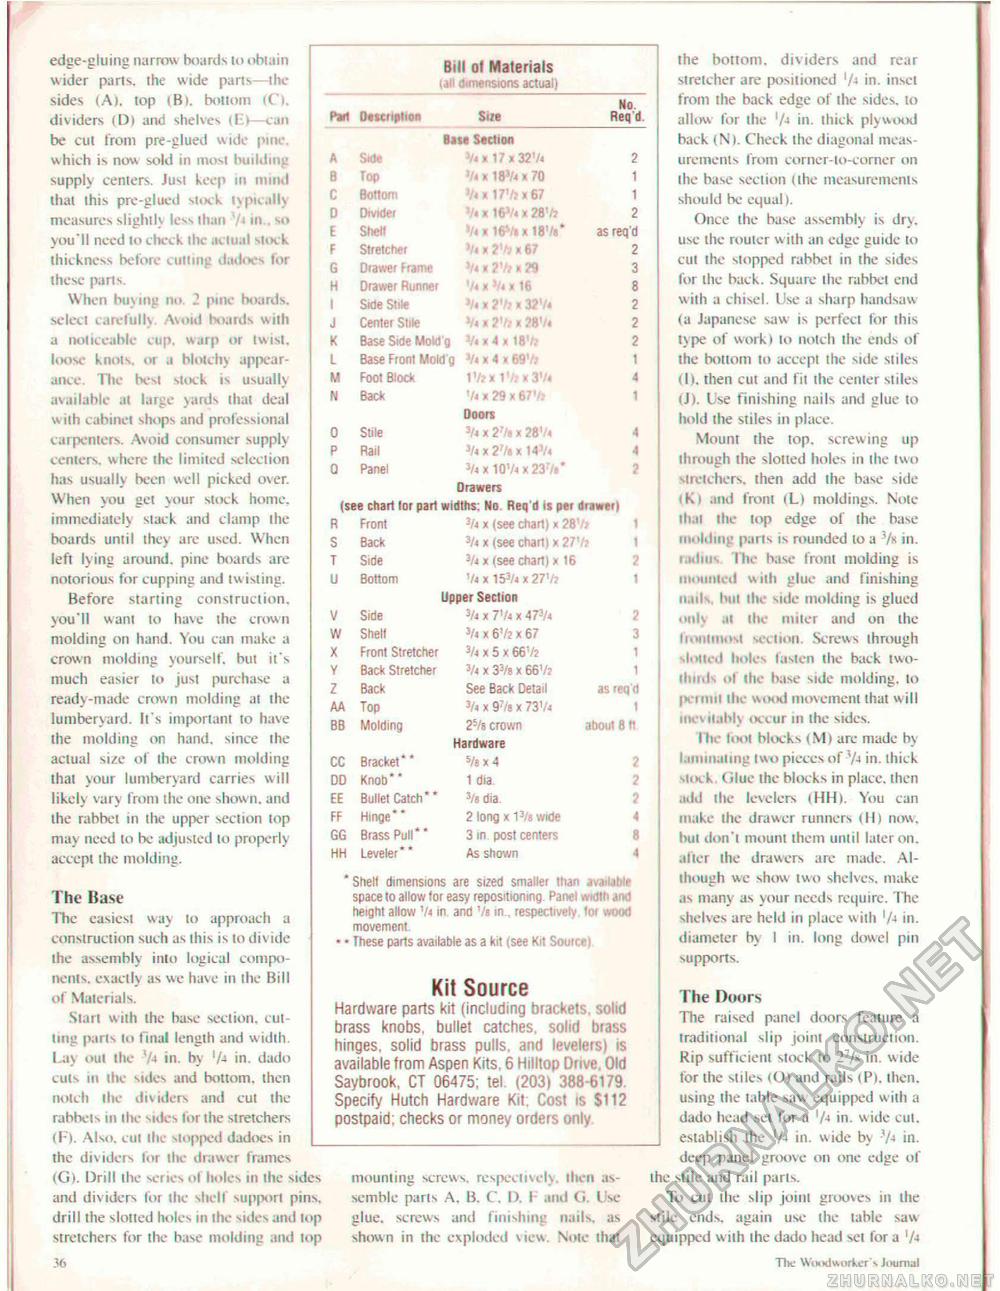
Bill of Materials (jii dimensions actual) Bill of Materials (jii dimensions actual)
'Shell dimensions are sized smaller than jvsiIjIiIc space to allow for easy repositioning. Panel v».dtti and height allow '/4 in. and Vb in., respectii/efy toi wood movement. * * These parts available as a kit (see Kit Source I Kit Source Hardware parts kit {including brackets, solid brass knobs, bullet catches, solid brass hinges, solid brass pulls, and levelers) is available from Aspen Kits. 6 Hilltop Drive. Old Saybrook, CT 06475; tel. (203) 388-6179 Specify Hutch Hardware Kit. Cost is $112 postpaid; checks or money orders only edge-gluing narrow boards to obtain wider parts, the wide pans—ihe sides (A), top (B). bottom (C). dividers <D| and shelves (E)—can be cut from pre-glued wide pine, which is now sold in most building supply centers. Jusi keep in mind lhat this pre-glued stock typicall) measures slightly less than - in so you'll need to check the actual slock thickness before cutting dadoes lor these pans. When buying no. 2 pine boards, select carefully Avoid boards with a noticeable cup, warp or twist. lOose knots, or a blotchy appearance. Tile hesi stock is usually available at large yards thai deal wiih cabinet shops and professional carpenters. Avoid consumer supply centers, where the limited selection has usually been well picked over. When you get your stock home, immediately slack and clamp Ihe boards until they are used. When left lying around, pine boards are notorious for cupping and twisting. Before starting construction, you'll warn to have the crown molding on hand. You can make a crown molding yourself, but it's much easier to just purchase a ready-made crown molding ai ihe lumberyard. It's important to have the molding on hand, since the actual size of the crown molding that your lumberyard carries will likely vary Iron) ihe one shown, and the rabbet in the upper section top may need to be adjusted to properly accept ihe molding. The Base The easiest way to approach a construction such as this is lo divide the assembly into logical components, exactly as we have in the Bill of Materials. Start with the base section, cutting parts to final length and w idth. Lay out the 7*i in. by '/-» in. dado cuts hi the sides and bottom, then notch ihe dividers and cut the rabbeis in the sides for the stretchers (F). Also, cut the stopped dadoes in the dividers lor the drawer frames (G). Drill the series ol holes in the sides and dividers for the shell support pins, drill the sloned holes in ihe sides and lop stretchers for the base molding and lop 36 mounting screws, respectively, then assemble pans A. B, C. D. F and G. Use glue, screws and finishing nails, as shown in the exploded view. Note that the bottom, dividers and rear stretcher are positioned 'A in. inset from the back edge of the sides, to allow for the 'A in. thick plywood back (N). Check the diagonal measurements from comer- lo-comer on the base section (the measurements should be equal). Once the base assembly is dry. use the router w ith an edge guide to cut the stopped rabbet in the sides for the back. Square the rabbet end wiih a chisel. Use a sharp handsaw (a Japanese saw is perfect lor this ty pe of work) to notch the ends of ihe bottom to accept the side stiles (I), then cut and fit the center stiles (J). Use finishing nails and glue to hold the stiles in place. Mount the top. screwing up ihrough ihe stoned holes in ihe two stretchers, then add the base side Ki and front iLl moldings. Note thai the lop edge of ihe base molding parts is rounded to a 3/» in. minis I he base front molding is mounted with glue and finishing nails, bui the side molding is glued only iit the miter and on ihe IhHitmosI section. Screws through slotted holes fasten the back two-third of the base side molding, lo l>. mill the wood movement that w ill iih vilahly occur in the sides. Iln toot blocks (Ml are made by laminating two pieces of -'A in. thick slock Glue the blocks in place, then add the levelers (HHI. You can make the drawer runners (II) now, but don't mount them until later on. •liter the drawers are made. Although we show two shelves, make as many as your needs require. The shelves are held in place with 'A in. diameter by I in. long dowel pin supports. The Doors The raised panel doors feature a traditional slip joint construction. Rip sufficient slock to 27A in. wide for the stiles (O) and rails (P). then, using ihe table saw equipped with a dado head set for a 'A in. wide cut, establish the 'A in. wide by 'A in. deep panel groove on one edge of the stile and rail parts. To cut the slip joint grooves in ihe stile ends, again use the table saw equipped with ihe dado head set for a 'A 36 The Woodworker's journal |
||||||||||||||||||||||||||||||||||||||||||||||||||||||||||||||||||||||||||||||||||||||||||||||||||||||||||||||||||||||||||||||||||||||||||||||||||||||||||||||||||||


