Woodworker's Journal 1985-9-5, страница 39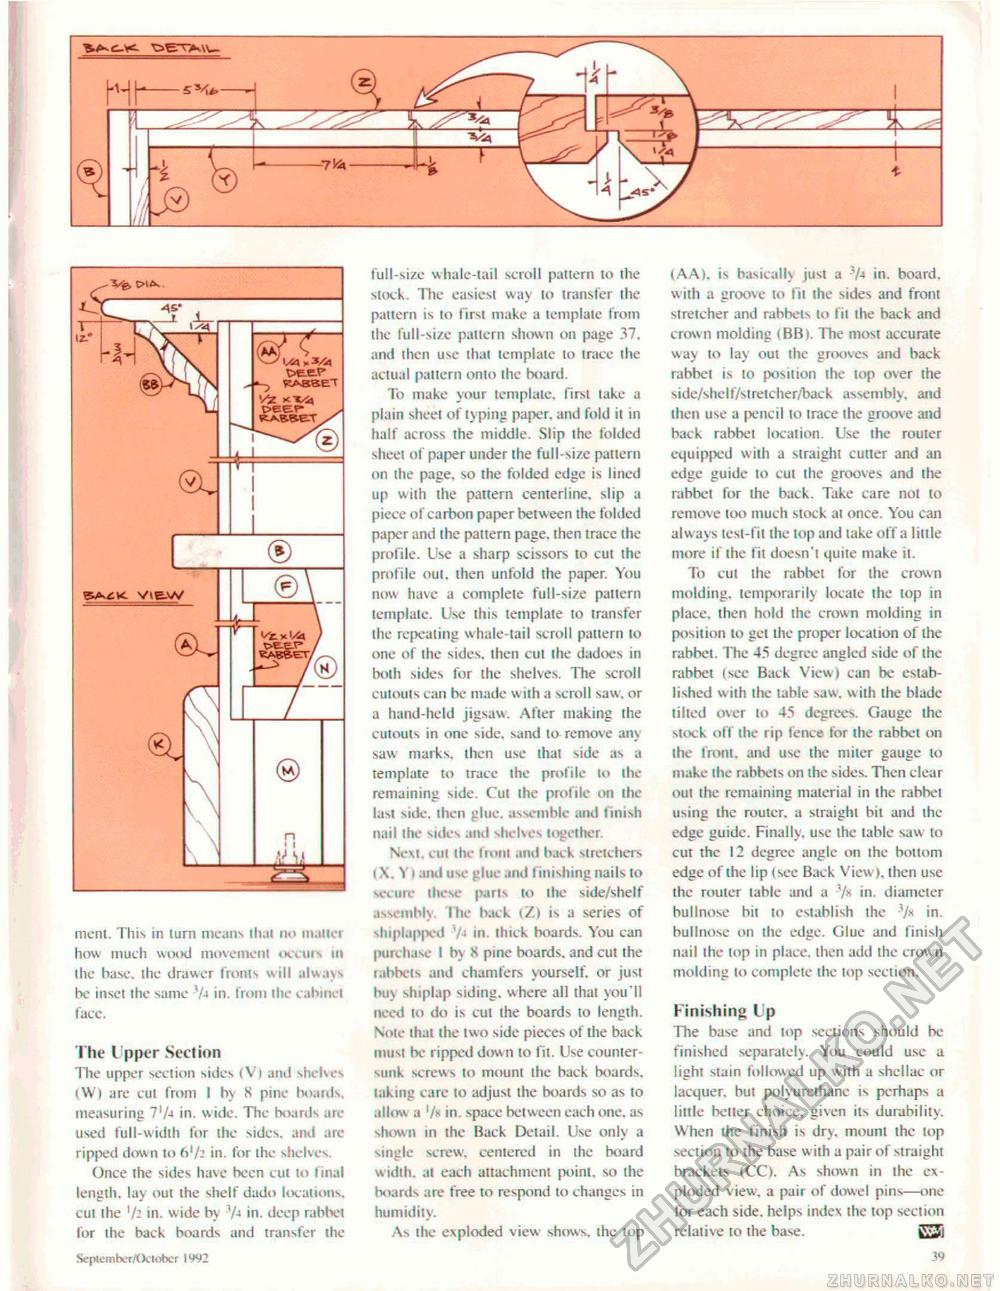
mcnt. This in turn means (Inn no mailer how much wood movement ikvuis itt the base, the drawer fronts will always be inset the same */4 in. from ihe cabinet face. The Upper Section The upper section sides (V) and shelves (Wt are cut from I by 8 pine boards, measuring 7'/-t in. wide. The boards are used full-width for the sides, and art-ripped dow n to f>'/2 in. for the shelves. Once the sides have been cut to linal length, lay out the shelf dado locations, cut the '/: in. wide by 'A in. deep rabbet for the back boards and transfer the September/October 1992 full-size whale-tail scroll pattern to the stock. The easiest way to transfer the pattern is to first make a template from ihe full-size pattern shown on page 37. and then use that template to trace the actual pattern onto the board. To make your template, first take a plain sheet of ty ping paper, and fold il in half across the middle. Slip the folded sheet of paper under the full-size pattern on the page, so the folded edge is lined up with the pattern centerline. slip a piece of carbon paper between the folded paper and ihe pattern page, then trace the profile. Use a sharp scissors to cut the profile out. then unfold the paper. You now have a complete full-size pattern template. Use this template to transfer the repeating whale-tail scroll pattern to one of ihe sides, then cut the dadoes in both sides for the shelves. The scroll cutouls can be made wiih a scroll saw, or a hand-held jigsaw. After making the cutouts in one side, sand to remove any saw marks, then use lhat side as a template to trace the profile lo the remaining side. Cut the profile on the last side, then glue, assemble and liiush nail Ihe sides and shelves together. Next, cut the front and back stretchers (X. Y) and use glue and finishing nails to secure these parts lo the side/shelf assembly. The back (Z) is a series of shiplapjted 'A in. thick boards. You can purchase I by X pine boards, and cut the rabbets and chamfers yourself, or just buy shiplap siding, where all that you'll need to do is cui ihe boards 10 length. Note that ihe two side pieces of the back must be ripped down to fit. Use counter-Mink screws to mount the hack boards, taking care to adjust ihe boards so as to allow a '/k in. space between each one. as shown in the Back Detail. Use only a single screw, centered in ihe board width, at each attachment point, so the boards are free to respond to changes in humidity. As the exploded view shows, ihe lop (AA). is basically just a !A in. board, with a groove to fit the sides and front stretcher and rabbets to fit the back and crown molding (BB>. The most accurate way lo lay oui the grooves and back rabbel is to position the lop over the side/shelf/stretcher/back assembly, and then use a pencil lo trace the groove and back rabbel location. Use the router equipped with a straight cutter and an edge guide to cut ihe grooves and the rabbel for Ihe back. Take care not to remove too much stock at once. You can always tesl-fit ihe lop and lake off a little more if the fit doesn'i quite make it. To cut the rabbet for the crown molding, temporarily locate the lop in place, then hold the crown molding in position to get the proper location of the rabbet. The 45 degree angled side of ihe rabbet (see Back View) can be established with the table saw. w ith the blade-lilted over to 45 degrees Gauge the stock off the rip fence for the rabbel on the front, and use the miter gauge to make ihe rabbets on ihe sides. Then clear out the remaining material in the rabbet using the rouicr. a straight bit and ihe edge guide. Finally, use the table saw to cut the 12 degree angle on the bottom edge of the lip (see Back View). (hen use the router table and a V* in. diameter bullnose hit to establish ihe V« in. bullnose on ihe edge. Glue and finish nail ihe lop in place, then add the crown molding lo complete ihe top section. Finishing I p The base and top sections should be finished separately. You could use a light stain followed up with a shellac or lacquer, hut polyurethane is perhaps a tittle better choice, given its durability. When the finish is dry. mount the lop section lo the base w ith a pair of straight brackets (CC). As shown in the exploded view, a pair of dowel pins—one for each side, helps index the top section relative to the base. EJj 39 |


