Woodworker's Journal 1985-9-5, страница 38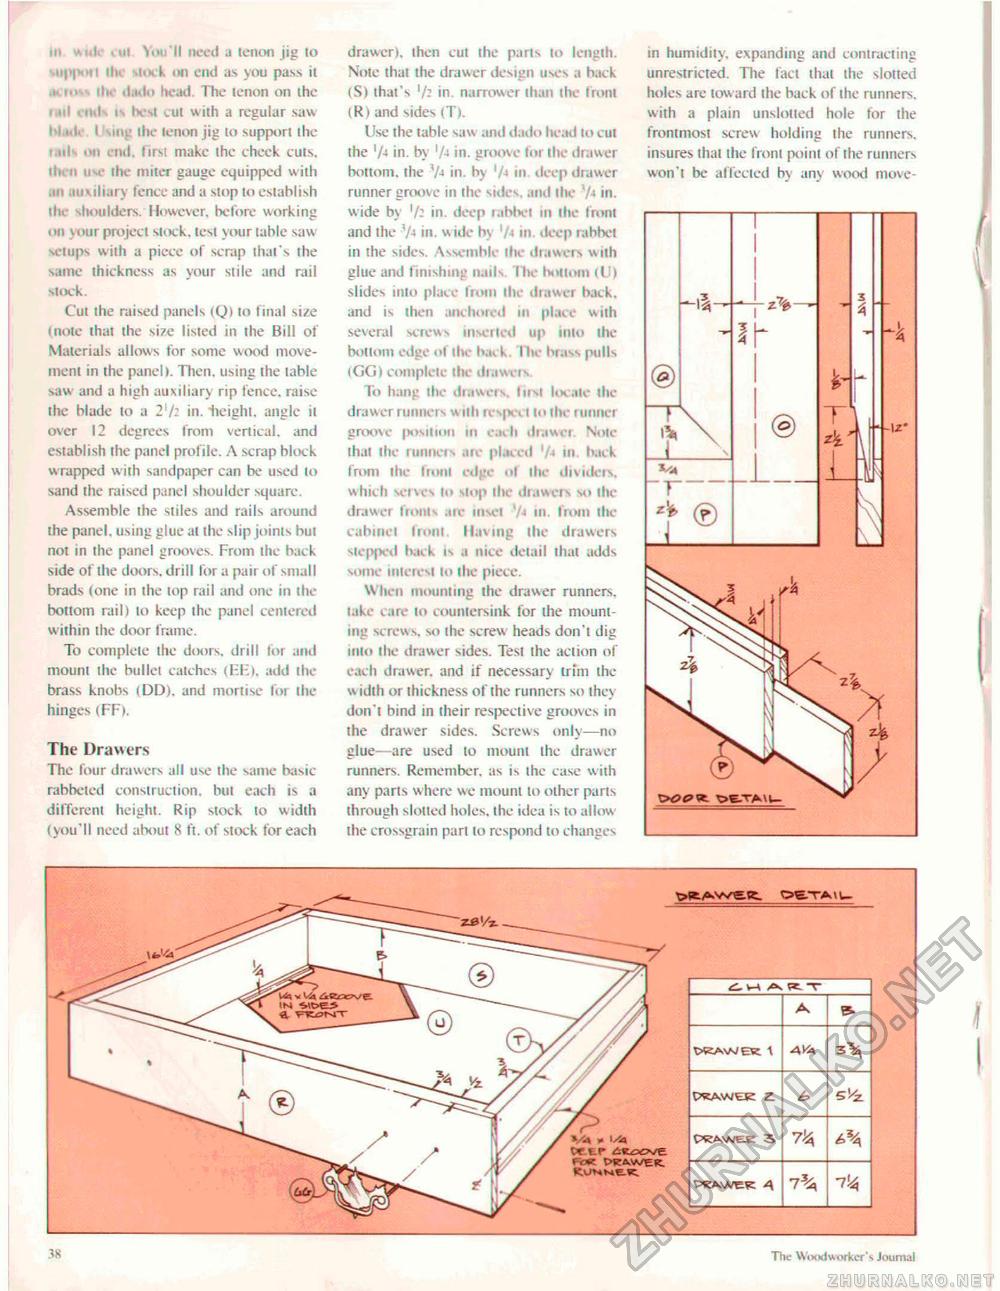
tit iul You'll need a tenon jig to .ii|>|h>h ih' .i>ik <ni end as you pass it .u iiv ili. il.nto head. The tenon on the i til nnl iv best cut with a regular saw i t.ni. I \111l' lite tenon jig to support the i ii) on end. first make the cheek cuts, ih< n is . the mtter gauge equipped w ith in Kn diary fence and a slop to establish the shoulders. However, before working mi \our project stixk, test your table saw setups with a piece of scrap that's the same thickness as your stile and rail stock. Cut the raised panels \Q) to final si^e (note that the si7e listed in the Bill of Materials allows for some wood movement in the panel). Then, using the table saw and a high auxiliary rip fence, raise the blade to a 2'h in. "height, angle it over 12 degrees from vertical, and establish the panel profile. A scrap block wrapped with sandpaper can be used to sand the raised panel shoulder square. Assemble the stiles and rails around the panel, using glue at the slip joints but not tn (he panel grooves. From the back side of the doors, drill for a pair of small brads (one in the top rail and one in the bottom rail) to keep the panel centered within the door frame. To complete the doors, drill for and mount the bullet catches (EKi. add the brass knobs (DD). and mortise for the hinges (FF). The Drawers The four drawers all use the same basic rabbeted construction, but each is a different height. Rip stock to width (you'll need about 8 ft. of stock for each drawer), then cut the parts to length. Note that the drawer design uses a hack <S> ihat's in. narrower (han the front (Riand sides (T). Use the table saw and dado head lo cut the 'A in. by 'A in, groove tor the drawer bottom, the '/■* in. h\ ' '•■ in deep drawer runner groove in the sides, and the 7-< in. wide b\ in. deep rabbet in lite front and the in. wide by '/■« in. deep rubhei in the sides. Assemble the drawers with glue and finishing nails I he bottom il l slides into place from the drawer back, and is then anchored in place with several screws inserted up into the bottom edge ol the luck Hie brass pulls <GG) complete the drawers To hang the drawers. Iirxl locate the drawer runners v> ttli rcsjxx I to the runner groove position in each drawer. Note thai the runners are placed '/■* mi. hack from the front edge ol the dividers, which serves to Mop the drawers so the drawer fronts are inset V-> in. from ific cabinet front. Having the drawers stepped hack IS a nice detail lhat adds some interest to the piece. When mounting the drawer runners, take care lo countersink for the mounting screws, so the screw heads don't dig into the drawer sides. Test the action of each drawer, and if necessary trim the w idlh or thickness of the runners so they don't bind in their respective grooves in the drawer sides. Screws only—no glue—are used to mount the drawer runners. Remember, as is the case with any parts where we mount lo other parts through slotted holes, the idea is to allow the crossgrain part to respond to changes in humidity, expanding and contracting unrestricted. The tact Lhat the slotted holes are toward the back of the runners, with a plain tmsloiied hole for the frontmost screw holding the runners, insures that the front point of the runners won't be affected by any wood move- »g»weg. Og-TAIU » IX* Cf.tr iifcoeyve f <*r t>KAWEK. KVMMEK. » IX* Cf.tr iifcoeyve f <*r t>KAWEK. KVMMEK.
38 The Woodworker's journal |
||||||||||||||||||


