Woodworker's Journal 1985-9-5, страница 42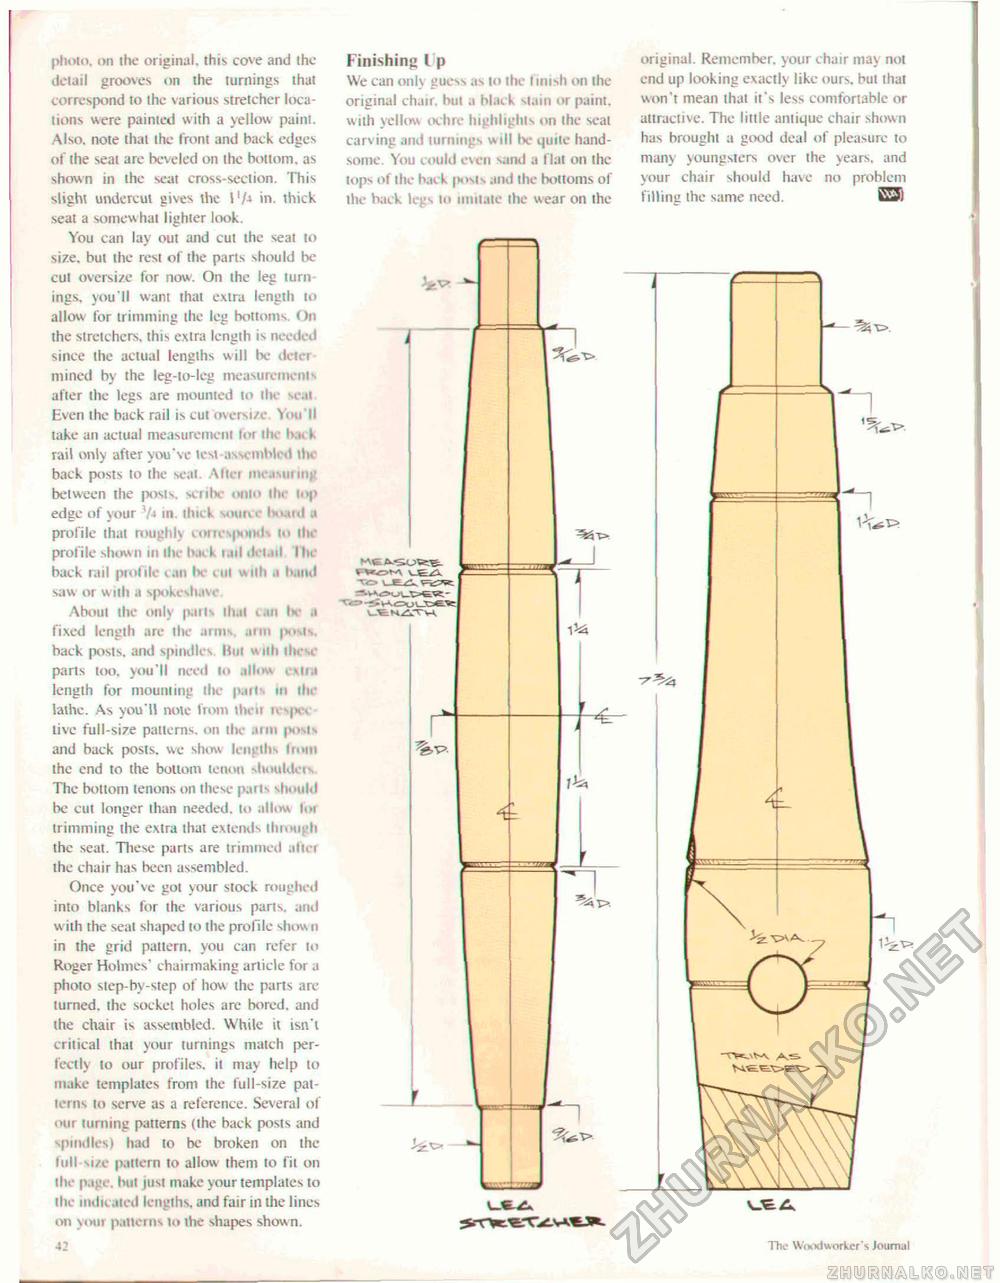
photo, on the original, this cove and the detail grooves on the turnings that correspond to the various stretcher locations were painted with a yellow paint. Also, note that the from and back edges of the seat are beveled on the bottom, as shown in the seat cross-section. This slight undercut gives the \1/a in. thick seat a somewhat lighter look. You can lay out and cut the seat to size, but the rest of the parts should be cut oversize for now. On the leg turn ings. you'll want that extra length to allow for trimming the leg bottoms. On the stretchers, this extra length ts needed since the actual lengths will be detet mined by the leg-to-leg measurements after the legs are mounted to tin- seat Even the back rail is cut oversize You II take an actual measurement lor the b;n k rail only after you've tesi assembled the back posts to the seal Altei im i urm; between the posts, set the onto tin i<>|> edge of your Vj in. thick «mr« e UmuI ' profile that roughly correspond* I" tin* profile shown in the b.u k tail detail I he back rail profile can he cul with a band saw or Willi a spokeshave About ihe only purls thai tan he a fixed length are the arms, arm posts, back posts, and spindles Hut Willi these parts loo, you'll need to illow extra length for mounting the pari in (he lathe. As you'll note from then >■• sjvt live full-size patterns, on the aim pt>sis and back posts, we show lengths from the end to the bottom iettun sltouUlct • The bottom tenons on these p.uis should be cut longer than needed, to allow 1«>i trimming the extra that extends tin• >1 ij-li the seat. Tliese parts are trimmed afln the chair has been assembled. Once you've got your slock roughed into blanks for ihe various parts, and w ith the seat shaped to the profile show n in the grid pattern, you can refer to Roger Holmes' chairmaking article for a photo step-by-step of how the parts arc turned, the socket holes are bored, and the chair is assembled. While it isn't critical that your turnings match perfectly lo our profiles, it may help lo make templates from the full-size patterns to serve as a reference. Several of our turning patterns (the back posts and spindles) had to be broken on the full-size pattern to allow them lo fit on the p.tjv. hut Mist make your templates to the indicated lengths, and fair in the lines on youi patterns to ihe shapes show n. Finishing I p We can only guess ;is to ihe finish oil the original chair, bui a black slain or paint, wiih yellow ochre highlights on the seat carving and turnings will be quite handsome, You could even sand a flat on ihe tops of the bai k posis and the bottoms of the back legs to imitate the wear on the original. Remember, your chair may not end up looking exactly like ours, hul thai won't mean thai it's less comfortable or attractive. The little antique chair shown has brought a good deal of pleasure to many youngsters over the years, and your chair should have no problem filling the same need. l£fi9D 42 Thi' Woodworker's Journal |


