Woodworker's Journal 1985-9-6, страница 36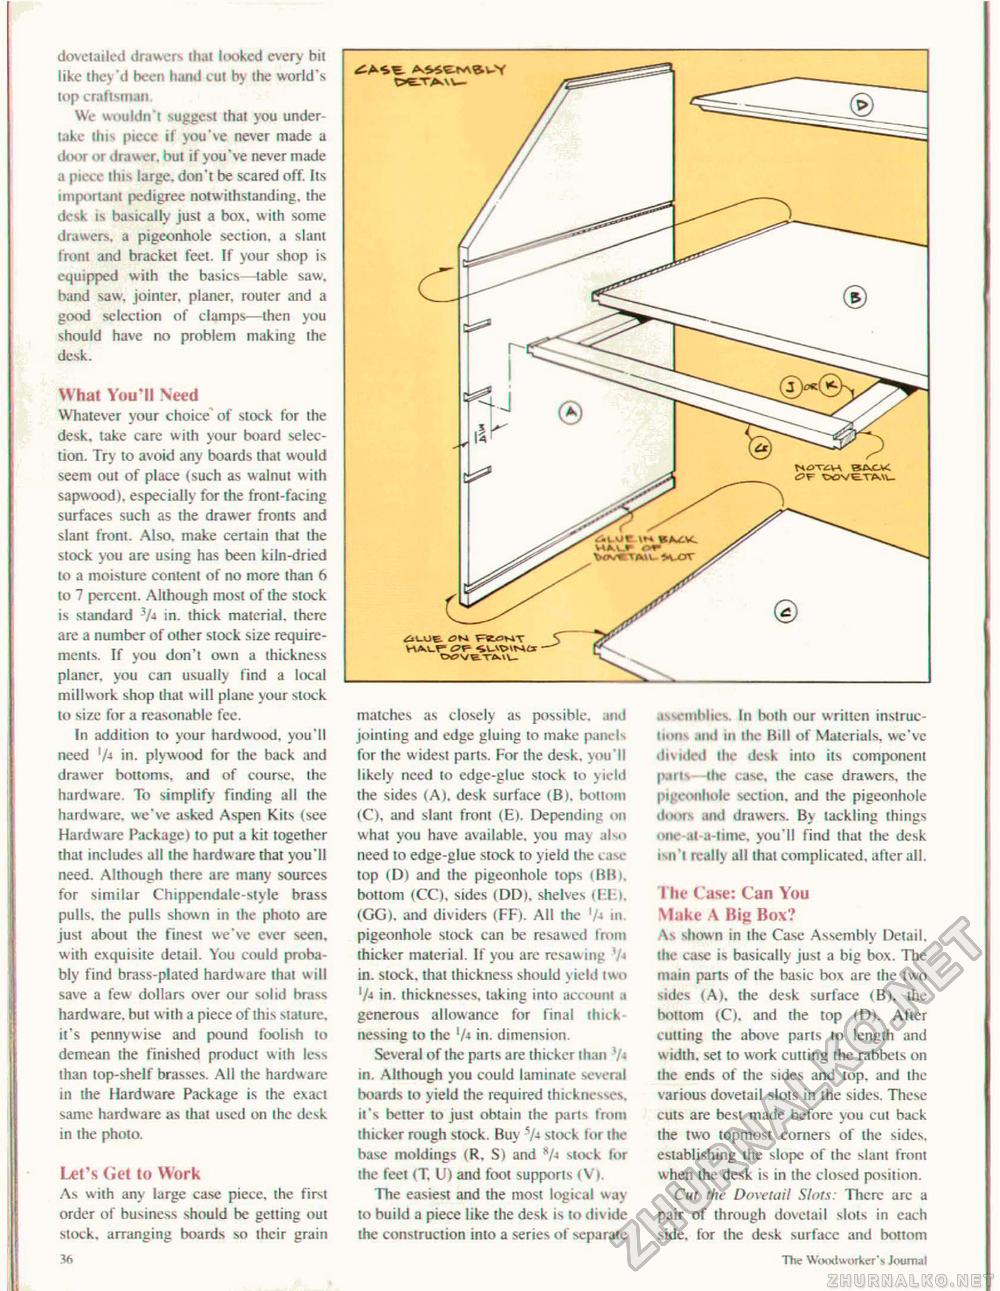
dovetailed drawers that looked every bit like they'd been Iwnd cut b\ the world's top craftsman We wouldn't suggest that you under-takc this piece it you've never made a door or drawer, but if you've never made a piece this large, don't be scared off. Its important pedigree notwithstanding, the desk ts basically just a box, with some drawers, a pigeonhole section, a slant front and bracket feet. If your shop is equipped with the basics—table saw. band saw, jointer, planer, router and a good selection of clamps—then you should have no problem making the desk. What You'll Need Whatever your choice of stock for the desk, take care with your board selection. Try to avoid any boards that would seem out of place (such as walnut with sapwood). especially for the front-facing surfaces such as the drawer fronts and slant front. Also, make certain that the stock you are using has been kiln-dried to a moisture content of no more than 6 to 7 percent. Although most of the stock is standard 3A in. thick material, there are a number of other stock size requirements. If you don't own a thickness planer, you can usually find a local millwork shop that w ill plane your stock to size for a reasonable fee. In addition to your hardwood, you'll need '/* in. plywood for the back and drawer bottoms, and of course, the hardware. To simplify finding all the hardware, we've asked Aspen Kits (see Hardware Package) to put a kit together that includes all the hardware that you'll need. Although there are many sources for similar Chippendale-style brass pulls, the pulls shown in the photo are just about the finest we've ever seen, with exquisite detail. You could probably find brass-plated hardware that will save a few dollars over our solid brass hardware, but w ith a piece of this stature, it's pennywise and pound foolish to demean the finished product with le>s than top-shelf brasses. AH the hardware in the Hardware Package is the exact same hardware as that used on the desk in the photo. Let's (Jet lo Work As with any large case piece, the first order of business should be getting out stock, arranging boards so their grain 36 L iLUE £1N FEONT HJvLP £?f= CWVETMU matches as closely as possible, and jointing and edge gluing to make panels for the w idest parts. For the desk, you'll likely need to edge-glue stock to yield the sides (A), desk surface (B). bottom (C), and slant front (E). Depending on what you have available, you may also need to edge-glue stock to yield the ease top (D) and the pigeonhole tops (BB), bottom (CC), sides (DD), shelves till. <GG), and dividers (FF). All the '/■» in. pigeonhole stock can be resawed from thicker material. If you are rcsaw ing '/•» in. stock, thai thickness should yield two 'A in. thicknesses, taking into account a generous allowance for final thick nessing to ihe !A in. dimension. Several of the parts are thicker than 'A in. Although you could laminate several boards to yield the required thicknesses, it's better to just obtain the parts from thicker rough stock. Buy SA stock for the base moldings (R. S) and ®A sunk for the feel (T. U) and foot supports (V). The easiest and the most logical way to build a piece like the desk is to divide the construction into a series of separate assemblies hi both our written instructions and in the Rill of Materials, we've divided the desk into its component p.ids the ease, Ihe case drawers, the pigonhole section, and the pigeonhole doors and drawers. By tackling things one at-a-lime, you'll find that the desk isn't really all that complicated, after all. I'lie Case: Can You Make A Big Box? \s shown in the Case Assembly Detail, ihe case is basically just a big box. The main parts of the basic box are the two sides (A), the desk surface (B). the bottom (C). and the top (D). After culling the above parts to length and w idth. set to work cutting the rabbets on ihe ends of the sides and top. and the various dovetail slots in the sides. These cuts are best made before you cut hack the two topmost corners of the sides, establishing the slope of the slant front when the desk is in the closed position. Cut the Dovetail Slots: There arc a pair of through dovetail slots in each side, for the desk surface and bottom The Wixxlworker's Journal |


