Woodworker's Journal 1992-16-5, страница 17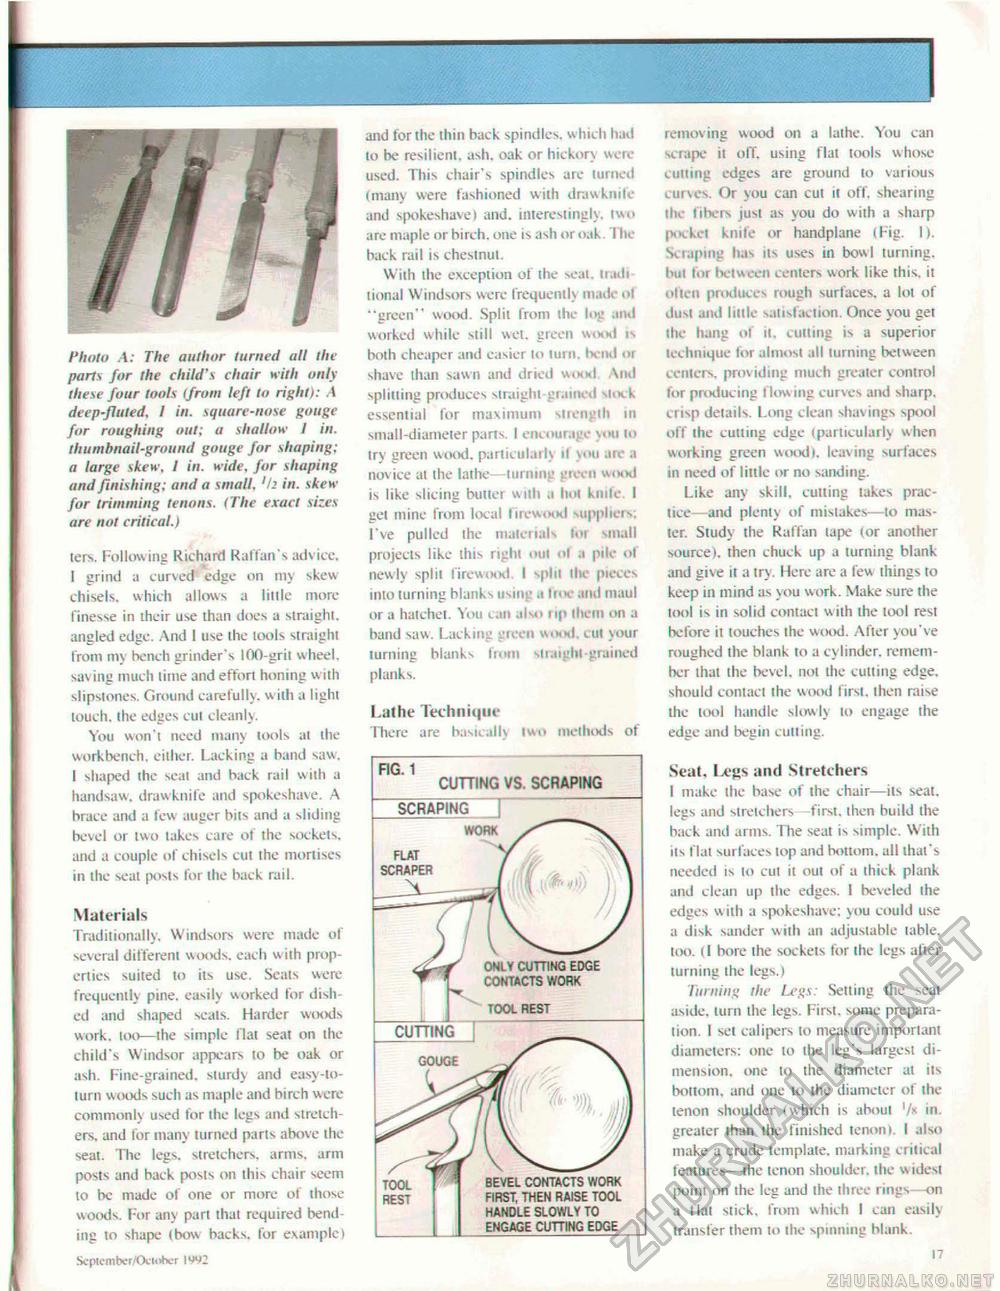
Photo A: The author turned all I he parts for the child's chair with only these four tools Ifrom left to right): A deep-fluted, I in. square-nose gouge for roughing out; a shallow I in. thumbnail-ground gouge for shaping: a large skew, 1 in. wide, for shaping and finishing: and a small, 'h in. skew for trimming tenons. <The exact sizes are not critical.} ters. Following Richard Kalian's advice, I grind a curved1 edge on my skew chisels, which allows a little more finesse in their use than does a straight, angled edge. And I use the tools straight from my bench grinder's 100 grit wheel, saving much time and effort honing with slipstones. Ground carefully, w ilh a light touch, the edges cut cleanly. You won't need many tools at the workbench, either. Lacking a band saw, I shaped the seal and back rail with a handsaw, drawknife and spokeshave. A brace and a few auger bits and a sliding bevel or two lakes care of the sockets, and a couple of chisels cut the mortises in the seat posts for the back rail. Materials Traditionally, Windsors were made of several different woods, each w ith properties suited to its use. Seats were frequently pine, easily worked for dished and shaped scats. Harder woods work, loo—the simple flat seat on the child's Windsor appears to be oak or ash. Fine-grained, sturdy and easy-to-turn woods such as maple and birch were commonly used for the legs and stretchers, and for many turned parts above the seat. The legs, stretchers, arms, arm posts and back posts on this chair seem to be made of one or more of those woods. For any part that required bending to shape (bow backs, for example) Scplember/Ocuttw IW2 and for the thin back spindles, which had to be resilient, ash. oak or hickory were used. This chair's spindles are turned (many were fashioned with drawknife and spokeshave) and. interestingly, two are maple or birch, one is ash or oak. The back rail is chestnut. With the exception of the seat, iradi tional Windsors were frequently made ol "green" wood. Split from the log and worked while still wet, green wood is both cheaper and easier to turn, bend or shave than sawn and dried wood \nd splitting produces straight graiiu d st»vk essential for maximum strength in small-diameter pans. I encourage you to try green wood, particularly il you are a novice at the lathe—turning green wood is like slicing butter with a hot knife. I get mine from local firewood suppliers; I've pulled the materials tor small projects like this right out of a pile of newly split firewood. I split the pieces into turning blanks using u Ikk and maul or a hatchet. You can also rip them on a band saw. Lacking green wood. cut your turning blank-, from straight-grained planks. Lathe Technique There are basically iwo methods of removing wood on a lathe. You can scrape it off. using flat tools whose cutting edges are ground to various curves. Or you can cut it off. shearing the fibers just as you do with a sharp pocket knife or handpiane (Fig. I). Scraping has lis uses in bowl turning, but for between centers work like this, it often produces rough surfaces, a lot of dust and little satisfaction. Once you get the hang ot it. cutting is a superior technique for almost all turning between centers, providing much greater control for producing flowing curves and sharp, crisp details. Long clean shavings spool off the culling edge (particularly when working green wood), leaving surfaces in need of little or no sanding. Like any skill, cutting takes practice—and plenty of mistakes—to master. Study the Raffan tape (or another source), then chuck up a turning blank and give it a try. Here are a few things to keep in mind as you work. Make sure the tool is in solid contact with the tool rest before it touches ihe woikJ. After you've roughed the blank to a cylinder, remember that the bevel, not the cutting edge, should contact the wood first, then raise the tool handle slowly to engage the edge and begin cutting. Seat. Legs and Stretchers I make the base of the chair—ils seat, legs and stretchers—first, then build the back and arms. The seat is simple. With ils flat surfaces top and bottom, all that's needed is to cut it out of a thick plank and clean up the edges, 1 beveled the edges with a spokeshave; you could use a disk sander with an adjustable table, too. (I bore the sockets for ihe legs after turning the legs.) honing the Legs: Setting the seat aside, turn the legs. First, some preparation. 1 set calipers to measure important diameters: one to the leg's largest dimension. one to the diameter at its bottom, and one to the diameter of the tenon shoulder (which is about in. greater than the finished tenon I. I also make a crude template, marking critical features—the tenon shoulder, the widest point on the leg and the three rings on a flat stick, from which 1 can easily transfer them to ihe spinning blank. 17 FIG. 1 CUTTING VS. SCRAPING SCRAPING WORK FLAT SCRAPER CUTTING EDGE CONTACTS WORK TOOL REST GOUGE BEVEL CONTACTS WORK FIRST, THEN RAISE TOOL HANDLE SLOWLY TO ENGAGE CUTTING EDGE CUTTING |


