Woodworker's Journal 1992-16-5, страница 62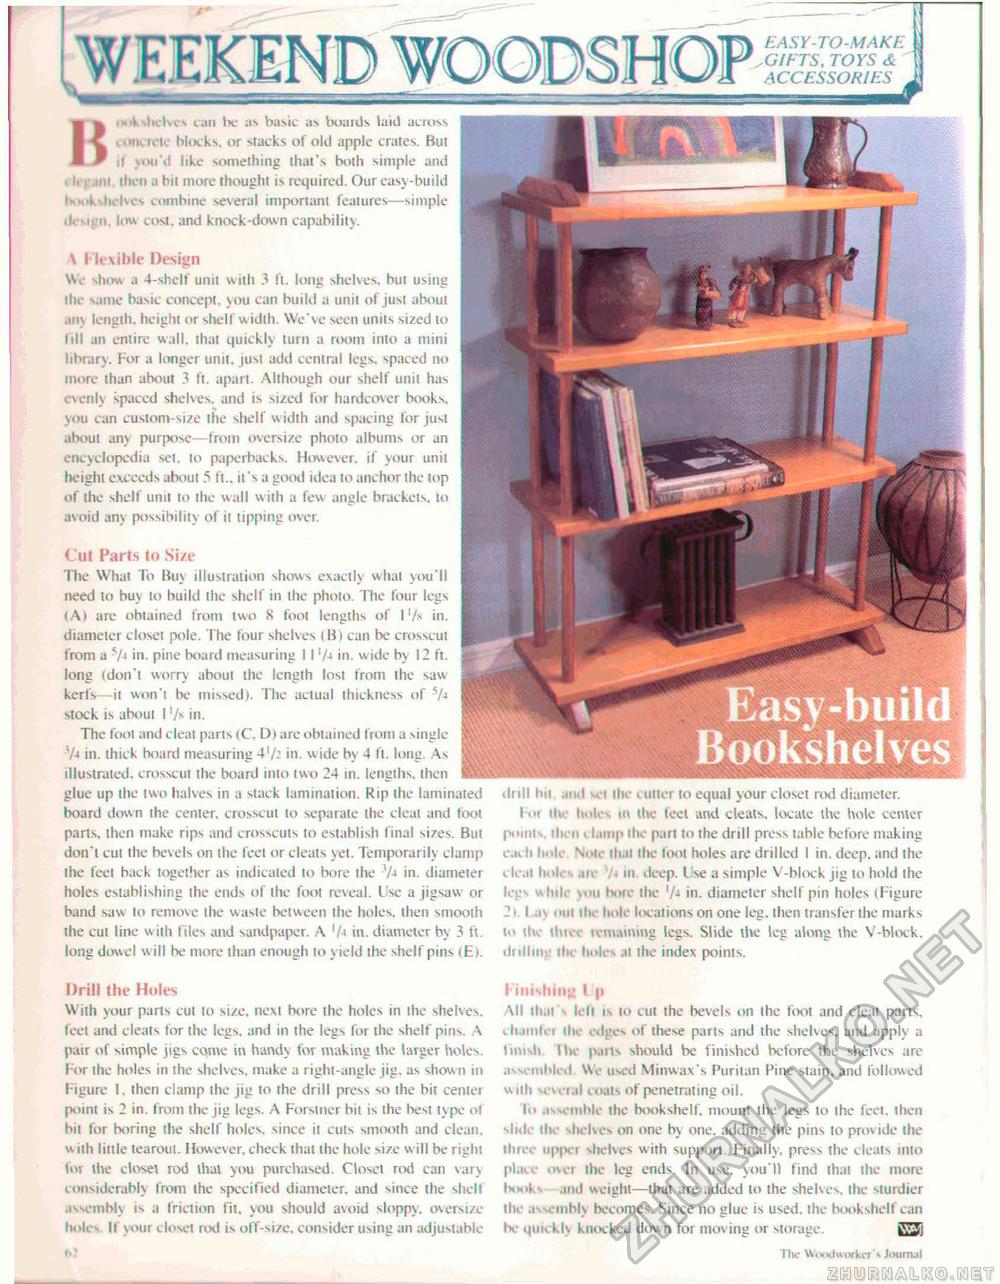
EASY-TO-MAKE G/ETS, TOYS & ACCESSORIES H<toV shelves can Ik- as basic as boards la.nl acmss (.iiiart'lc blocks, or slacks ol old apple crates. Bui ii you'd like something dial's both simple and i. mi itu ii a bit more thought is required. Our easy-build ihi,.l>Julvcs combine several important features—simple design, km cost, and knock-down capability. \ Flexible Design We show a 4-shelf unit with 3 ft. long shelves, but using tin- same basic concept, you can build a unit of just about .my length, height or shell w idth. We've seen units sized to hll an entire wall, that quickly turn a room into a mini library. For a longer unit, just add central legs, spaced no more than about 3 ft. apart. Although our shelf unit has evenly spaced shelves, and is sized for hardcover books, you can custom-size the shell" w idth and spacing lor just about any purpose—from oversize photo albums or an encyclopedia set, to paperbacks. However, if your unit height exceeds about 5 ft., it 's a good idea to anchor the top of the shelf" unit lo the wall w ith a few angle brackets, to av oid any possibility of it tipping over. Cut Parts to Size The What To Buy illustration shows exactlv what you'll need to buy to build the shelf in the photo. The four legs (A) are obtained from two 8 foot lengths of I'/x in. diameter closet pole. The four shelves (B i can be crosscut from a V-i in. pine board measuring 11 '/-< in. w ide by 12 ft. long (don't worrj about the length lost from the saw kerfs—it won't be missed). The actual thickness of 7-t stock is about I !/s in. The fool and cleat parts (C. D tare obtained from a single -V* in. thick board measuring Vfc in. w ide bv 4 ft. long. As illustrated, crosscut the board into two 24 in. lengths, then glue up the two halves in a slack lamination. Rip the laminated board down the center, crosscut to separate the cleat and foot parts, then make rips and crosscuts to establish final sizes. But don't cut the bevels on the feel or cleats jet. Temporarily clamp the feet back together as indicated to bore ihe '/-i in. diameter holes establishing the ends of the foot reveal. Use a jigsaw or band saw to remove the waste between the holes, then smooth the cut line w ith tiles and sandpaper. A 1 in. diameter by 3 ft. long dowel will be more than enough to yield the shelf pins <E>. ih ill bit .mil m;| the cutler to equal your closet rod diameter. I or ilt- holes in the feet and cleats, locale the hole center point il> t., ;.im|> the part to the drill press table before making each In 'I. Note iJi.it the foot holes are drilled I in. deep, and the ti< mi hull ■ hi .in deep. Use a simple V-block jig to hold ihe lers - Ink .. ii bore the '/- in. diameter shell" pin holes (Figure 2' I av > 'Hi ili. hole locations on one leg. then transfer tiie marks to tin linn remaining legs. Slide the leg along the V-block. drilling the holes at the index points. Drill the Holes With your parts cut to size, next bore the holes in the shelves, feet and cleats tor the legs, and in the legs for the shelf pins. A pair of simple jigs come in handy for making the larger holes. For the holes in the shelves, make a right-angle jig, as shown in Figure 1. then clamp the jig to the drill press so the bit center point is 2 in. from the jig legs. A Forstner bit is the best type of hit for boring the shell" holes, since it cuts smooth and clean, vi ith little tearout. However, check that the hole size w ill be right lor ihe closet rod thai you purchased. Closet rod can varv considerably from the specified diameter, and since the shelf assembly is a friction fit. you should avoid sloppy, oversi/e holes II your closet rod is off-size, consider using an adjustable 62 Finishing t p Ml ili.it lo 11 is to cut the bevels on the fool and cleat parts, cli.imlei ili edges of these parts and the shelves, and apply a finish I In pai ls should be finished before ihe shelves are assembled We used Minwax's Puritan Pine stain, and followed with . u i.il coals of penetrating oil. I<> .issemhle the bookshelf, mount the legs to the feet, then slide the shelves on one by one. adding the pins to provide ihe ili hi upper shelves with support. Finally, press the cleats into place iivei the leg ends. In use. you'll find thai the more Imoks and weight—that are added lo the shelves, the sturdier ili. a-. v inbK becomes. Since no glue is used, the btKtkshelf can K qui: kl\ knocked down for moving or storage. iVJi The Woodworker's Journal |


