Woodworker's Journal 1992-16-6, страница 67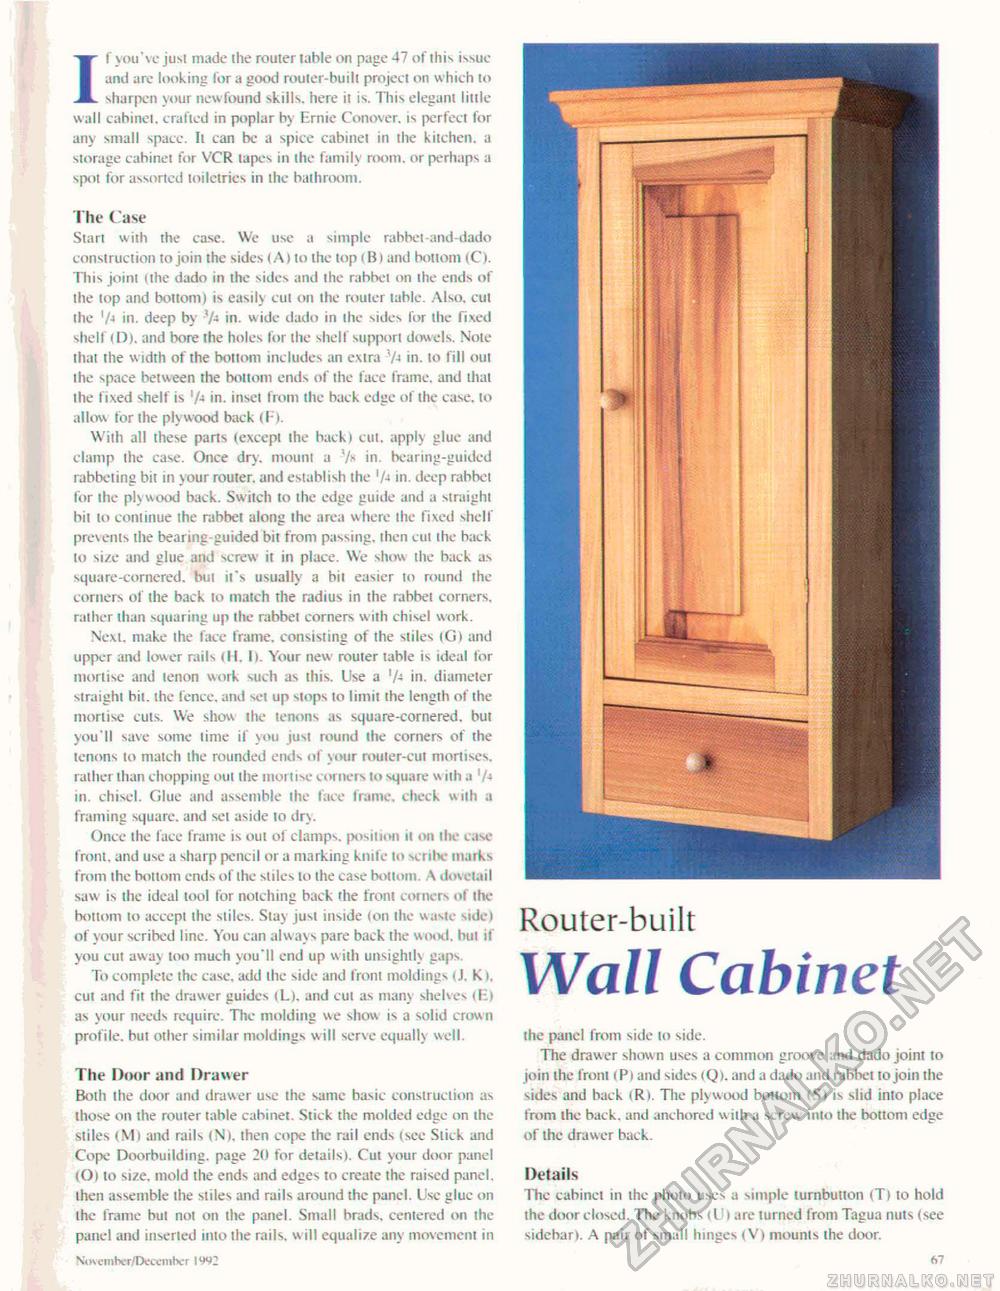
II you've just made the router table on page 47 of this issue and are looking for a good router-built project on which to sharpen your newfound skills, here it is. This elegant little wall cabinet, crafted in poplar by Ernie Conover. is perfect for any small space. It can be a spice cabinet in the kitchen, a storage cabinet for VCR lapes in ihe family room, or perhaps a spot for assorted toiletries in the bathroom. The Case Start with the case. We use a simple rabbet-and-dado construction to join the sides (A) lo the lop (Bl and bottom (C). This joint (the dado in the sides and the rabbet on the ends of the lop and bottom) is easily cut on the rouier table. Also, cut the '/-» in. deep by 7J in. wide dado in the sides for the fixed shelf (D). and bore the holes for the shelf support dowels. Note that the width of the bottom includes an extra 7-> in. to fill oui the space between the bottom ends of the face frame, and that the fixed shelf is '/■» in. inset from the back edge of the case, to allow for the plywood back (F). With ail these parts (excepl ihe back) cut. apply glue and clamp the case. Once dry. mount a 7s in. bearing-guided rabbeting bit in your router, and establish the 7-» in. deep rabbet for ihe plywood back. Switch to ihe edge guide and a straight bil lo continue the rabbet along ihe area where the fixed shell prevents the bearing-guided bit from passing, then cut ihe back to size and glue and screw it in place. We show the back as square-cornered, btil it's usually a bil easier to round ihe corners of the back lo match the radius in the rabbet corners, rather than squaring up ihe rabbei corners w ith chisel work. Next, make the face frame, consisting of the sliles (G) and upper and lower mils ill, I). Your new router table is ideal for mortise and tenon work such as this. Use a 7-* in. diameter straight bit. the fence, and set up stops to limit ihe length of the mortise cuts. We show the tenons as square-cornered, but you'll save some time if you just round ihe corners of the tenons to match ihe rounded ends of your router-cut mortises, rather than chopping oul ihe morlise corners to square w iih a 7* in. chisel. Glue and assemble ihe face frame, check wilh a framing square, and set aside to dr\. Once the face frame is out ol clamps, position ii on the case front, and use a sharp pencil or a marking knife lo scnlv marks from the bottom ends of the sliles to ihe Case bottom. A dovetail saw is the ideal tool for notching back the front corners of the bottom to accept the stiles. Slay just inside (on ihe waste side) of your scribed line. You can always pare back the wood, bui if you cut away too much you'll end up with unsightly gaps. To complete the case, add the side and front moldings (J. K), cut and fit the drawer guides iL). and cut as many shelves (El as your needs require. The molding we show is a solid crown profile, but other similar moldings w ill serve equally well. The Door and Drawer Both the door and drawer use ihe same hasic construction as those on the router table cabinet. Stick the molded edge on the sliles (Mi and rails (N), then cope the rail ends (see Slick and Cope Doorbuilding. page 20 tor details). Cut your door panel (Ol to size, mold the ends and edges to create the raised panel, then assemble the sliles and rails around the panel. Use glue on the frame but not on the panel. Small brads, centered on the panel and inserted into ihe rails, w ill equalize any movement in NWmber/Dttembcr IW 67 Router-built Wall Cabinet the panel from side to side. The drawer shown uses a common groove and dado joint to join the front <P) and sides <Q). and a dado anil rabbei lo join the sides and hack (R). The plywood bottom (S) is slid into place from the back, and anchored with a screw into the bottom edge of ihe drawer back. Details The cabinet in the photo uses a simple lurnbutton <Tl lo hold ihe door closed. The knobs <U > are turned from Tagua nuts (see sidehar). A pair of small hinges (V) mounts the door. |


