Woodworker's Journal 1993-17-1, страница 32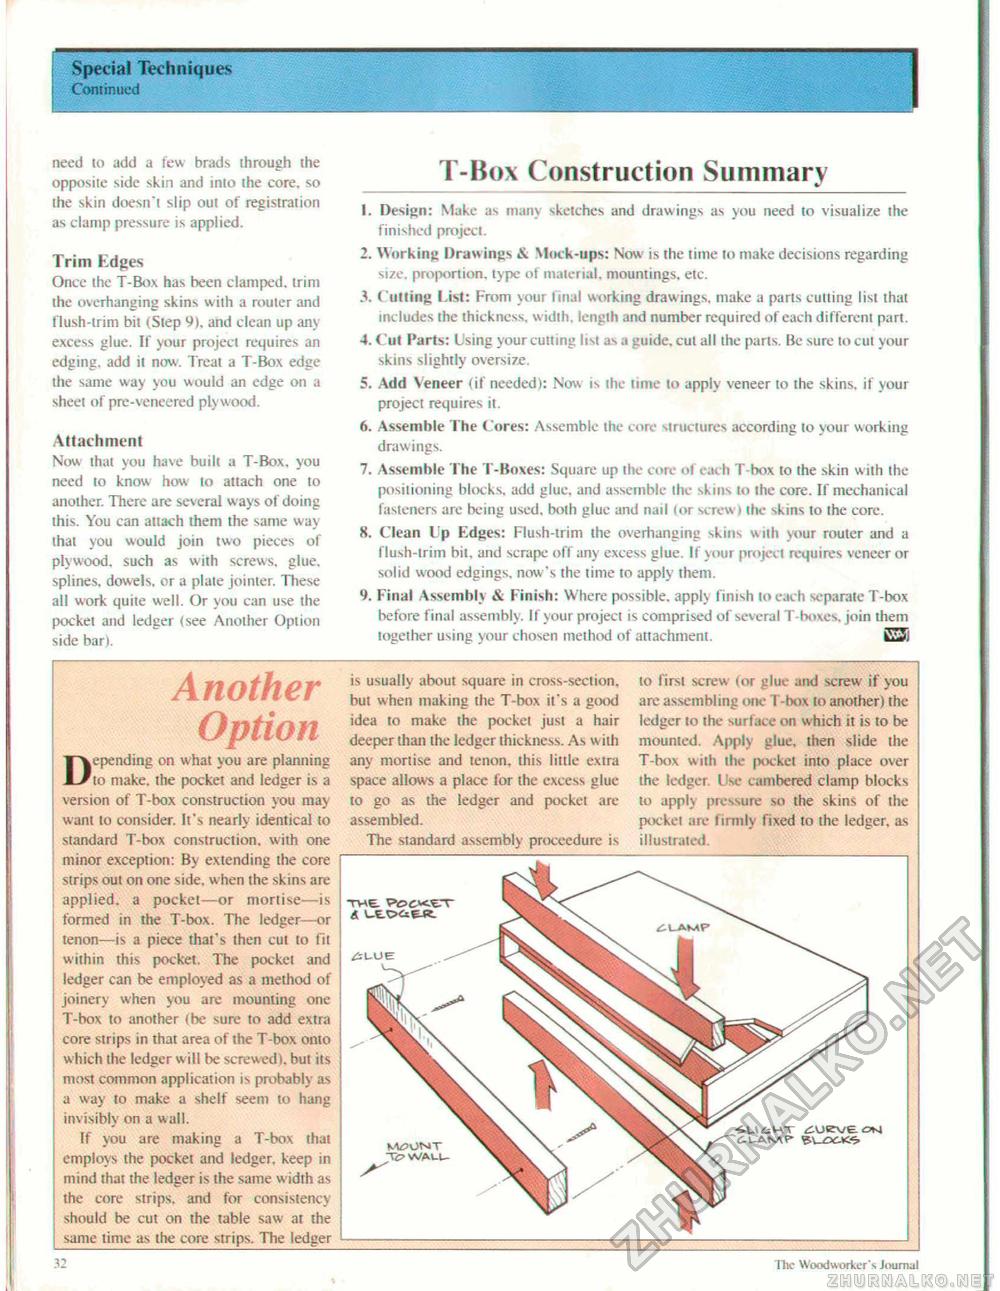
Special Techniques Continued need to add a few brads through the opposite side skin and into the core, so the skin doesn't slip out of registration as clamp pressure is applied. Trim Edges Once the T-Box has been clamped, trim the overhanging skins with a router and flush-trim bit (Step 9), and clean up any excess glue. If your project requires an edging, add it now. Treat a T-Box edge the same way you would an edge on a sheet of pre-veneered plywood. Attachment Now that you have built a T-Box. you need to know how to attach one to another. There are several w ays of doing this. You can attach them the same way that you would join two pieces of plywood, such as with screws, glue, splines, dowels, or a plate jointer. These all work quite well. Or you can use the pocket and ledger (see Another Option side bar). T-Box Construction Summarv 1. Design: Make as many sketches and draw ings as you need to visualize the finished project. 2. Working Draw ings A Mock-ups: Now is the time to make decisions regarding size, proportion, type of material, mountings, etc. 3. Cutting List: From your final working drawings, make a parts cutting list that includes the thickness, width, length and number required of each different part. 4. Cut Parts: Using your cutting list as a guide, cut all the parts. Be sure to cut your skins slightly oversize. 5. Add Veneer (if needed): Now is the time to apply veneer to the skins, if your project requires it. 6. Assemble The Cores: Assemble the core structures according lo your working drawings. 7. Assemble The T-Boxes: Square up ihe core ol each T-box lo the skin w ith the positioning blocks, add glue, and assemble ihe skins to Ihe core. If mechanical fasteners are being used, both glue and nail lor screw i the skins to the core. 8. Clean lp Edges: Flush-trim the overhanging skins wnji your router and a Flush-trim bit, and scrape off any excess glue. If your project requires veneer or solid wood edgings, now's the time to apply them. 9. Final Assembly & Finish: Where possible, apply finish to each separate T-box before final assembly. II your project is comprised of several T-boxes. join ihem together using your chosen method of attachment. Another Option Depending on what you are planning to make, the pocket and ledger is a version of T-box construction you may want to consider. It's nearly identical 10 standard T-box construction, with one minor exception: By extending the core strips out on one side, w hen the skins are applied, a pocket—or mortise—is formed in the T-box. The ledger—or tenon—is a piece that's then cut lo fit within this pocket, The pockei and ledger can be employed as a method of joinery when you are mounting one T-box to another (be sure to add extra core strips in that area of the T-box onto which the ledger will be screwed), bul its most common application is probably as a way to make a shelf seem to hang invisibly on a wall. If you are making a T-box thai employs the pocket and ledger, keep in mind that the ledger is the same width as the core strips, and for consistency should be cut on the table saw at the same time as the core strips. The ledger is usually about square in cross-seciion. bul when making the T-box it's a good idea to make the pocket just a hair deeper than the ledger thickness. As w ith any mortise and tenon, this little extra space allows a place for ihe excess glue to go as the ledger and pocket are assembled. The standard assembly proceedure is to first screw (or glue and screw if you are assembling one 1 box to another) the ledger to the surface on w hich it is to be mounted. Applj glue, then slide the T-box with the pocket into place over the ledger. Use cambered clamp blocks to apply pressure so the skins of the pockei are firmly fixed to ihe ledger, as illustrated. THE. Pot-WtT A UtCXiER. iluAMP' euot*^ IX The Woodworker'1, Journal |


