Woodworker's Journal 1993-17-1, страница 61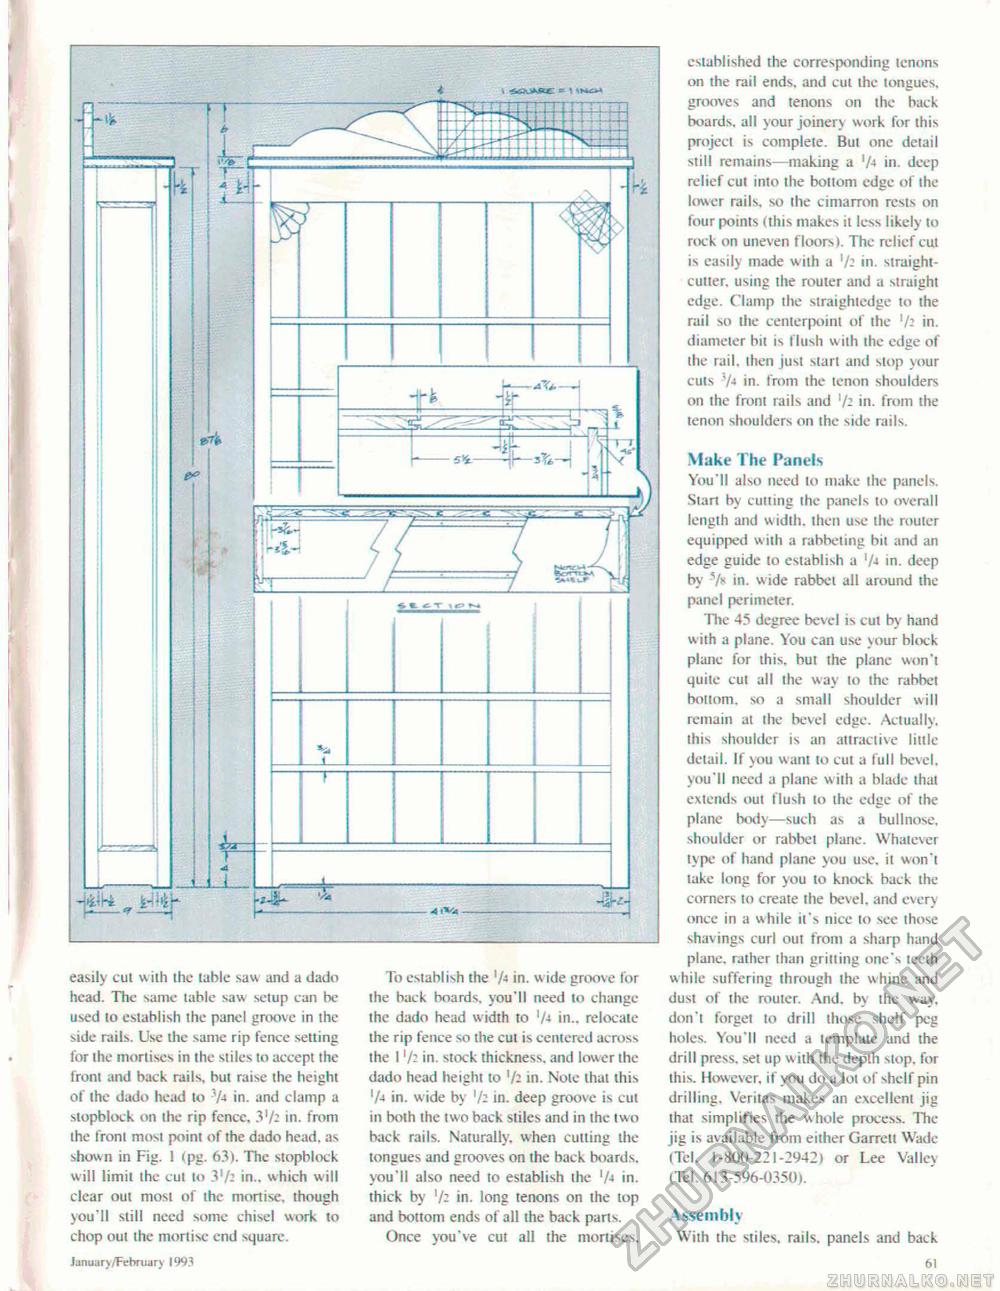
easily cul w ilh the lable saw and a dado head. The same table saw selup can be used to establish the panel groove in the side rails. Use the same rip fence setting for the mortises in the stiles to accept the front and back rails, but raise the height of the dado head to 3M in. and clamp a stopblock on the rip fencc, 3V- in. from ihe front most point of the dado head, as shown in Fig. 1 <pg. 63). The stopblock will limit the cut lo 3'/- in., which will clear out most of ihe mortise, though you'll still need some chisel work lo chop out the mortise end square, January/February llW To establish the '/4 in- w ide groove for the back boards, you'll need to change the dado head w idth to '/-* in., relocate the rip fence so the cut is centered across the Iin. stock thickness, and lower ihe dado head height to l/2 in. Nole that this '/4 in. wide by '/: in. deep groove is cut in both the two back stiles and in the two back rails. Naturally, when culling the tongues and grooves on the back boards, you'll also need to establish the xh in. thick by '/- in. long tenons on the top and bottom ends of all the back parts. Once you've cut all the mortises. established the corresponding tenons on the rail ends, and cul the tongues, grooves and tenons on the back boards, all your joinery w ork for this project is complete. But one detail still remains—making a '/-* in. deep relief cut into the bottom edge of ihe lower rails, so the Cimarron rests on four points (this makes it less likely lo rock on uneven floors). The relief cut is easily made with a in. straight-cutter, using the router and a straight edge. Clamp the straightedge to the rail so the centerpoinl of the lfi in. diameter bit is flush w ith the edge of the rail, then just start and stop \our cuts -/i in. from the tenon shoulders on ihe front rails and '/: in. from the tenon shoulders on the side rails. Make The Panels You'll also need to make the panels. Start by culling the panels to overall length and width, then use the router equipped w ith a rabbeting bit and an edge guide to establish a '/■< in. deep by 7* in. wide rabbet all around the panel perimeter. The 45 degree bevel is cul by hand with a plane. You can use your block plane for this, but the plane won't quite cui all the way to the rabbet bottom, so a small shoulder will remain at the bevel edge. Actually, this shoulder is an attractive little detail. If you want to cui a full bevel, you'll need a plane with a blade that extends out flush to the edge of the plane body—such as a bull nose, shoulder or rabbet plane. Whatever type of hand plane you use. it won't lake long for you to knock back the corners to create the bevel, and every once in a while it's nice to sec those shavings curl out from a sharp hand plane, rather than gritting one's teeth while suffering through the whine and dust of the router. And. by the way, don't forget to drill those shelf peg holes. You'll need a template and the drill press, set up w ith the depth stop, for this. However, if you do a lot of shelf pin drilling, Veritas makes an excellent jig that simplifies the whole process. The jig is available from either Garrett Wade (Tel. 1-800-221-2942) or Lee Valley (Tel. 613-596-0350). Assembly With the stiles, rails, panels and back Pico if circle No. JO on the Reader Service Card. 7 |


