Woodworker's Journal 1993-17-1, страница 64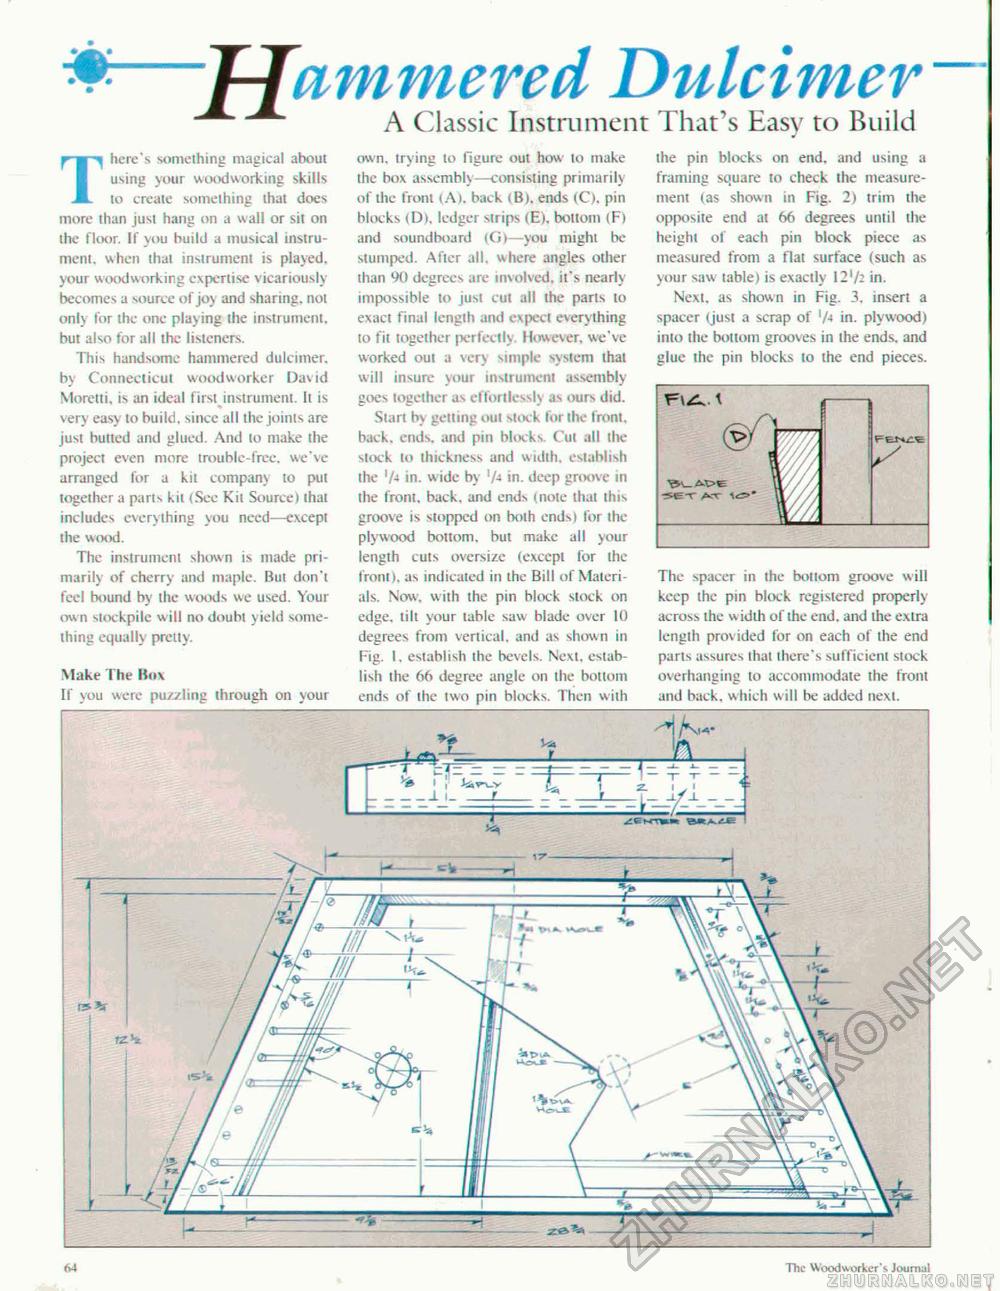
'TJammered Dulcimer A Classic Instrument That's Easy to Build There's something magical about using your woodworking skills to create something that does more than just hang on a wall or sit on the floor. If you build a musical instrument. when that instrument is played, your woodworking expertise vicariously becomes a source of joy and sharing, not only for the one playing the instrument, but also for all the listeners. This handsome hammered dulcimer, by Connecticut woodworker David Moretti. is an ideal first instrument. It is very easy to build, since all the joints are just bulled and glued. And to make the project even more trouble-free, we've arranged for a kit company to put together a parts kit (Sec Kit Source) that includes everything you need—except the wood. The instrument shown is made primarily of cherry and maple. But don't feci bound by the woods we used. Your own stockpile w ill no doubt yield something equally pretty. Make The li<i\ IT you were puzzling through on your own, trying to figure out how to make the box assembly—consisting primarily of die front (A), back i B). ends tC). pin blocks (D), ledger strips (E). bottom (F) and soundboard <(J)—-you might be stumped. After all, where angles other than 90 degrees are involved, it's nearly impossible to just cut all the parts to exact final length and expect everything to fit together perfectly. However, we've worked out a very simple system that will insure your instrument assembly goes together as effortlessly as ours did. Start by getting out slock for ihe front, back, ends, and pin blttcks. Cut all the stock lo thickness and width, establish the '/4 in. w ide by 'A in. deep groove in the front, back, and ends (note that this groove is stopped on both endsi for the plywood bottom, but make all your length cuts oversize (except for the front), as indicated in the Bill of Materials. Now, with the pin block stock on edge, tilt your table saw blade over 10 degrees from vertical, and as shown in Fig. I, establish the bevels. Next, establish the 66 degree angle on the bottom ends of the two pin blocks. Then with Ihe pin blocks on end. and using a framing square to check the measurement (as shown in Fig. 2) trim the opposite end at 66 degrees until the height of each pin block piece as measured from a flat surface (such as your saw table) is exactly 12'/: in. Next, as shown in Fig. 3, insert a spacer (just a scrap of '/-f in. plywood) into the bottom grooves in the ends, and glue the pin blocks to the end pieces. Ft^. \ ■ser A--f ic=>* The spacer in the bottom groove will keep the pin block registered properly across the width of the end. and the extra length provided for on each of the end parts assures that there's sufficient stock overhanging to accommodate the front and back, which will be added next. IX The Woodworker'1, Journal |


