Woodworker's Journal 1993-17-3, страница 50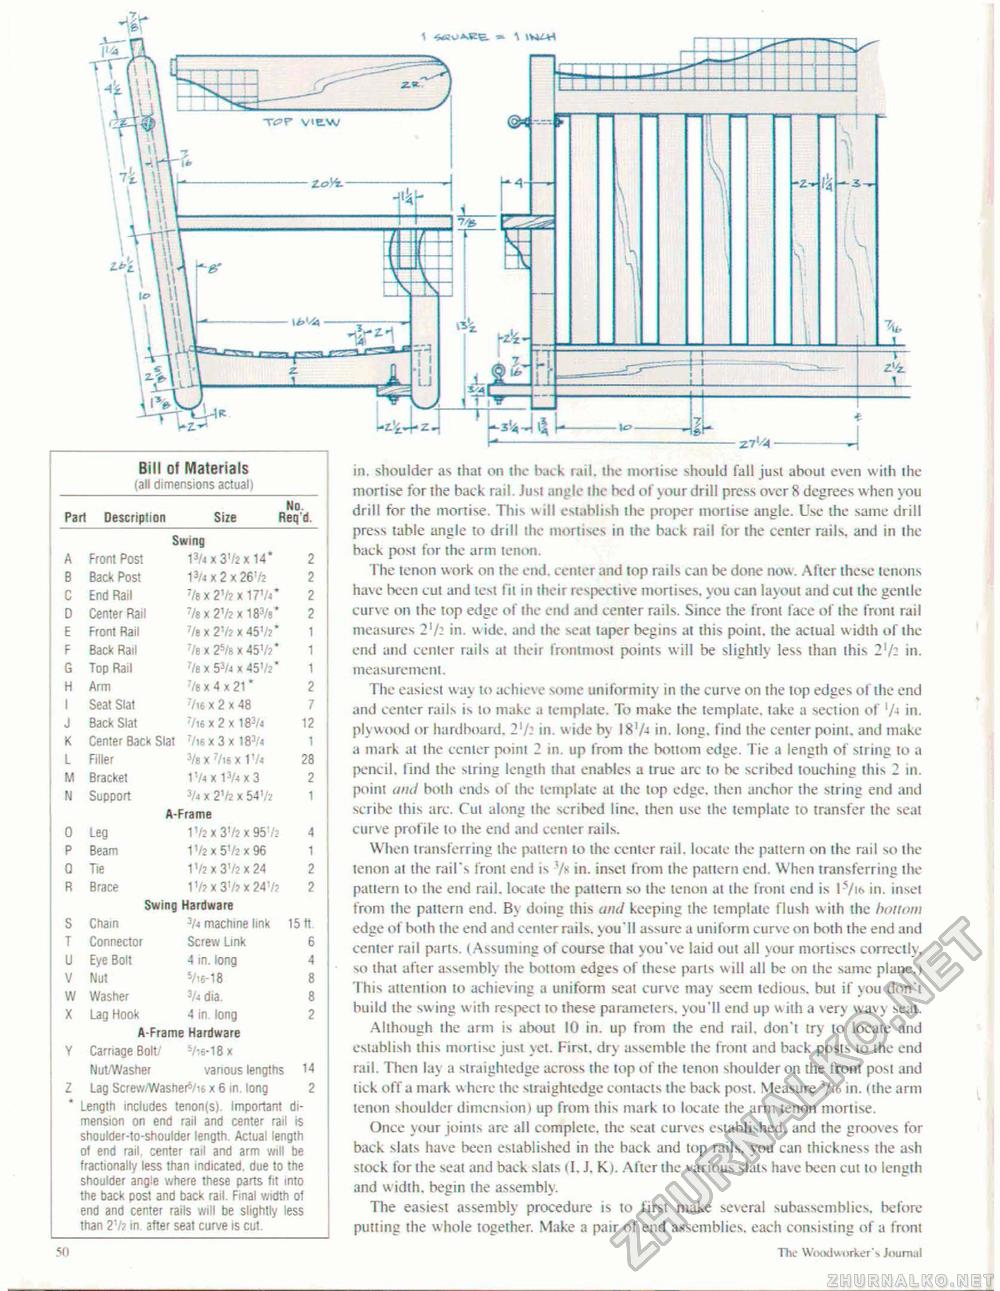
Bill ol Materials (ail dimensions actual)
mension on end rail and center rail is shoulder-to-shoulder length. Actual length ot end rail, center rail and arm will be fractionally less than indicated, due to the shoulder angle where these parts fit into the back post and back rail. Final width of end and center rails will be slightly less than 2V? in. after seat curve is cul. in. shoulder as that on the back rail, the mortise should fall just about even with the mortise for the back rail. Just angle the bed of your drill press over 8 degrees when you drill for the mortise. This will establish the proper mortise angle. Use the same drill press table angle to drill the mortises in the back rail for the center rails, and in the back post for the arm tenon. The tenon work on the end. center and top rails can be done now. After these tenons have been cut and lest fit in their respective mortises, you can layout and cut the gentle curve on the top edge of the end and center rails. Since the front face of the front rail measures 2l/i in. w ide. and the seal taper begins at this point, the actual w idth of the end and center rails at their frontmost points will be slightly less than this 2'/: in. measurement. The easiest w ay to achieve some uniformity in the curve on the top edges of the end and center rails is to make a template. To make the template, take a section of '/■> in. plywood or hardboard, 21/: in. wide by 18'A in. long, find the center point, and make a mark at the center point 2 in. up from the bottom edge. Tie a length of string to a pencil, find the string length that enables a true arc to be scribed touching this 2 in. point and both ends of the template at the top edge, then anchor the string end and scribe this arc. Cul along the scribed line, then use the template to transfer the seat curve profile to the end and center rails. When transferring the pattern to the center rail, locate the pattern on the rail so the tenon at the rail's front end is Vs in. inset from the pattern end. When transferring the pattern to the end rail, locate the pattern so the tenon at the front end is ls/i<> in. inset from the pattern end. B> doing this and keeping the template flush w ith the bottom edge of both the end and center rails, \ou ll assure a uniform curve on both the end and center rail parts. (Assuming of course that you've laid out all your mortises correctly, so that afier assembly the bottom edges of these parts will all be on the same plane.) This attention to achieving a uniform seat curve may seem tedious, but if you don't build the swing with respect to these parameters, you'll end up w iih a very wavy seal. Although the arm is about 10 in. up from the end rail, don't try to locate and establish this mortise just yet. l irst, dr\ assemble the front and back posts to the end rail. Then lay a straightedge across the top of the tenon shoulder on the front post and tick off a mark w here the straightedge contacts the back post. Measure tyi6 in. (the arm tenon shoulder dimension) up from this mark to locate the arm tenon mortise. Once your joints are all complete, the seat curves established, and the grooves for back slats have been established in the back and lop rails, you can thickness the ash stock for the seat and back slats (I, J. K). Alter the various slats have been cut to length and width. begin the assembly. The easiest assembly procedure is to first make several subassemblies, before putting the whole together. Make a pair of end assemblies, each consisting of a front The WihkIwniter's Joum.ii |
||||||||||||||||||||||||||||||||||||||||||||||||||||||||||||||||||||||||||||||||||||||||||||||||||||||||||||||||||||||||||||||||||||


