Woodworker's Journal 1993-17-6, страница 47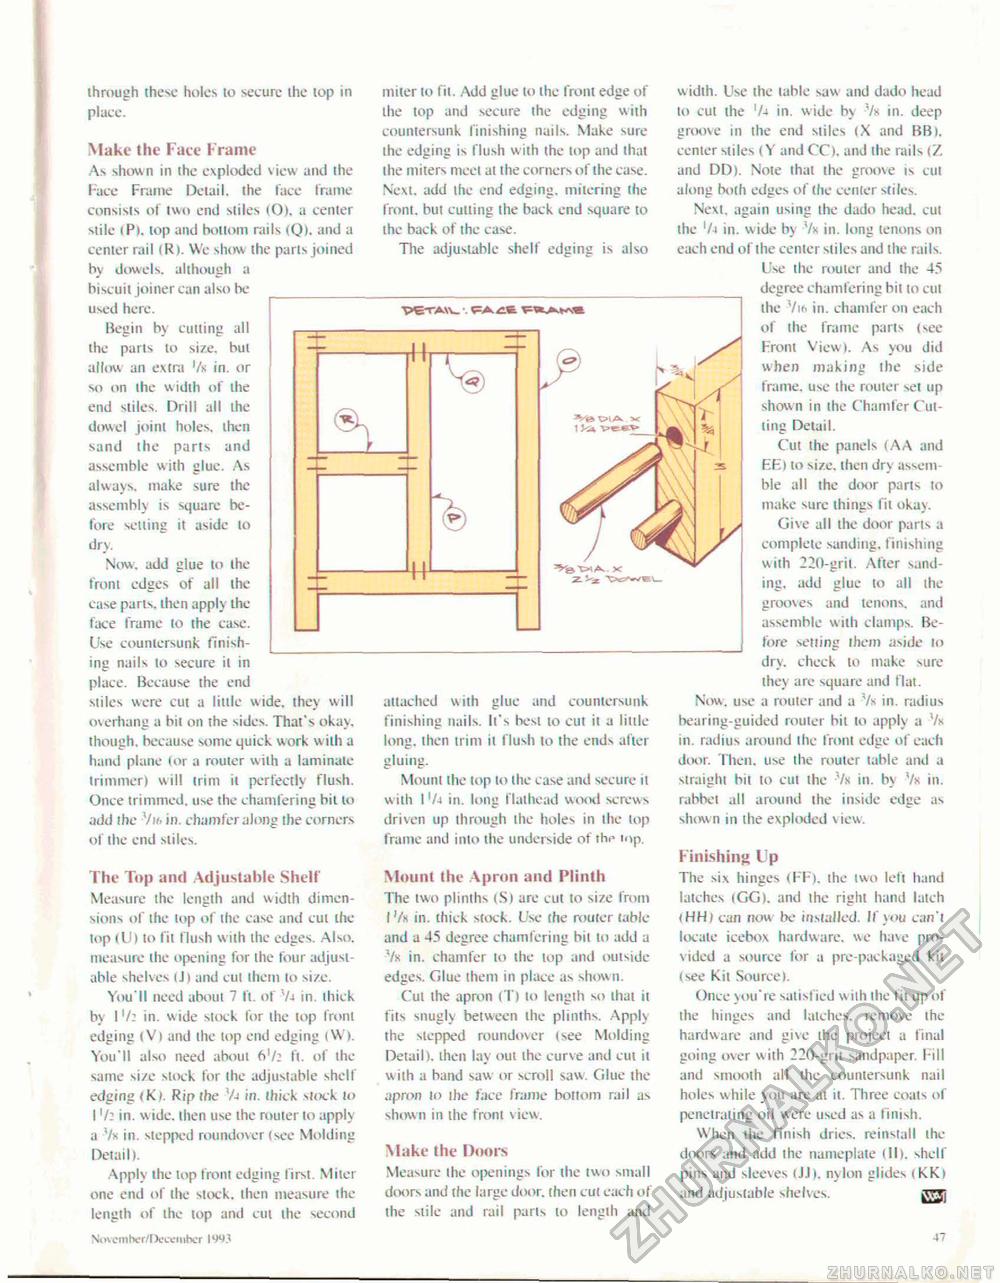
through these holes lo secure the lop in place. Make the Face Frame As shown in the exploded view and the Face Frame Detail, the face frame consists of two end stiles (O). a center stile < Pt. top and bottom rails (Q). and a center rail (R). We show the parts joined by dowels, although a biscuit joiner can also be used here. Begin by cutting all the parts to size, but allow an extra Vx in. or so 011 the width of the end stiles. Drill all ihe dowel joint holes, then sand the parts and assemble with glue. As always, make sure the assembly is square before setting it aside to dry. Now, add glue to the front edges of all the ease pans, then apply the face frame to the case. Use countersunk finishing nails lo secure it in place. Because the end stiles were cut a little wide, (hey will overhang a bil on the sides. That's okay, though, because some quick work wilh a hand plane tor a router with a laminate trimmer) will trim it perfectly flush. Once trimmed, use the chamfering bit lo add the Vm. in. chamfer along ihe corners of the end stiles. The Top and Adjustable Shelf Measure the length and width dimensions of the lop of the case and cul the top <U > to fit flush w ith the edges. Also, measure the opening for the four adjustable shelves ill and cul them lo size. You'll need about 7 ft. of V-t in thick by I'/: in. wide slock for the lop front edging (Vl and the top end edging (W). You'll also need about ft1/: ft. of ihe same size sttxk lor the adjustable shell' edging <IO. Rip the Vt in. thick stock to I'/: in. wide, then use the router to apply a Vx in. stepped mundovcr (see Molding Detail). Apply the top front edging lirst. Milcr one end of the slock, then measure the lengih of the lop and cut the second November/Dciciitbcr IW miter lo Fit. Add glue lo the front edge of the top and secure the edging with countersunk finishing nails. Make sure the edging is flush with (he lop and thai the miters meet al the corners of the case. Next, add the end edging, miiering the front, but cutting the back end square to the back of the case. The adjustable shelf edging is also attached with glue and countersunk finishing nails. It's best to cut ii a little long, then trim il flush to the ends after gluing. Mount the top to the case and secure il with 1 '/it in. long flalhead wood screws driven up through the holes in the lop frame and into the underside of the top. Mount the Apron and Plinth The two plinths (S) are cut to size from 1 j/r in. thick sttxk. Use (he router table and a 45 degree chamfering bil lo add a Vtt in. chamfer lo the lop and outside edges. Glue them in place as shown. Cul the apron (T) lo length so ihai it fits snugly between the plinths. Apply the stepped roundover (see Molding Detail), then lay out ihe curve and cut it with a band saw or scroll saw. Glue the apron lo ihe face frame bottom rail as shown in the front view. Make the Doors Measure ihe openings for the two small doors and the large door, then cul each of the stile and rail parts lo length and widlh. Use ihe table saw and dado head to cul ihe '/4 in. wide by Vx in. deep groove in the end stiles (X and BB>. center stiles (Y and CC). and the rails (Z and DD). Note that the groove is cul along both edges of (he center stiles. Next, again using the dado head, cut ihe 'At in. wide by Vx in. long tenons on each end of the center sliles and the rails. Use the router and the 45 degree chamfering bil to cut the Vi* in. chamfer on each of ihe frame parts (see Front View). As you did when making the side frame, use the rottier set up shown in the Chamfer Cutting Detail. Cut the panels (AA and EE I to size, then dry assemble all the door parts to make sure things fit okay. Give all the door parts a complete sanding, finishing with 220-gril. Afier sanding, add glue to all the grooves and tenons, and assemble with clamps. Before setting them aside lo dry. check lo make sure ihey are square and flat. Now, use a router and a Vx in, radius bearing-guided rouler bit to apply a Vx in. radius around the front edge of each door. Then, use the router table and a straight bil to cut the Vx in. by Vx in. rabbet all around the inside edge as shown in the exploded view. Finishing Up The six hinges (FF). the iwo left hand latches (GG). and the right hand latch (HH) can now be installed. If you can't locate icebox hardware, we have provided a source for a pre-packaged kit (see Kit Source). Once you're satisfied with the fit up of the hinges and latches, remove ihe hardware and give the project a final going over with 220-grii sandpaper. Fill and smooth all ihe countersunk nail holes while you are al it. Three coats of penetrating oil were used as a Finish. When the finish dries, reinstall the doors and add the namcpiate ill), shelf pins and sleeves (JJ), nylon glides < KK> and adjustable shelves. gffi 47 |


