Woodworker's Journal 1993-17-6, страница 44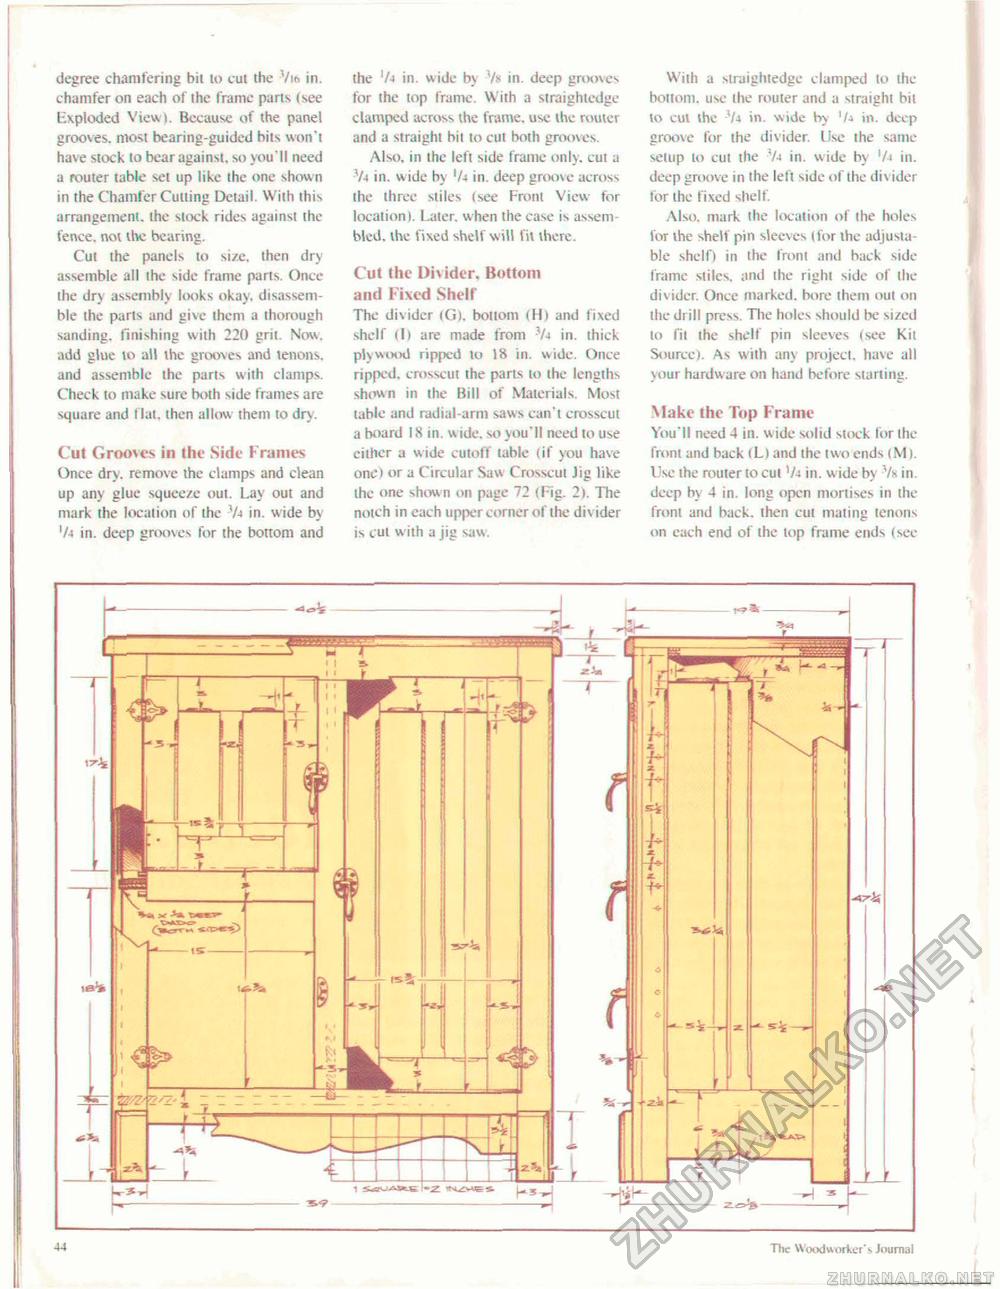
degree chamfering bit lo cut the Via in. chamfer on each of the frame parts (see Exploded View). Because of the panel grooves, most bearing-guided bits won't have stock to bear against, so you'll need a router table set up like the one shown in the Chamfer Cutting Detail. With this arrangement, the stock rides against the fence, not the bearing. Cut the panels to si/e, then dry assemble all the side frame parts. Once the dry assembly looks okay, disassemble the parts and give them a thorough sanding, finishing wiih 220 grit. Now. add glue to all the grooves and tenons, and assemble the parts with clamps. Check to make sure both side frames are square and flat, then allow them to dry. Cut Grooves in the Side Frames Once dry. remove the clamps and clean up any glue squeeze out. Lay out and mark the location of the Vj in. w ide by '/4 in. deep grooves for the bottom and the '/■> in. wide by Vs in. deep grooves for the top frame. With a straightedge clamped across the frame, use the router and a straight bit to cut both grooves. Also, in the left side frame only, cul a Vi in. wide by 'As in. deep groove across ihe three stiles (see Front View for location). Later, when the case is assembled. the fixed shelf will fit there. Cut the Divider, Bottom and Fixed Shelf The divider (G). bottom (lit and fixed shelf (I) are made from Vj in. thick plywood ripped to 18 in. wide. Once ripped, crosscut the parts lo the lengths shown in the Bill of Materials. Most table and radial-arm saws can't crosscut a board 18 in. w ide. so you'll need to use cither a wide cutoff table (if you have one*) or a Circular Saw Crosscut lig like the one shown on page 72 (Fig. 2). The notch in each upper corner of the divider is cut with a jig saw. With a straightedge clamped to the bottom, use the router and a straight bit to cul the Vi in. wide by '/a in. deep groove for the divider lise the same setup lo cul the Va in. wide by in. deep groove in ihe left side of the div ider for the fixed shelf. Also, mark the location of the holes for the shelf pin sleeves (for the adjusia-ble shelf) in the front and back side frame stiles, and the right side of the divider. Once marked, bore them out on the drill press. The holes should be sized to fit the shell pin sleeves (see Kit Source). As with any project, have all your hardware on hand before starting. Make the Top Frame You'll need 4 in. wide solid stock lor the front and back (L) and the two ends (M). Use the muter to cut in. w ide by Vh in. deep bv 4 in. long open mortises in the front and back, then cut mating tenons on each end of the lop frame ends (see 44 The Woodworker'- journal |


