Woodworker's Journal 1994-18-1, страница 51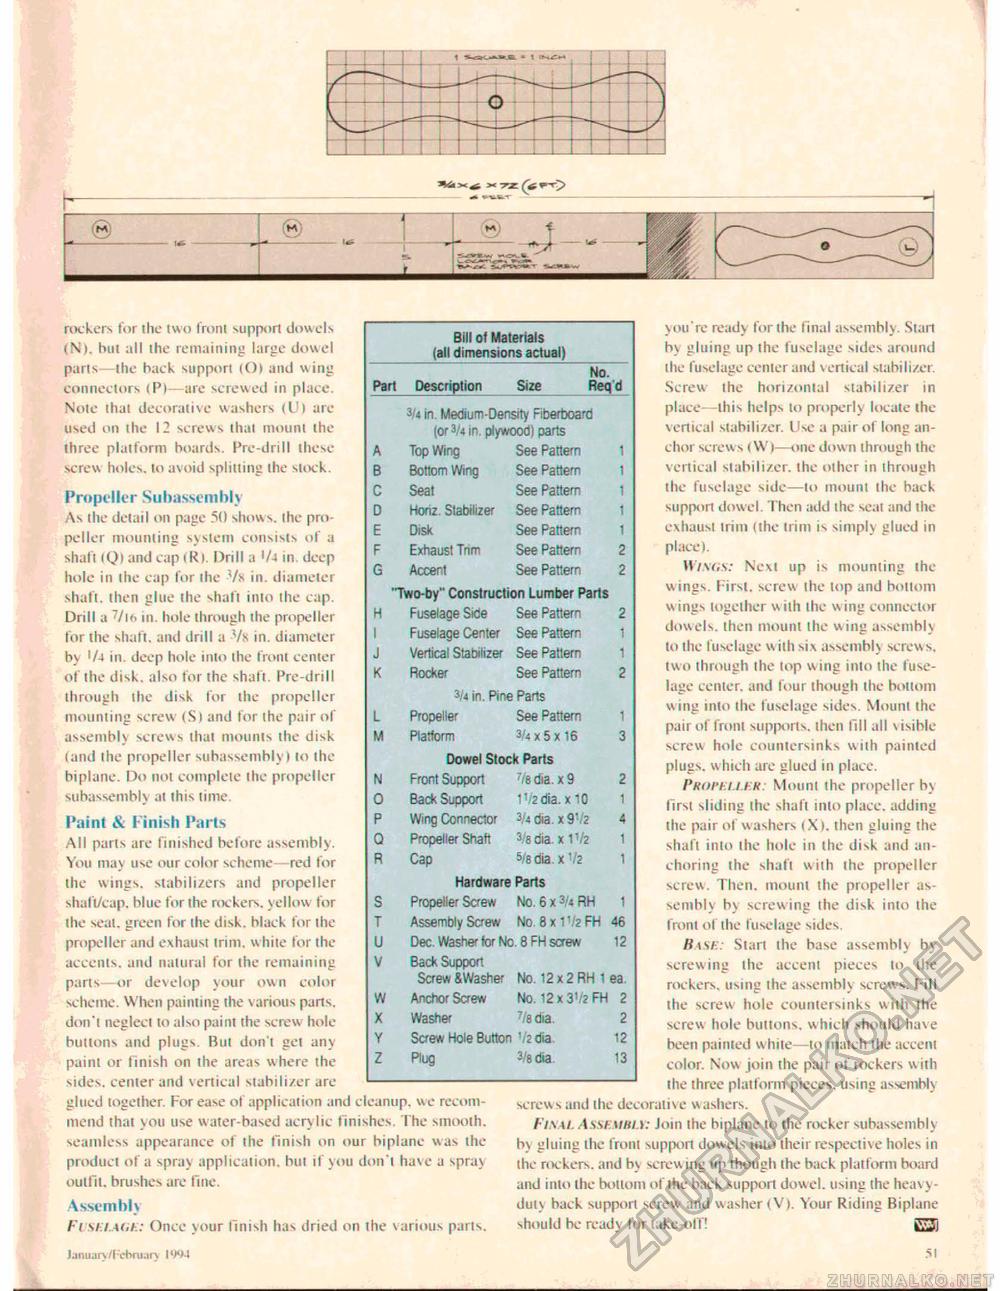
rockers for the two front support dowels (N). but all ihe remaining large dowel paris—the back support (O) and wing connectors (P)—are screwed in place. Note that decorative washers (U) are used on the 12 screws that mount the three platform boards. Pre-drill these screw holes, to avoid splitting the slock. Propeller Subassembly As ihe detail on page 50 shows, the propeller mounting syslem consists of a shaft (Q) and cap (Rl. Drill a >/4 in deep hole in the cap for the Vx in. diameter shall, then glue the shaft into the cap. Drill a 7/U' in. hole through the propeller for (he shall, and drill a -Vs in. diameter by '/-i in. deep hole into the front center of the disk, also for the shaft. Pre-drill through the disk for the propeller mounting screw- (Si and for ihe pair of assembly screws (hat mounts the disk (and the propeller subassembly) to the biplane. Do not complete the propeller subassembly at this time- Paint & Finish Parts All parts are finished before assembly. You may use our color scheme -red for the wings, stabilizers and propeller shaft/cap. blue for the rockers, yellow for the seal, green for the disk, black for ihe propeller and exhaust trim, white for the accents, and natural for the remaining parts—or develop your own color scheme. When painting the various pans, don't neglect to also paint the screw hole buttons and plugs But don't gel any paint or finish on the areas where the sides, center and vertical stabilizer are glued together. For ease of application and cleanup, we recommend thai you use w ater-based acry lic finishes. The smooth, seamless appearance of the finish on our biplane was the product of a spray application, but if you don't have a spray outfit, brushes are fine. Assembh
you re ready for the final assembly. Stan by gluing up the fuselage sides around the fuselage center and vertical stabilizer. Screw ihe horizontal stabilizer in place—this helps lo properly locate the vertical stabilizer. Use a pair of long anchor screws <W>—one down through the vertical siabilizer. the other in through the fuselage side—to mount ihe back support dowel. Then add the seat and the exhaust trim (the trim is simply glued in place). W7vr,v.* Next up is mounting ihe wings. First, screw the (op and bottom wings together with the wing connector dowels, then mount ihe w ing assembly to the fuselage with six assembly screws, two through the top wing into the fuselage center, and four though the bottom wing into the fuselage sides. Mount the pair of front supports, then fill all \ isible screw hole countersinks with painted plugs, w hich are glued in place. PROPhu.HR: Mount the propeller b\ first sliding the shall into place, adding the pair of washers (X). then gluing the shaft into the hole in the disk and anchoring the shafl with the propeller screw. Then, mount the propeller assembly by screwing the disk into the front of the fuselage sides. R\SE: Start the base assembly by screwing the accent pieces to the rockers, using the assembly screws. Fill the screw hole countersinks with the screw hole buttons, which should have been painted w hite—to match the accent color. Now join the pair of rockers with the three platform pieces, using assembly screws and the decorative washers. Fi\al Asshmhlv: Join the biplane to the rocker subassembly by gluing the front support dowels into their respective holes in (he rockers, and by screw ing up though the back platform board and into the bottom of the back support dowel, using the heavy-duty back support screw and washer (V). Your Riding Biplane Flshiaoh: Once your finish has dried on the various parts. should be ready for take-off! lanuaiv/Fcbruan IW 51 |
|||||||||||||||||||||||||||||||||||||||||||||||||||||||||||||||||||||||||||||||||||||||||||||||||||||||||||||||


