Woodworker's Journal 1994-18-2, страница 54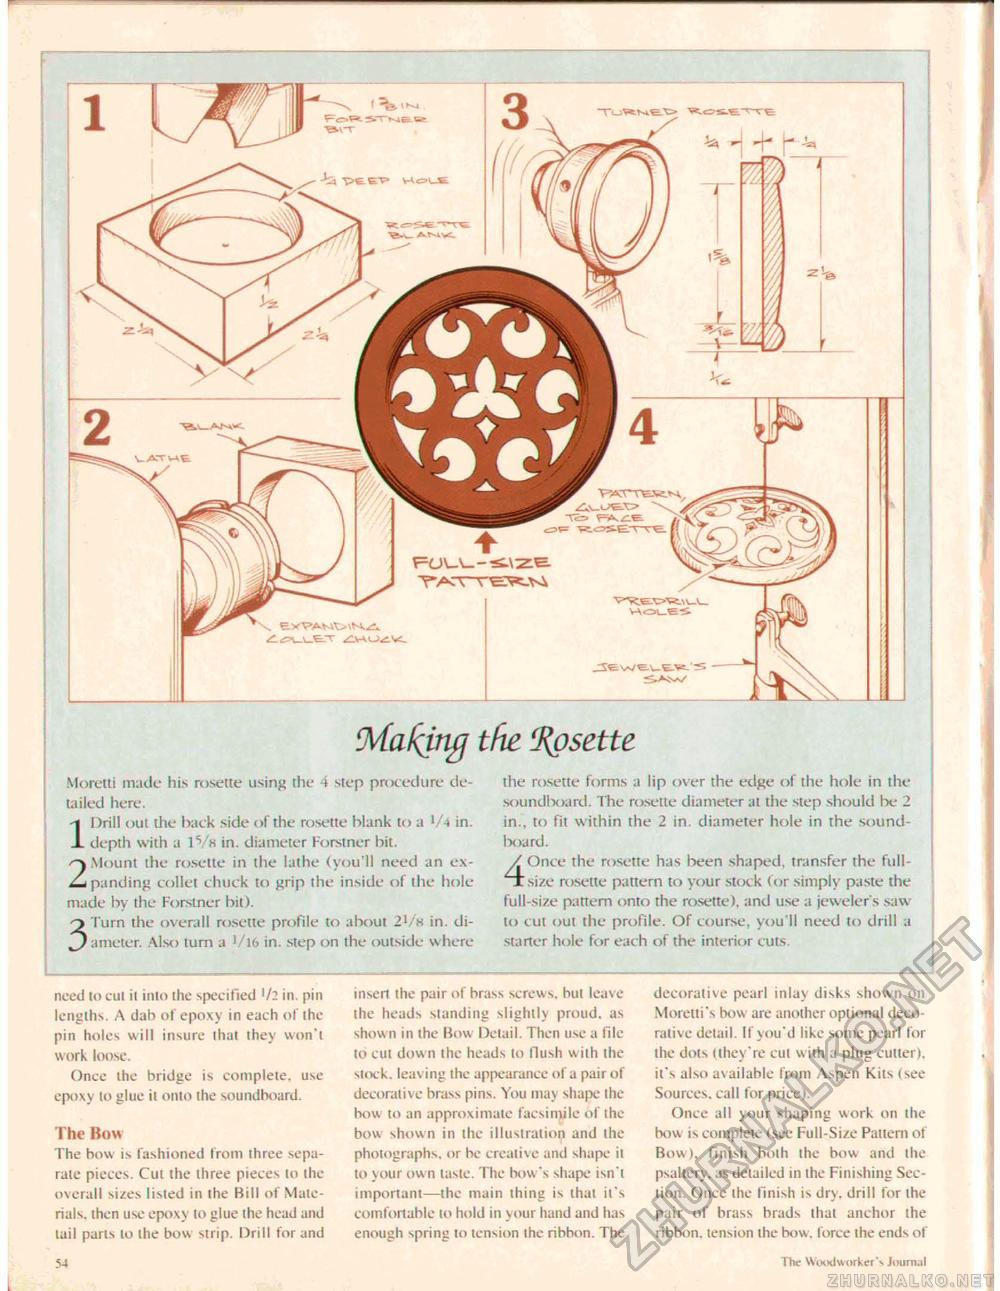
Matting tfie Rosette Moretti made his rosette using the 4 step procedure detailed here. 1 Drill out the hack side of the rosette blank to a V4 in. depth with a IV* in. diameter Forstner bit. 2 Mount the rosette in the lathe (yrou'll need an expanding collet chuck to grip the inside of the hole made by the Forstner bit). 3 Turn the overall rosette profile to about 2!/« in. diameter. Also turn a 1 16 in. step on the outside where the rosette forms a lip over the edge of the hole in the soundlvrard. The rosette diameter at the step should be 2 in., to fit within the 2 in. diameter hole in the soundboard. 4Once the rosette has been shaped, transfer the full-size rosette pattern to your stock < or simply paste the full-size pattern onto the rosette), and use a jeweler s saw to cut out the profile. Of course, you'll need to drill a starter hole for each of the interior cuts. need to cul it into ihe specified '/; in pin lengths. A dab of epoxy in each of the pin holes will insure that they won't work loose. Once the bridge is complete, use epoxy to glue it onto the soundboard. The Bow The bow is fashioned from ihree separate pieces. Cul the three pieces to the overall sizes listed in the Bill of Materials. then use epoxy to glue the head and tail parts to die bow strip. Drill for and insert the pair of brass screws, bui leave the heads standing slightly proud, as shown in the Bow Detail. Then use a file to cut dow n ihe heads to Hush with the stock, leaving the appearance of a pair of decorative brass pins. You may shape Ihe bow to an approximate facsimile of the bow shown in the illustration and the photographs, or be creative and shape it to your own taste. The bow 's shape isn't important—the main thing is that it's comfortable to hold in your hand and has enough spring to tension the ribbon. The decorative pearl inlay disks shown on Moretti's bow are another optional decorative detail. If you'd like some pearl for the dots (they're cul with a plug cutter), it's also available from Aspen Kits (see Sources, call for price). Once all your shaping work on the bow is complete (see Full-Size Pattern of Bow ), finish both ihe bow and the psaltery, as detailed in the Finishing Section. Once the finish is dry. drill for the pair of brass brads thai anchor the ribbon, lension ihe bow . force the ends of 5-t The WiH>d\uirker"\ Jitum.il |


