Woodworker's Journal 1994-18-5, страница 21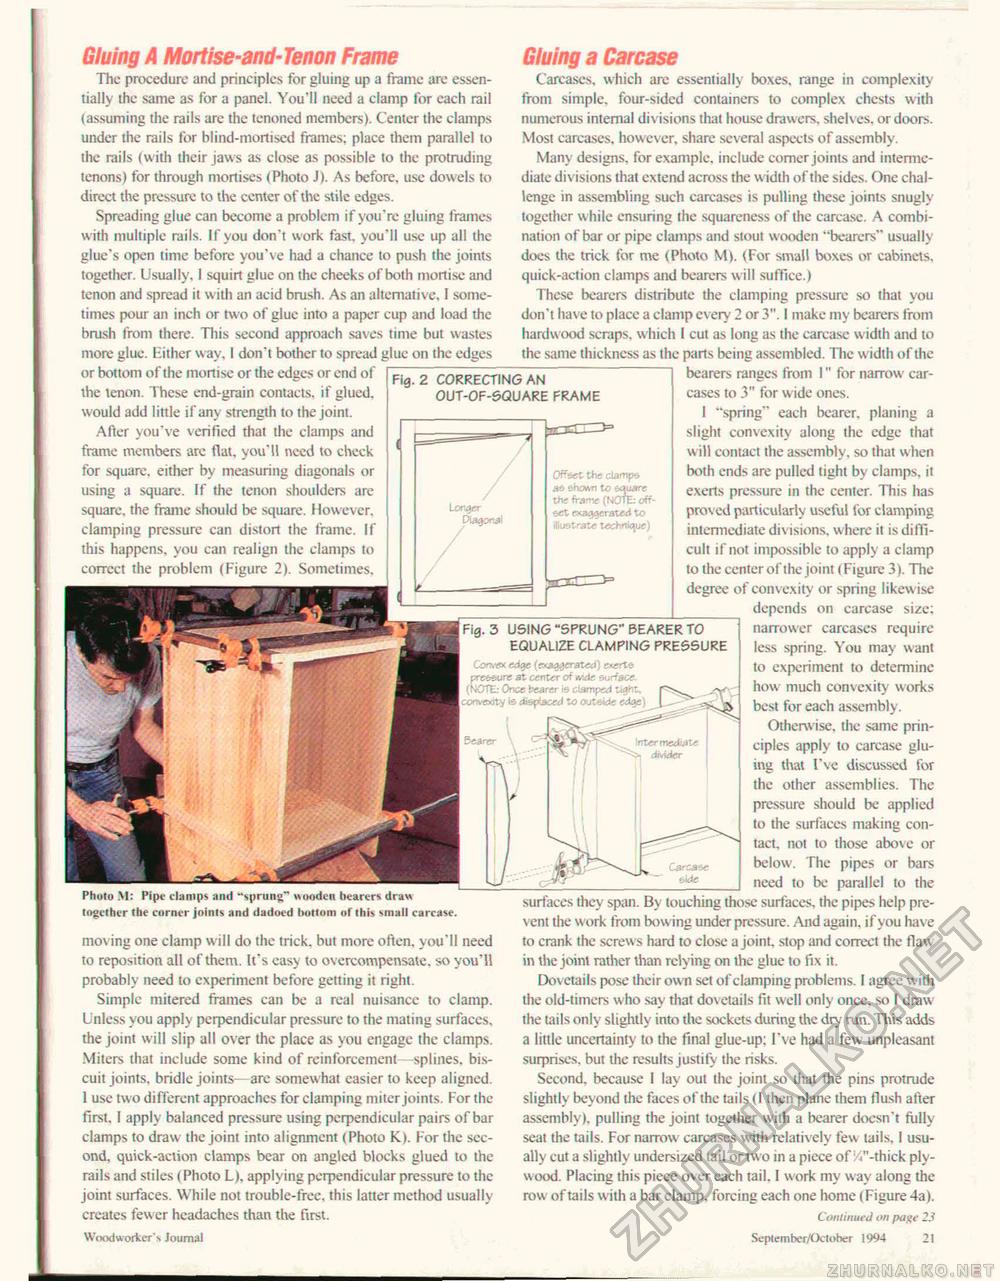
Gluing A Mortise-and-Tenon Frame The procedure and principles for gluing up a frame are essentially the same as for a panel. You'll need a clamp for cach rail (assuming the rails are the tenoned members). Center the clamps under the rails for blind-mortised frames: place them parallel to the rails (with their jaws as close as possible to the protruding tenons) for through mortises (Photo J). As before, use dowels to direct the pressure to the center of the stile edges. Spreading glue can become a problem if you're gluing frames with multiple rails. If you don't work fast, you'll use up all the glue's open time before you've had a chance to push the joints together. Usually. I squirt glue on the cheeks of both mortise and tenon and spread it with an acid brush. As an alternative, I sometimes pour an inch or two of glue into a paper cup and load the brush from there. This second approach saves time but wastes more glue. Hither way, I don't bother to spread glue on the edges or bottom of the mortise or the edges or end of the tenon. These end-grain contacts, if glued, would add little if any strength to the joint. After you've verified that the clamps and frame members arc flat, you'll need to check for square, either by measuring diagonals or using a square. If the tenon shoulders are square, the frame should be square. However, clamping pressure can distort the frame. If this happens, you can realign the clamps to correct the problem (Figure 2). Sometimes. Gluing a Carcase Fig. 2 CORRECTING AN OUT-OF-SQUARE FRAME Longer Piaqorjd Bearer m Photo M: Pipt' clamps and ^sprung" wooden bearers draw together the corner joints and dadoed bottom of this small carcase. moving one clamp will do the trick, but more often, you'll need to reposition all of them. It's easy to overcompensate. so you'll probably need to experiment before getting it right. Simple mitered frames can be a real nuisance to clamp. Unless you apply perpendicular pressure to the mating surfaces, the joint will slip all over the place as you engage the clamps. Miters that include some kind of reinforcement—splines, biscuit joints, bridle joints—arc somewhat easier to keep aligned. 1 use two different approaches for clamping miter joints. For the first. I apply balanced pressure using perpendicular pairs of bar clamps to draw the joint into alignment (Photo K). For the second, quick-action clamps bear on angled blocks glued to the rails and stiles (Photo L). applying perpendicular pressure to the joint surfaces. While not trouble-free, this latter method usually creates fewer headaches than the first. Woodworker's Journal Carcases, which are essentially boxes, range in complexity from simple, four-sided containers to complex chests with numerous internal divisions that house drawers, shelves, or doors. Most carcases, however, share several aspects of assembly. Many designs, for example, include comer joints and intermediate divisions that extend across the width of the sides. One challenge in assembling such carcases is pulling these joints snugly together w hile ensuring (he squareness of the carcase. A combination of bar or pipe clamps and stout wooden "bearers" usually does the trick for me (Photo M). (For small boxes or cabinets, quick-action clamps and bearers will suffice.) These bearers distribute the clamping pressure so that you don't have to place a clamp every 2 or 3". I make my bearers from hardwood scraps, which I cut as long as the carcase width and to the same thickness as the parts being assembled. The width of the bearers ranges from I" for narrow carcases to 3" for w ide ones. I "spring" each bearer, planing a slight convexity along the edge that w ill contact the assembly, so that when both ends are pulled tight by clamps, it exerts pressure in the center. This has proved particularly useful for clamping intermediate divisions, where it is difficult if not impossible to apply a clamp to the center of the joint (Figure 3 ). The degree of convexity or spring likewise _ depends on carcase size; narrower carcases require less spring. You may want to experiment to determine how much convexity works best for each assembly. Otherwise, the same principles apply to carcase gluing that I've discussed for the other assemblies. The pressure should be applied to the surfaces making contact, not to those above or below. The pipes or bars need to be parallel to the Offset the clampe as shown to square the frame (NOTE: offset exaggerated to illustrate technique) Fig. 3 USING "SPRUNG" BEARER TO EQUALIZE CLAMPING PRESSURE Convex edge (exaggerated) exerts pressure at center of wide surface. (NiOTE: Once bearer is damped tight, sy convexity is displaced to oul&de e-Aqp) ~ surfaces they span. By touching those surfaces, the pipes help prevent the work from bowing underpressure. And again, if you have to crank the screws hard to close a joint, stop and correct the flaw in the joint rather than relying on the glue to fix it. Dovetails pose their own set of clamping problems. I agree with the old-timers who say that dovetails fit well only once, so I draw the tails only slightly into the sockets during the dry run. This adds a little uncertainty to the final glue-up: I've had a few unpleasant surprises, but the results justify the risks. Second, because 1 lay out the joint so that the pins protrude slightly beyond the faces of the tails (I then plane them flush after assembly), pulling the joint together with a bearer doesn't frilly seat the tails. For narrow carcases with relatively few tails, I usually cut a slightly undersized tail or two in a piece of'//'-thick plywood. Placing this piece over each tail. I work my way along the row of tails with a bar clamp, forcing each one home (Figure 4a). Continued on page 23 September/October 1994 21 |


