Woodworker's Journal 1994-18-5, страница 18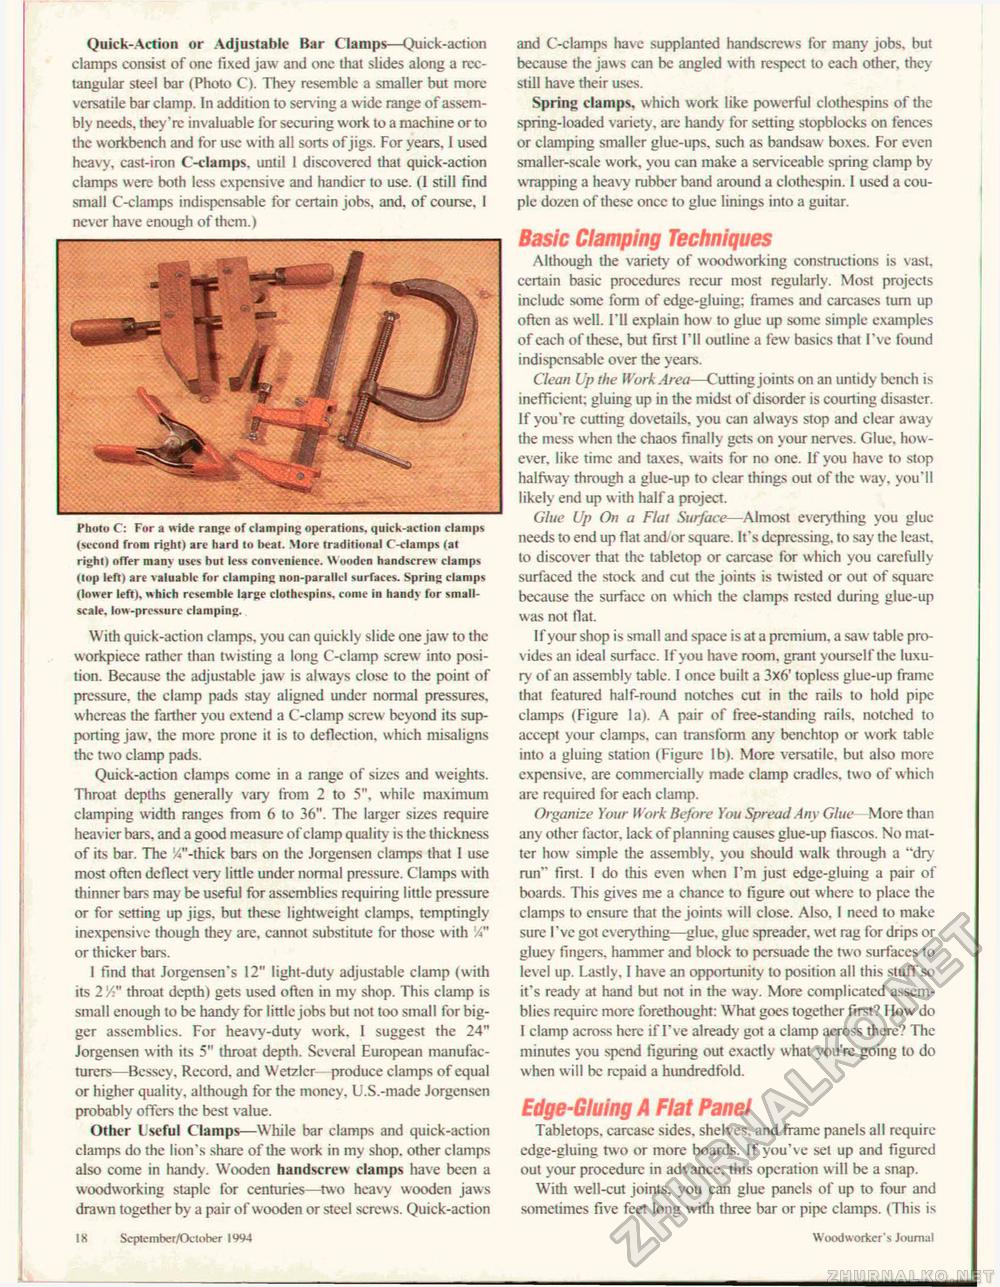
Quick-Action or Adjustable Bar Clamps—Quick-action clamps consist of one fixed jaw and one that slides along a rectangular steel bar (Photo C). They resemble a smaller but more v ersatile bar clamp. In addition to serving a wide range of assembly needs, they're invaluable for securing work to a machine or to the workbench and for use with all sorts of jigs. For years. 1 used heavy, cast-iron C-clamps. until 1 discovered that quick-action clamps were both less expensive and handier to use. (1 still find small C-clatnps indispensable for certain jobs. and. of course, I never have enough of them.) Photo C: For a wide range of clamping operations, quick-action clamps (second from right) are hard to beat. More traditional C-clamps (at right) ofTer many uses but less convenience. Wooden handserew clamps (lop left) are valuable for clamping non-parallel surfaces. Spring clamps (lower left), which resemble large clothespins, come in handy for small-scale. low-pressure clamping. With quick-action clamps, you can quickly slide one jaw- to the workpiece rather than twisting a long C-clamp screw into position. Because the adjustable jaw is always close to the point of pressure, the clamp pads stay aligned under normal pressures, whereas the farther you extend a C-clamp screw beyond its supporting jaw, the more prone it is to deflection, which misaligns die two clamp pads. Quick-action clamps come in a range of sizes and weights. Throat depdis generally vary from 2 to 5", while maximum clamping width ranges from 6 to 36". The larger sizes require heavier bars, and a good measure of clamp quality is the thickness of its bar. The i"-thick bars on the Jorgensen clamps that 1 use most often deflect very little under normal pressure. Clamps with thinner bars may be useful for assemblies requiring little pressure or for setting up jigs, but these lightweight clamps, temptingly inexpensive though they are. cannot substitute for those with A" or thicker bars. I find that Jorgensen's 12" light-duty adjustable clamp (with its 2/:" throat depth) gets used often in my shop. This clamp is small enough to be handy for little jobs but not too small for bigger assemblies. For heavy-duty work. I suggest the 24" Jorgensen with its 5" throat depth. Several European manufacturers—Bcsscy, Rccord. and Wetzlcr produce clamps of equal or higher quality, although for the money. U.S.-made Jorgensen probably offers the best value. Other Useful Clamps—While bar clamps and quick-action clamps do the lion's share of the work in my shop, other clamps also come in handy. Wooden handserew clamps have been a woodworking staple for centuries—two heavy wooden jaws drawn together by a pair of wooden or steel screws. Quick-action and C-clamps have supplanted handscrcws for many jobs, but because the jaws can be angled with respect to each other, they still have their uses. Spring clamps, which work like powerful clothespins of the spring-loaded variety, are handy for setting stopblocks on fences or clamping smaller gluc-ups, such as handsaw boxes. For even smaller-scale work, you can make a serviceable spring clamp by wrapping a heavy rubber band around a clothespin. 1 used a couple dozen of these once to glue linings into a guitar. Basic Clamping Techniques Although the variety of woodworking constructions is vast, ccrtain basic procedures recur most regularly. Most projects include some form of edge-gluing; frames and carcases turn up often as well. I'll explain how to glue up some simple examples of each of these, but first I'll outline a few basics that I've found indispensable over the years. Clean Up the Work Area—Cutting joints on an untidy bench is inefficient; gluing up in the midst of disorder is courting disaster. If you're cutting dovetails, you can always stop and clear away the mess when the chaos finally gets on your nerves. Glue, however. like time and taxes, waits for no one. If you have to stop halfway through a glue-up to clear things out of the way, you'll likely end up with half a project. Glue Up On a Flat Surface—Almost everything you glue needs to end up flat and or square. It's depressing, to say die least, to discover that the tabletop or carcase for which you carefully surfaced the stock and cut the joints is tw isted or out of square because the surfacc on which the clamps rested during glue-up was not flat. If your shop is small and space is at a premium, a saw table provides an ideal surfacc. If you have room, grant yourself the luxury of an assembly table. I once built a 3x6' topless glue-up frame that featured half-round notches cut in the rails to hold pipe clamps (Figure la). A pair of free-standing rails, notched to accept your clamps, can transform any benchtop or work table into a gluing station (Figure lb). More versatile, but also more expensive, are commercially made clamp cradles, two of which are required for each clamp. Organize Your Work Before You Spread Any Glue More than any other factor, lack of planning causes glue-up fiascos. No matter how simple the assembly, you should walk through a "dry run" first. I do this even when I'm just edge-gluing a pair of boards. This gives me a chancc to figure out where to place the clamps to ensure that the joints will close. Also. I need to make sure I've got everything—glue, glue spreader, wet rag for drips or gluey fingers, hammer and block to persuade the two surfaces to level up. Lastly, I have an opportunity to position all this stuff so it's ready at hand but not in the way. More complicated assemblies require more forethought: What goes together first? How do I clamp across here if I've already got a clamp across there? The minutes you spend figuring out exactly w hat you're going to do when will be repaid a hundredfold. Edge-Gluing A Flat Panel Tabletops, carcase sides, shelves, and frame panels all require edge-gluing two or more boards. If you've set up and figured out your procedure in advance, this operation w ill be a snap. With well-cut joints, you can glue panels of up to four and sometimes five feet long with three bar or pipe clamps. (This is IX September/October IW4 Woodworker s Journal |


