Woodworker's Journal 1994-18-5, страница 33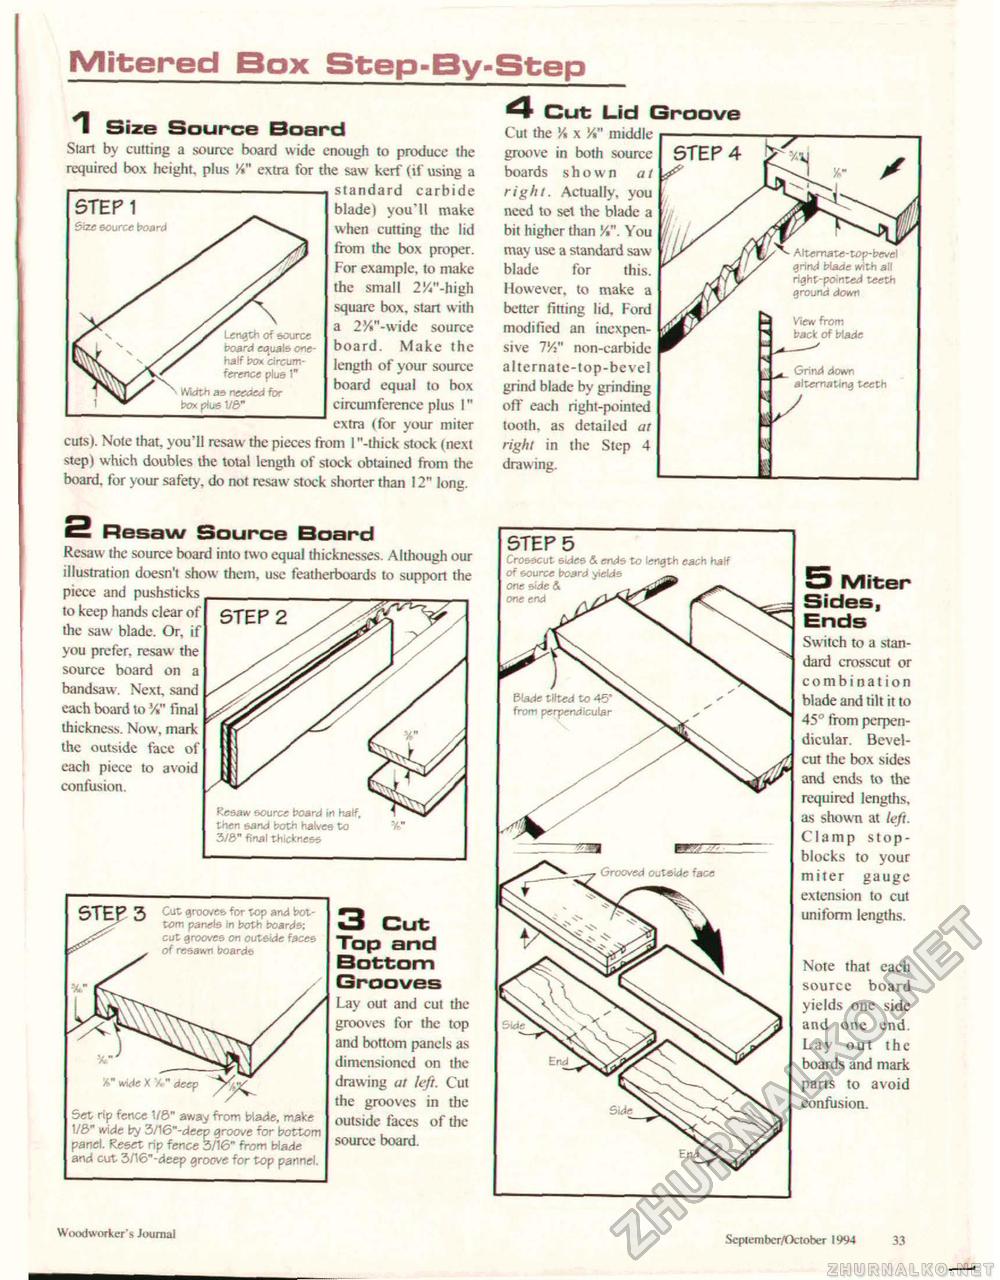
Mitered Box Step-By-Step 1 Size Source Board Start by cutting a source board wide enough to produce the required box height, plus 'A" extra for the saw kerf (if using a standard carbide
blade) you'll make when cutting the lid from the box proper. For example, to make the small 2^"-htgh square box, start with a 2%"-wide source board. Make the length of your source board equal to box circumference plus ]" extra (for your miter cuts). Note that, you'll resaw the pieces from l "-thick stock (next step) which doubles the total length of stock obtained from the board, for your safety, do not resaw stock shorter than 12" long. 4 Cut Lid Groove Cut the V, x Vt" middle groove in berth source boards shown at right. Actually, you need to set the blade a bit higher than /.", You may use a standard saw blade for this. However, to make a better fitting lid. Ford modified an inexpensive IV" non-carbide alternate-top-bevel grind blade by grinding off each right-pointed tooth, as detailed at right in the Step 4 drawing. 5 Miter Sides, Ends Switch to a standard crosscut or combination blade and tilt it to 45° from perpendicular. Bevel-cut the box sides and ends to the required lengths, as shown at left. Clamp stop-blocks to your miter gauge extension to cut uniform lengths. Note that each source board yields one side and one end. Lay out the boards and mark parts to avoid confusion. Kesaw source board in half, then sand both halves to V 3/6" final thickness & Resaw Source Board Resaw the source board into two equal thicknesses. Although our illustration doesn't show them, use featherboards to support the piece and pushsticks to keep hands clear of the saw blade. Or, if you prefer, resaw the source board on a bandsaw. Next, sand each board to %" final thickness. Now, mark the outside face of each piece to avoid confusion.
3 cut Top and Bottom Grooves Lay out and cut the grooves for the top and bottom panels as dimensioned on the drawing at left. Cut the grooves in the outside faces of the source board. STEP 5 Crosscut Sides & ends to length each half of source board yields one side 4 one end Blade tilted to 45* from perpendicular Woodworker's Journal Scpiember/Oclober 1994 33 |
|||||||||||||||||||||


