Woodworker's Journal 1994-18-5, страница 34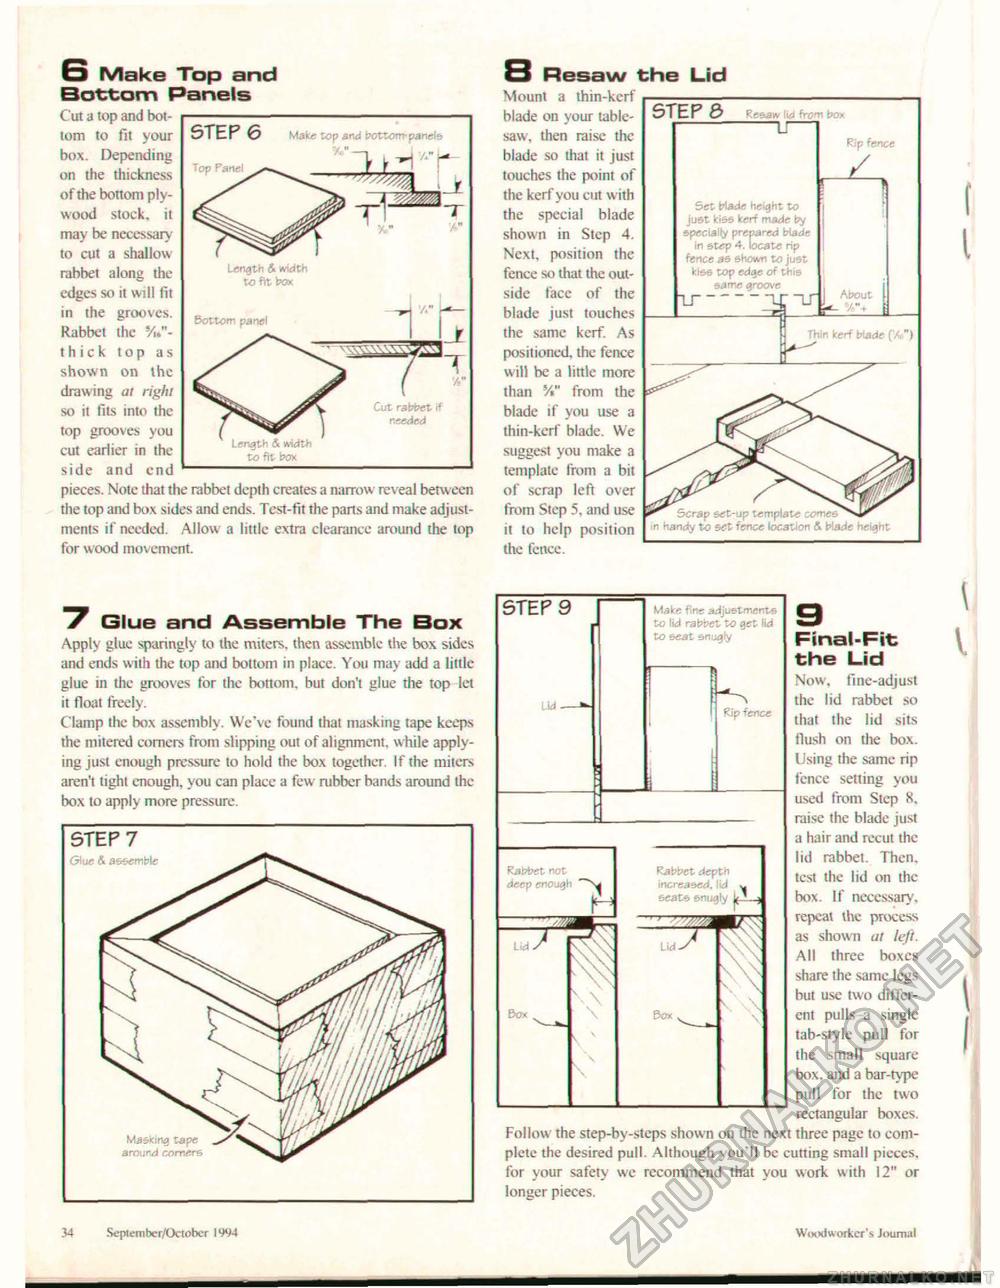
6 Make Top and Bottom Panels Cut a top and bottom to fit your box. Depending on the thickness of the bottom plywood stock, it may be necessary to cut a shallow rabbet along the edges so it will fit in the grooves. Rabbet the */■„"-thick top as shown on the drawing at right so it fits into the top grooves you cut earlier in the side and end pieces. Note that the rabbet depth creates a narrow reveal between the top and box sides and ends. Test-fit the pans and make adjustments if needed. Allow a little extra clearance around the top for wood movement. 7 Glue and Assemble The Box Apply glue sparingly to the miters, then assemble the box sides and ends with the top and bottom in place. You may add a little glue in the grooves for the bottom, but don't glue the top let it float freely. Clamp the box assembly. We've found that masking tape keeps the mitered comers from slipping out of alignment, while applying just enough pressure to hold the box together. If the miters aren't tight enough, you can placc a few rubber bands around the box to apply more pressure. 8 Resaw the Lid Mounl a thin-kerf blade on your table-saw, then raise the blade so that it just touches the point of the kerf you cut w ith the special blade shown in Step 4. Next, position the fence so that the outside facc of the blade just touches the same kerf. As positioned, the fence will be a little more than !/i" from the blade if you use a thin-kerf blade. We suggest you make a template from a bit of scrap left over from Step 5, and use it to help position the fence. 9 Final-Fit the Lid Now, fine-adjust the lid rabbet so that the lid sits flush on the box. Using the same rip fence setting you used from Step 8. raise the blade just a hair and recut the lid rabbet. Then, test the lid on the box. If necessary, repeat the process as shown at left. All three boxes share the same legs but use two different pulls a single tab-style pull for the small square box, and a bar-type pull for the two rectangular boxes. Follow the step-by-steps shown on the next three page to complete the desired pull. Although you'll be cutting small pieces, for your safety wc recommend that you work with 12" or longer pieces. STEP 6 Make top and bottom-panels Top Panel Length & width to fit bo* Ucltom panel length & width to fit box ... Cut rabbet if needed STEP 6 Resaw lid from box -LT~ Set bfade height to just kiss kerf made by specially prepared blade in step 4. locate rip fence as shown to just kise top edge of tiiis same groove ru-----or ir Rip fence / Scrap set-up template con in handy to 5£t fence location & blade height 34 September/October IW4 Woodworker's Journal |


