Woodworker's Journal 1994-18-5, страница 60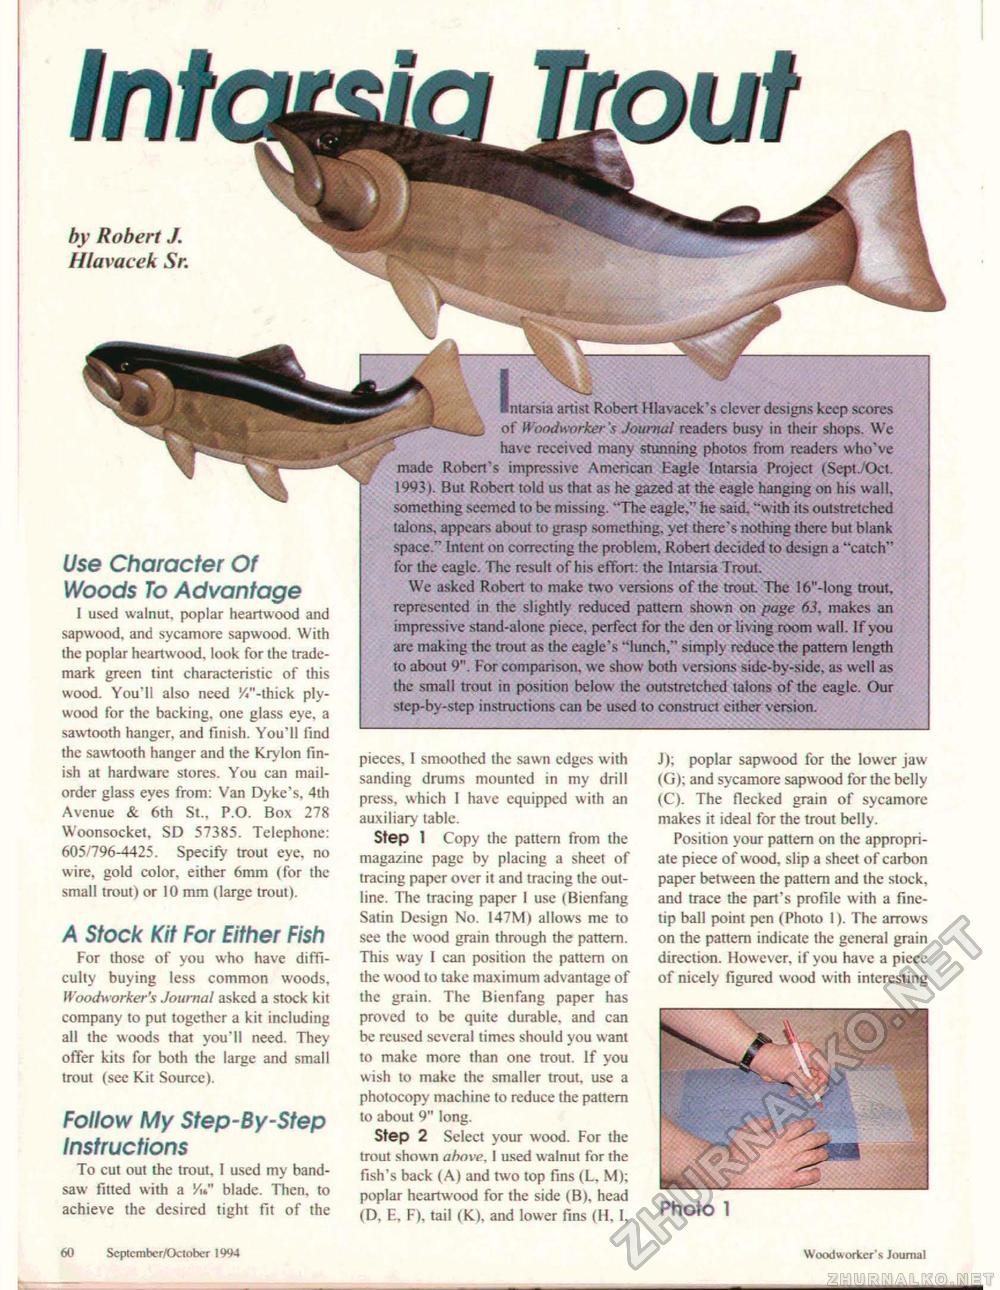
by Robert J. Hlavacek Sr. Use Character Of Woods To Advantage I used walnut, poplar heartwood and sap wood, and sycamore sapwood. With the poplar heartwood, took for the trademark green tint characteristic of this wood. You'll also need !4"-thick plywood for the backing, one glass eye, a sawtooth hanger, and finish. You'll find the sawtooth hanger and the Krylon finish at hardware stores. You can mailorder glass eyes from: Van Dyke's, 4th Avenue & 6th St.. P.O. Box 278 Woonsocket, SD 57385. Telephone: 605/796-4425. Specify trout eye. no wire, gold color, either 6mm (for the small trout) or 10 mm (large trout). A Stock Kit For Either Fish For those of you who have difficulty buying less common woods, Woodworker's Journal asked a stock kit company to put together a kit including all the woods that you'll need. They offer kits for both the large and small trout (see Kit Source). Follow My Step-By-Step Instructions To cut out the trout, I used my band-saw fitted with a W blade. Then, to achieve the desired tight fit of the Intarsia artist Robert Hlavacek's clever designs keep scores of Woodworker's Journal readers busy in their shops. We have rcccried many stunning photos from readers who've made Robert's impressive American Eagle Intarsia Project (Sept 'Oct. 1993). But Robert told us that as he gazed at the eagle hanging on his wall, something seemed to be missing. "The eagle," he said, "with its outstretched talons, appear; about to grasp something, ye( there's nothing there but blank space." Intent on correcting the problem, Robert decided to design a "catch" for the eagle. The result of his effort: the Intarsia Trout. We asked Robert to make two versions of the trout. The l6"-long trout, represented in the slightly reduced pattern shown on page 63, makes an impressive stand-alone piece, perfect for the den or living room wall. If you are making the trout as the eagle's "lunch," simply reduce the pattern length to about 9". For comparison, we show both v ersions side-by-stde, as well as the small trout in position below the outstretched talons of the eagle. Our step-by-step instructions can be used to construct cither version. pieces, I smoothed the sawn edges with sanding drums mounted in my drill press, which I have equipped with an auxiliary tabic. Step 1 Copy the pattern from the magazine page by placing a sheet of tracing paper over it and tracing the outline. The tracing paper ! use (Bienfang Satin Design No. I47M) allows me to see the wood grain through the pattern. This way I can position the pattern on the v.ood to take maximum advantage of the grain. The Bienfang paper has proved to be quite durable, and can be reused several times should you want to make more than one trout If you wish to make the smaller trout, use a photocopy machine to reduce the pattern to about 9" long. Step 2 Select your wood. For the trout shown above, I used walnut for the fish's back (A) and two top fins (L. M); poplar heartwood for the side (B), head (D, E. F), tail (K). and lower fins (H. I, J); poplar sapwood for the lower jaw (G): and sycamore sapwood for the belly (C). The flecked grain of sycamore makes it ideal for the trout belly. Position your pattern on the appropriate piece of wood, slip a sheet of carbon paper between the pattern and the stock, and trace the part's profile with a fine-tip ball point pen (Photo 1). The arrows on the pattern indicate the general grain direction. However, if you have a piece of nicely figured wood with interesting Photo 1 60 Scptcmbcr/October IW4 Woodworker's Journal |


