Woodworker's Journal 1994-18-5, страница 61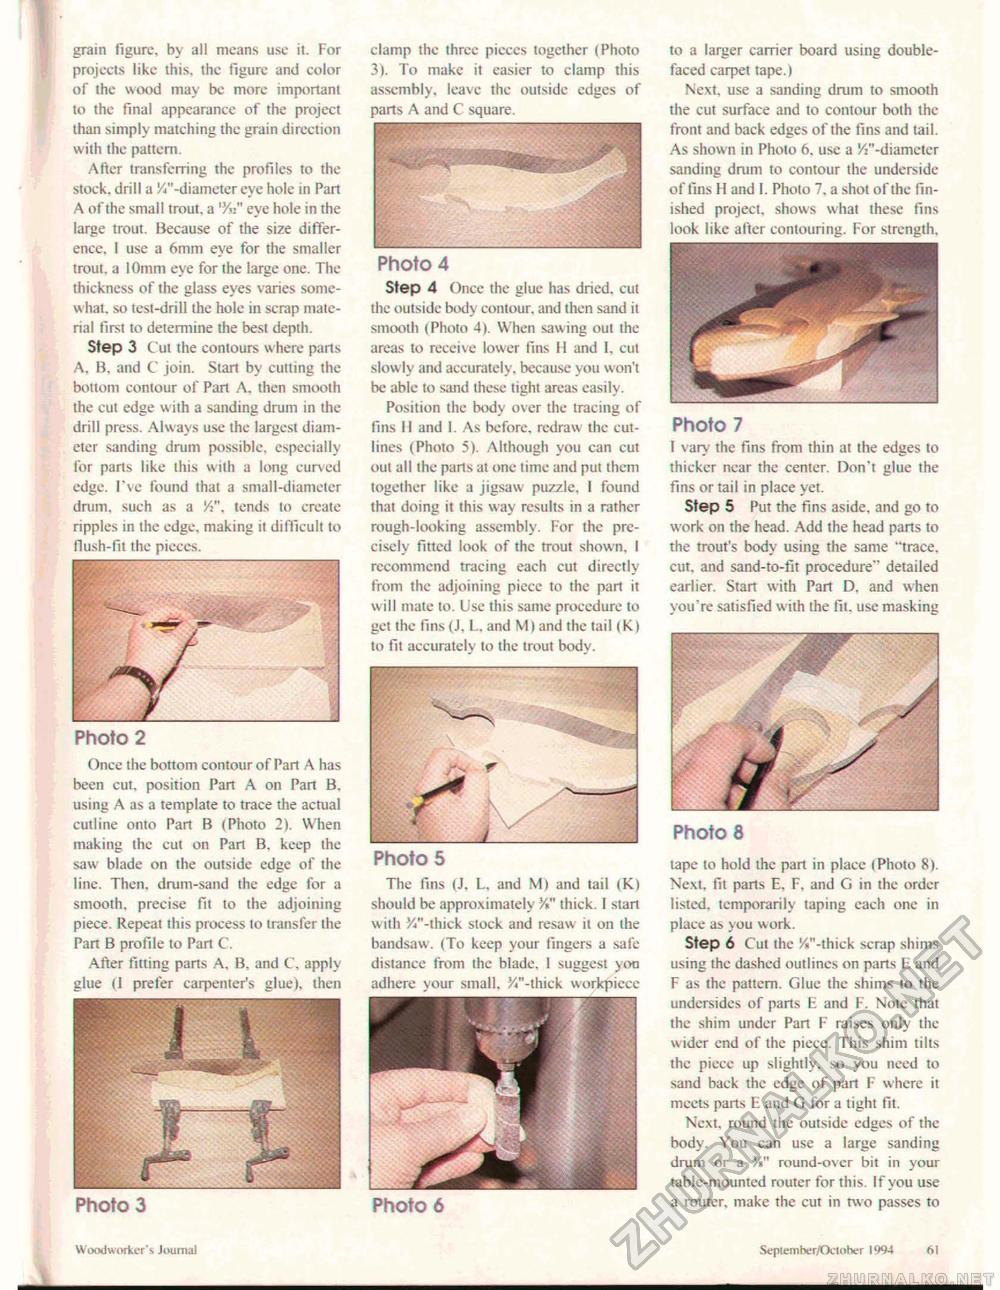
grain figure, by a!! means use it. For projects like this, the figure and color of the wood may be more important to the final appearance of the project than simply matching the grain direction with the pattern. After transferring the profiles to the stock, drill a //'-diameter eye hole in Part A of the small trout, a '/»" eye hole in the large trout. Because of the size difference, I use a 6mm eye for the smaller trout, a 10mm eye for the large one. The thickness of the glass eyes varies somewhat, so test-drill the hole in scrap material first to determine the best depth. Step 3 Cut the contours where parts A, B, and C join. Start by cutting the bottom contour of Part A. then smooth the cut edge with a sanding drum in the drill press. Always use the largest diameter sanding drum possible, especially for parts like this with a long curved edge. I've found that a small-diameter drum, such as a 'A", lends to create ripples in the edge, making it difficult to flush-fit the pieces. Photo 2 Once the bottom contour of Part A has been cut. position Part A on Part B. using A as a template to trace the actual cutline onto Part B (Photo 2). When making the cut on Part B. keep the saw blade on the outside edge of the line. Then, drum-sand the edge for a smooth, precise fit to the adjoining piece. Repeat this process to transfer the Part B profile to Part C. After fitting parts A, B, and C. apply glue (J prefer carpenter's glue), then I- Photo 3 clamp the three pieces together (Photo 3). To make it easier to clamp this assembly, leave the outside edges of parts A and C square. Photo 4 Step 4 Once the glue has dried, cut the outside body contour, and then sand it smooth (Photo 4). When sawing out the areas to receive lower fins H and I. cut slowly and accurately, because you won't be able to sand these tight areas easily. Position the body over the tracing of fins II and 1. As before, redraw the cut-lines (Photo 5). Although you can cut out all the parts at one time and put them together like a jigsaw puzzle, 1 found that doing it this way results in a rather rough-looking assembly. For the precisely fitted look of the trout shown, I rccommcnd tracing each cut directly from the adjoining piece to the part it will mate to. Use this same procedure to get the fins {J, L, and M > and the tail (K) to fit accurately to the trout body. The fins (J, L. and M> and tail (K) should be approximately //* thick. I start with %"-thick stock and res a v. it on the bandsaw. (To keep your lingers a safe distance from the blade. I suggest y ou adhere your small, //'-thick workpiece Photo 6 to a larger carrier board using double-faced carpet tape.) Next, use a sanding drum to smooth the cut surface and to contour both the front and back edges of the fins and tail. As shown in Photo 6. use a //'-diameter sanding drum to contour the underside of fins H and I. Photo 7. a shot of the finished project, shows what these fins look like alter contouring. For strength. Photo 7 I vary the fins from thin at the edges to thicker near the center. Don't glue the fins or tail in place yet. Step 5 Put the fins aside, and go to work on the head. Add the head parts to the trout's body using the same "trace, cut. and sand-to-fit procedure" detailed earlier. Start with Part D, and when you're satisfied with the fit. use masking Photo 8 tape to hold the part in place (Photo 8). Next, fit parts E. F. and G in the order listed, temporarily taping each one in place as you work. Step 6 Cut the '/."-thick scrap shims using the dashed outlines on parts E and F as the pattern. Glue the shims to the undersides of parts E and F. Note that the shim under Part F raises only the wider end of the piece. This shim tilts the piece up slightly, so you need to sand back the edge of part F where it meets parts E and G for a tight fit. Next, round the outside edges of the body. You can use a large sanding drum or a 'A" round-over bit in your table-mounted router for this. If you use a router, make the cut in two passes to Woodworker'*. Journal Soptem her/October 1994 fit |


