Woodworker's Journal 1994-18-6, страница 65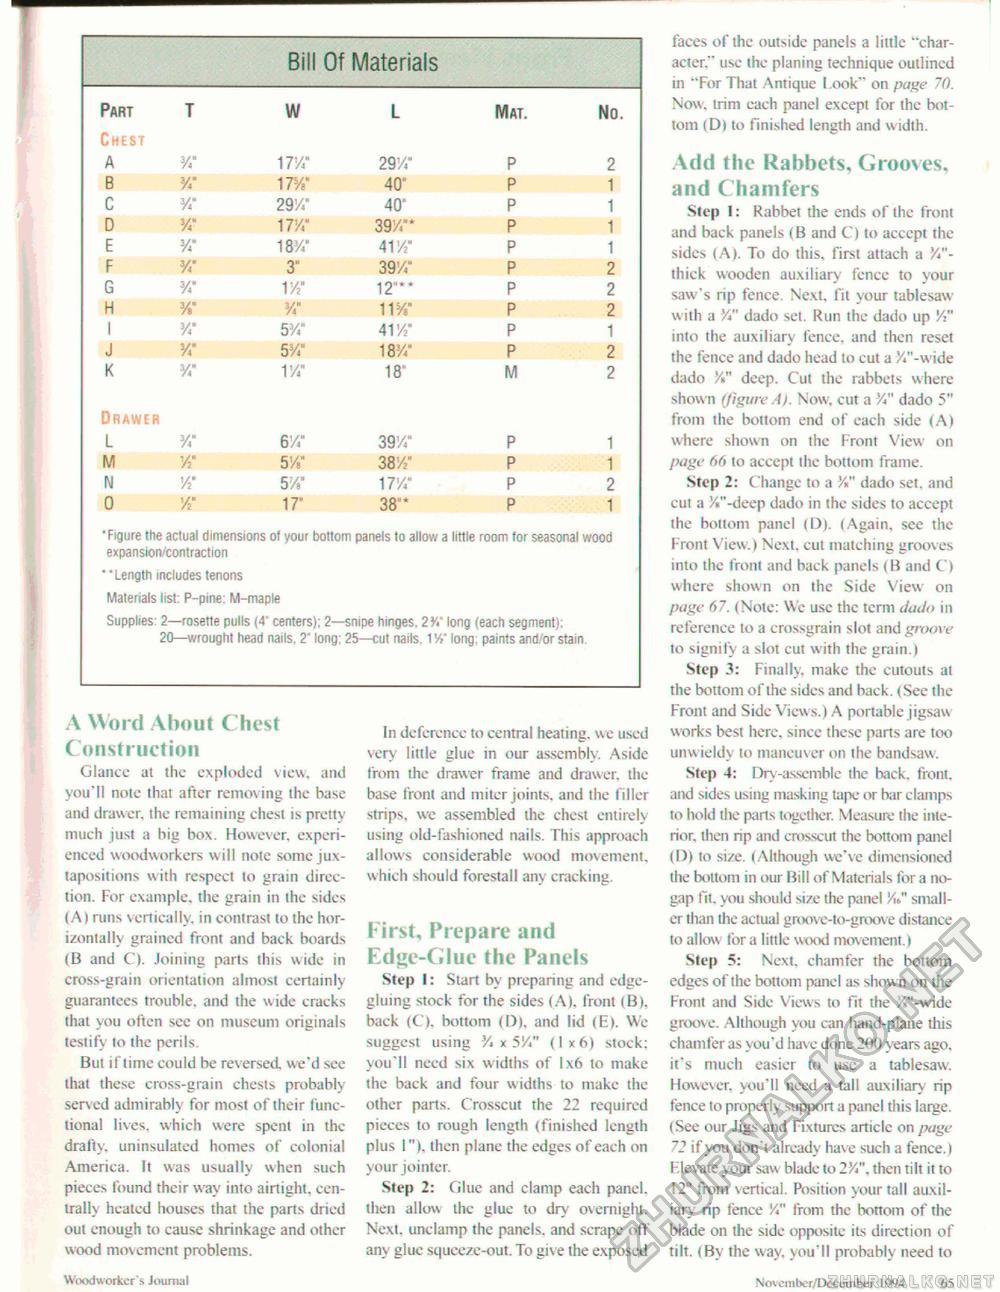
A Word About Chest Construction Glance at the exploded view, and you'll note that after removing the base and drawer, the remaining chest is pretty much just a big box. However, experienced woodworkers will note some juxtapositions with respect to grain direction. For example, the grain in the sides (A) runs vertically, in contrast to the horizontally grained front and back boards (B and C). Joining parts this wide in cross-grain orientation almost certainly guarantees trouble, and the wide cracks that you often sec on museum originals testify to the perils. But if time could be rev ersed, we'd see that these cross-grain chests probably served admirably for most of their functional lives, which were spent in the drafty, uninsulated homes of colonial America. It was usually when such pieces found their way into airtight, centrally heated houses that the parts dried out enough to cause shrinkage and other wood movement problems. Woodworker s Journal In defcrcnec to central heating, we used very little glue in our assembly. Aside from the drawer frame and drawer, the base front and miter joints, and the filler strips, we assembled the chest entirely using old-fashioned nails. This approach allows considerable wood movement, which should forestall any cracking. First, Prepare and Edge-Glue the Panels Step I: Start by preparing and edge-gluing stock for the sides (A), front (B), back (C), bottom (D), and lid (E>. We suggest using 3A x 5'A" (1x6) stock: you'll need six widths of 1x6 to make the back and four widths to make the other parts. Crosscut the 22 required pieces to rough length (finished length plus 1"), then plane the edges of each on your jointer. Step 2: Glue and clamp each panel, then allow the glue to dry overnight. Next, unclamp the panels, and scrape off any glue squeeze-out. To give the exposed faces of the outside panels a little "character." use the planing technique outlined in "For That Antique l ook" on page 70. Now. trim each panel except for the bottom (D) to finished length and width. Add the Rabbets, Grooves, and Chamfers Slep I: Rabbet the ends of the front and back panels (B and C) to accept the sides (A). To do this, first attach a V"-thick wooden auxiliary fence to your saw's rip fence. Next, fit your tablesaw with a Vi" dado set. Run the dado up 'A" into the auxiliary fence, and then reset the fence and dado head to cut a %"-wide dado Y»" deep. Cut the rabbets where shown (figure A). Now, cut a 'A" dado 5" from the bottom end of each side (A) where shown on the Front View- on page 66 to accept the bottom frame. Step 2: Change to a dado set. and cut a y*"-deep dado in the sides to accept the bottom panel (D). (Again, see the Front View.) Next, cut matching grooves into the front and back panels < B and C) where shown on the Side View on page 67. (Note: We use the term dado in reference to a crossgrain slot and groove to signify a slot cut with the grain.) Step 3: Finally, make the cutouts at the bottom of the sides and back. (See the Front and Side Views.) A portable jigsaw works best here, since these parts are too unwieldy to maneuver on the handsaw. Step 4: Dry-assemble the back, front, and sides using masking tape or bar clamps to hold the parts together. Measure the interior. then np and crosscut the bottom panel (D) to size. (Although we've dimensioned the bottom in our Bill of Materials for a no-gap fit. you should size the panel V\" smaller than the actual groove-to-groove distance to allow for a little wood movement.) Step 5: Next, chamfer the bottom edges of the bottom panel as shown on the Front and Side Views to fit the /."-wide groove. Although you can hand-plane this chamfer as you'd have done 200 years ago. it's much easier to use a tablesaw. However, you'll need a tall auxiliary rip fence to properly support a panel this large. (See our Jigs and Fixtures article on page 72 if you don't already have such a fence.) Elevate your saw blade to 2'A", then tilt it to 12° from vertical. Position your tall auxiliary rip fence V" from the bottom of the blade on the side opposite its direction of tilt. (By the way, you'll probably need to Novcmber/Deeember 1994 65 |
||||||||||||||||||||||||||||||||||||||||||||||||||||||||||||||||||||||||||||||||||||||||||||||||||||||||||||||||||||||||||||||||||||||||||||||||||||||


