Woodworker's Journal 1994-18-6, страница 66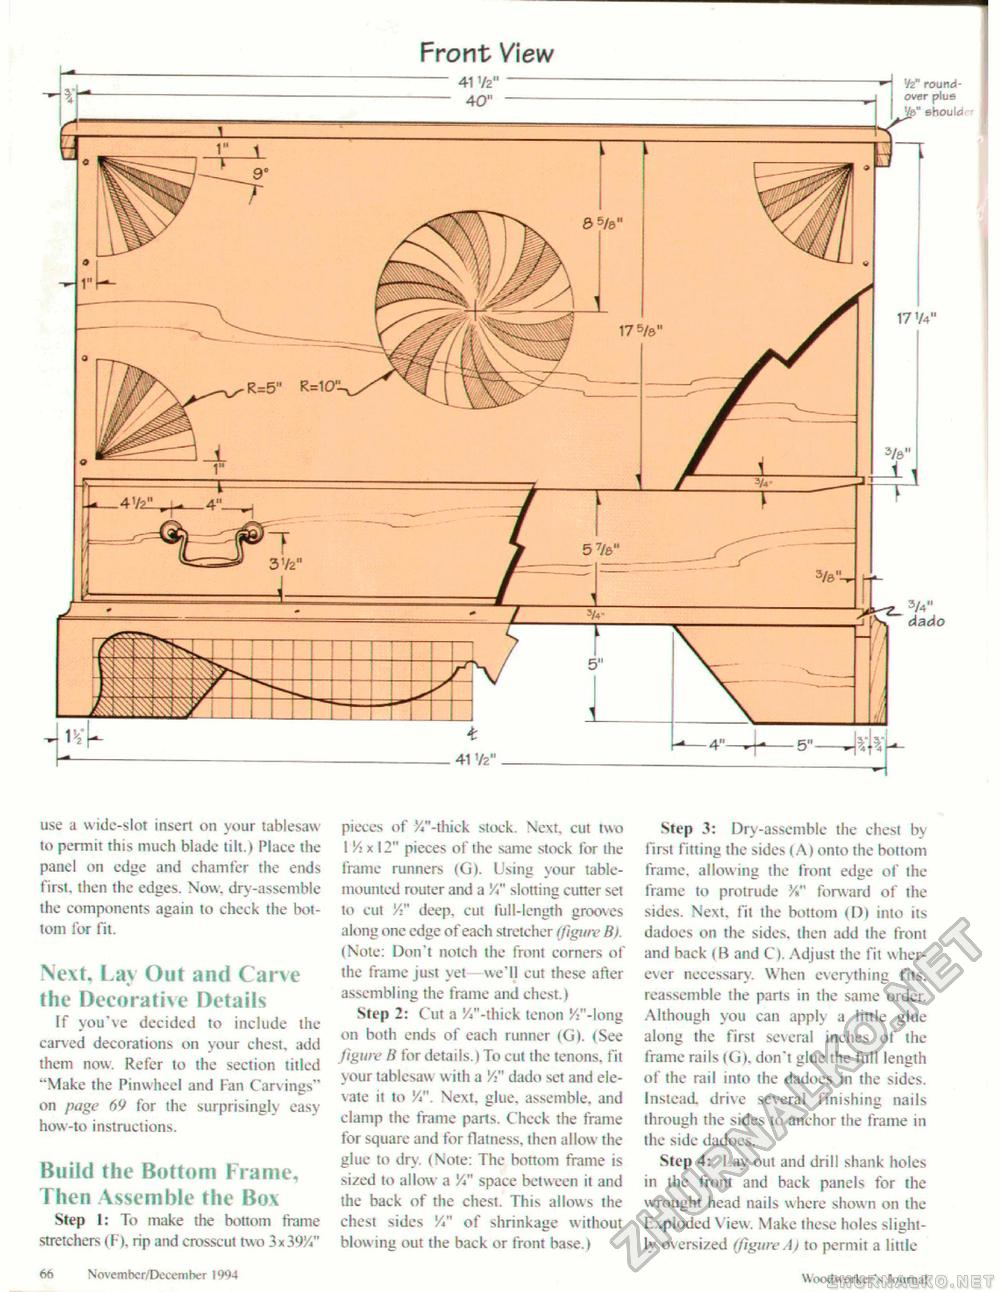
Front View 'h" round-over plus Vfe" should use a w ide-slot insert on your tablesaw to permit this much blade tilt.) Place the panel on edge and chamfer the ends first, then the edges. Now, dry-assemble the components again to check the bottom for fit. Next, Lay Out and Carve the Decorative Details If you've decided to include the caned decorations on your chest, add them now. Refer to the section titled "Make the Pinwhccl and Fan Carv ings" on page 69 for the surprisingly easy how-to instructions. Build the Bottom Frame, Then Assemble the Box Step I: To make the bottom frame stretchers (F), rip and crosscut two 3x39%" pieces of X"-thick stock. Next, cut two 1 Vi x 12" pieces of the same stock for the frame runners (G). Using your table-mounted router and a %" slotting cutter set to cut Yi" deep, cut full-length grooves along one edge of each stretcher (figure B). (Note: Don't notch the front corners of the frame just vet—we'll cut these after assembling the frame and chest.) Step 2: Cut a //'-thick tenon ^"-long on both ends of each runner (G). (See figure B for details.) To cut the tenons, fit your tablesaw with a Yi" dado set and elevate it to Y". Next. glue, assemble, and clamp the frame parts. Check the frame for square and for flatness, then allow the glue to dry. (Note: The bottom frame is sized to allow a Y" space between it and the back of the chest. This allows the chest sides Yi" of shrinkage without blowing out the back or front base.) Step 3: Dry-assemble the chest by first fitting the sides (A) onto the bottom frame, allowing the front edge of the frame to protrude Yt" forward of the sides. Next, fit the bottom <D) into its dadoes on the sides, then add the front and back (B and C). Adjust the lit wherever necessary. When everything fits, reassemble the parts in the same order. Although you can apply a little glue along the first several inches of the frame rails (G). don't glue the fill! length of the rail into the dadoes in the sides. Instead, drive several finishing nails through the sides to anchor the frame in the side dadoes. Step 4: Lay out and drill shank holes in the front and back panels for the wrought head nails w here shown on the Exploded View. Make these holes slightly oversized (figure.t) to permit a little 66 Novembcr/Deeember 1994 Woodworker's Journal |


