Woodworker's Journal 1994-18-6, страница 67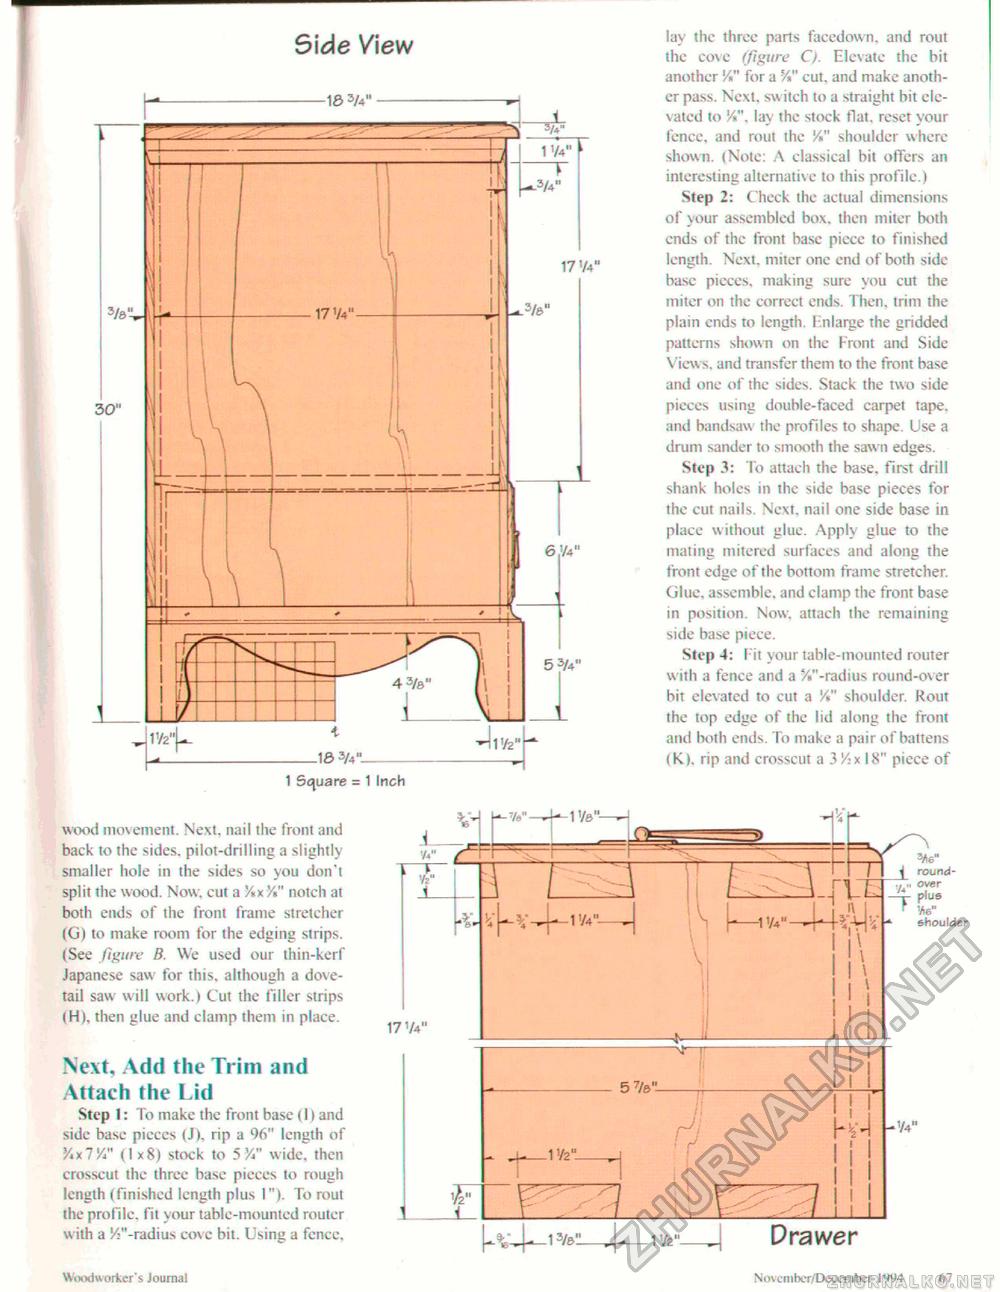
Side View lay the three parts facedown, and rout the cove (figure C). Elevate the bit another '/»" for a 54" cut, and make another pass. Next, switch to a straight bit elevated to %". lay the stock flat, reset your fence, and rout the V* shoulder where shown. (Note: A classical bit offers an interesting alternative to this profile.) Step 2: Check the actual dimensions of your assembled box. then miter both ends of the front base piece to finished length. Next, miter one end of both side base pieces, making sure you cut the miter on the correct ends. Then, trim the plain ends to length. Enlarge the gridded patterns shown on the Front and Side Views, and transfer them to the front base and one of the sides. Stack the two side pieces using double-faced carpet tape, and bandsaw the profiles to shape. Use a dram sander to smooth the sawn edges. Step 3: To attach the base, first drill shank holes in the side base pieces for the cut nails. Next, nail one side base in place without glue. Apply glue to the mating mitered surfaces and along the front edge of the bottom frame stretcher. Glue, assemble, and clamp the front base in position. Now, attach the remaining side base piece. Step 4: I it your table-mounted router with a fence and a y»"-radius round-over bit elevated to cut a V* shoulder. Rout the top edge of the lid along the front and both ends. To make a pair of battens (K). rip and crosscut a 3 x 18" piece of 1 Square = 1 Inch wood movement. Next, nail the front and back to the sides, pilot-drilling a slightly smaller hole in the sides so you don't split the wood. Now, cut a %x 7i" notch at both ends of the front frame stretcher (G) to make room for the edging strips. (See figure B. We used our thin-kerf Japanese saw for this, although a dovetail saw will work.) Cut the filler strips |H), then glue and clamp them in place. »vf r-'h" Add the Trim and Attach the Lid Step I: To make the front base (1) and side base picccs (J), rip a 96" length of y.xiy." (1 x8) stock to 5 ft" wide, then crosscut the three base pieces to rough length (finished length plus 1"). To rout the profile, fit your table-mounted router w ith a ^''-radius cove bit. Using a fcnce. '„ over plus We" Shoulder 17 Va" Drawer Woodworker s Journal Novembcr/December 1994 1<1 |


