Woodworker's Journal 2004-Winter, страница 71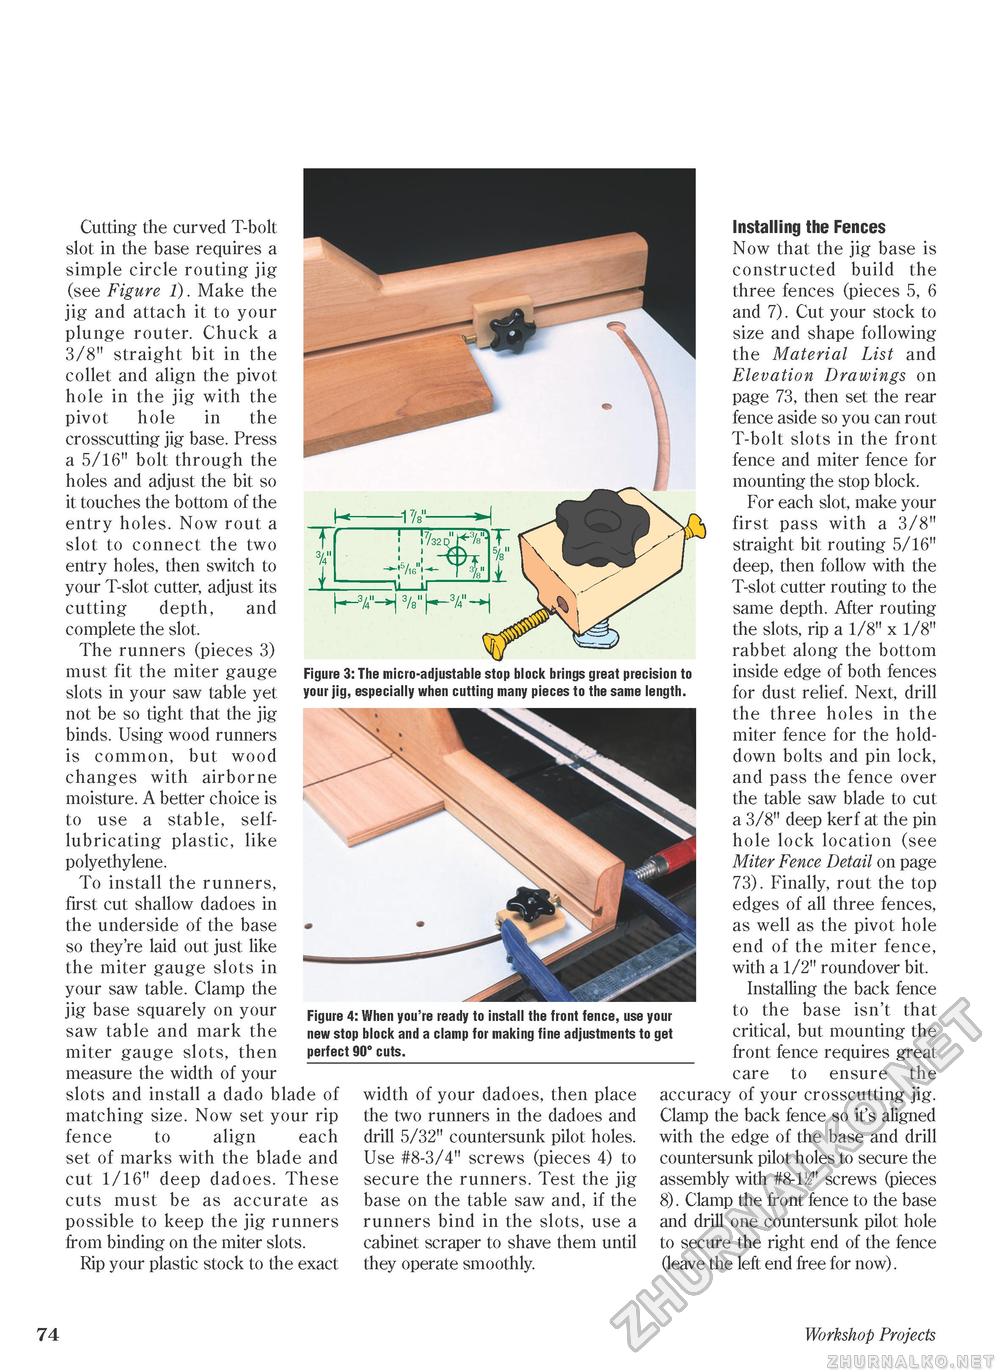
Cutting the curved T-bolt slot in the base requires a simple circle routing jig (see Figure 1). Make the jig and attach it to your plunge router. Chuck a 3/8" straight bit in the collet and align the pivot hole in the jig with the pivot hole in the crosscutting jig base. Press a 5/16" bolt through the holes and adjust the bit so it touches the bottom of the entry holes. Now rout a slot to connect the two entry holes, then switch to your T-slot cutter, adjust its cutting depth, and complete the slot. The runners (pieces 3) must fit the miter gauge slots in your saw table yet not be so tight that the jig binds. Using wood runners is common, but wood changes with airborne moisture. A better choice is to use a stable, self-lubricating plastic, like polyethylene. To install the runners, first cut shallow dadoes in the underside of the base so they're laid out just like the miter gauge slots in your saw table. Clamp the jig base squarely on your saw table and mark the miter gauge slots, then measure the width of your slots and install a dado blade of matching size. Now set your rip fence to align each set of marks with the blade and cut 1/16" deep dadoes. These cuts must be as accurate as possible to keep the jig runners from binding on the miter slots. Rip your plastic stock to the exact Figure 3: The micro-adjustable stop block brings great precision to your jig, especially when cutting many pieces to the same length. Figure 4: When you're ready to install the front fence, use your new stop block and a clamp for making fine adjustments to get perfect 90° cuts. width of your dadoes, then place the two runners in the dadoes and drill 5/32" countersunk pilot holes. Use #8-3/4" screws (pieces 4) to secure the runners. Test the jig base on the table saw and, if the runners bind in the slots, use a cabinet scraper to shave them until they operate smoothly. Installing the Fences Now that the jig base is constructed build the three fences (pieces 5, 6 and 7). Cut your stock to size and shape following the Material List and Elevation Drawings on page 73, then set the rear fence aside so you can rout T-bolt slots in the front fence and miter fence for mounting the stop block. For each slot, make your first pass with a 3/8" straight bit routing 5/16" deep, then follow with the T-slot cutter routing to the same depth. After routing the slots, rip a 1/8" x 1/8" rabbet along the bottom inside edge of both fences for dust relief. Next, drill the three holes in the miter fence for the hold-down bolts and pin lock, and pass the fence over the table saw blade to cut a 3/8" deep kerf at the pin hole lock location (see Miter Fence Detail on page 73). Finally, rout the top edges of all three fences, as well as the pivot hole end of the miter fence, with a 1/2" roundover bit. Installing the back fence to the base isn't that critical, but mounting the front fence requires great care to ensure the accuracy of your crosscutting jig. Clamp the back fence so it's aligned with the edge of the base and drill countersunk pilot holes to secure the assembly with #8-1)2" screws (pieces 8). Clamp the front fence to the base and drill one countersunk pilot hole to secure the right end of the fence (leave the left end free for now). 74 * Workshop Projects |


