Woodworker's Journal 2008-32-4, страница 19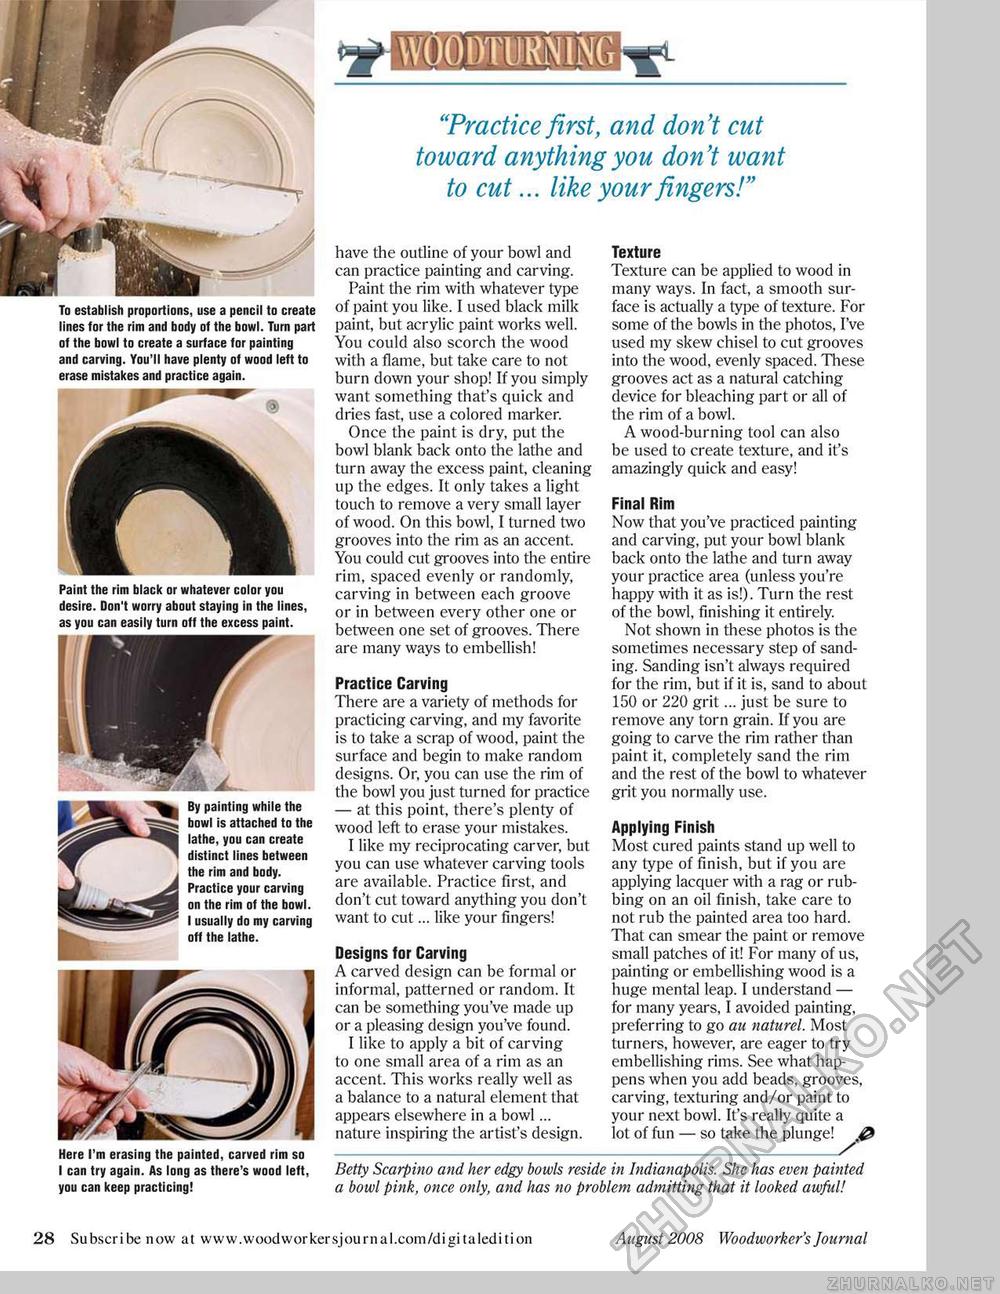
"Practice first, and don't cut toward anything you don't want to cut... like your fingers!" have the outline of your bowl and can practice painting and carving. Paint the rim with whatever type of paint you like. I used black milk paint, but acrylic paint works well. You could also scorch the wood with a flame, but take care to not burn down your shop! If you simply want something that's quick and dries fast, use a colored marker. Once the paint is dry, put the bowl blank back onto the lathe and turn away the excess paint, cleaning up the edges. It only takes a light touch to remove a very small layer of wood. On this bowl, I turned two grooves into the rim as an accent. You could cut grooves into the entire rim, spaced evenly or randomly, carving in between each groove or in between every other one or between one set of grooves. There are many ways to embellish! Practice Carving There are a variety of methods for practicing carving, and my favorite is to take a scrap of wood, paint the surface and begin to make random designs. Or, you can use the rim of the bowl you just turned for practice — at this point, there's plenty of wood left to erase your mistakes. I like my reciprocating carver, but you can use whatever carving tools are available. Practice first, and don't cut toward anything you don't want to cut... like your fingers! Designs for Carving A carved design can be formal or informal, patterned or random. It can be something you've made up or a pleasing design you've found. I like to apply a bit of carving to one small area of a rim as an accent. This works really well as a balance to a natural element that appears elsewhere in a bowl... nature inspiring the artist's design. Texture Texture can be applied to wood in many ways. In fact, a smooth surface is actually a type of texture. For some of the bowls in the photos, I've used my skew chisel to cut grooves into the wood, evenly spaced. These grooves act as a natural catching device for bleaching part or all of the rim of a bowl. A wood-burning tool can also be used to create texture, and it's amazingly quick and easy! Final Rim Now that you've practiced painting and carving, put your bowl blank back onto the lathe and turn away your practice area (unless you're happy with it as is!). Turn the rest of the bowl, finishing it entirely. Not shown in these photos is the sometimes necessary step of sanding. Sanding isn't always required for the rim, but if it is, sand to about 150 or 220 grit... just be sure to remove any torn grain. If you are going to carve the rim rather than paint it, completely sand the rim and the rest of the bowl to whatever grit you normally use. Applying Finish Most cured paints stand up well to any type of finish, but if you are applying lacquer with a rag or rubbing on an oil finish, take care to not rub the painted area too hard. That can smear the paint or remove small patches of it! For many of us, painting or embellishing wood is a huge mental leap. I understand — for many years, I avoided painting, preferring to go au naturel. Most turners, however, are eager to try embellishing rims. See what happens when you add beads, grooves, carving, texturing and/or paint to your next bowl. It's really quite a lot of fun — so take the plunge! @ Betty Scarpino and her edgy bowls reside in Indianapolis. She has even painted a bowl pink, once only, and has no problem admitting that it looked awful! To establish proportions, use a pencil to create lines for the rim and body of the bowl. Turn part of the bowl to create a surface for painting and carving. You'll have plenty of wood left to erase mistakes and practice again. Paint the rim black or whatever color you desire. Don't worry about staying in the lines, as you can easily turn off the excess paint. By painting while the bowl is attached to the lathe, you can create distinct lines between the rim and body. Practice your carving on the rim of the bowl. I usually do my carving off the lathe. Here I'm erasing the painted, carved rim so I can try again. As long as there's wood left, you can keep practicing! 28 Subscribe now at www.woodworkersjournal.com/digitaledition August 2008 Woodworker's Journal |


