Woodworker's Journal 2008-32-6, страница 61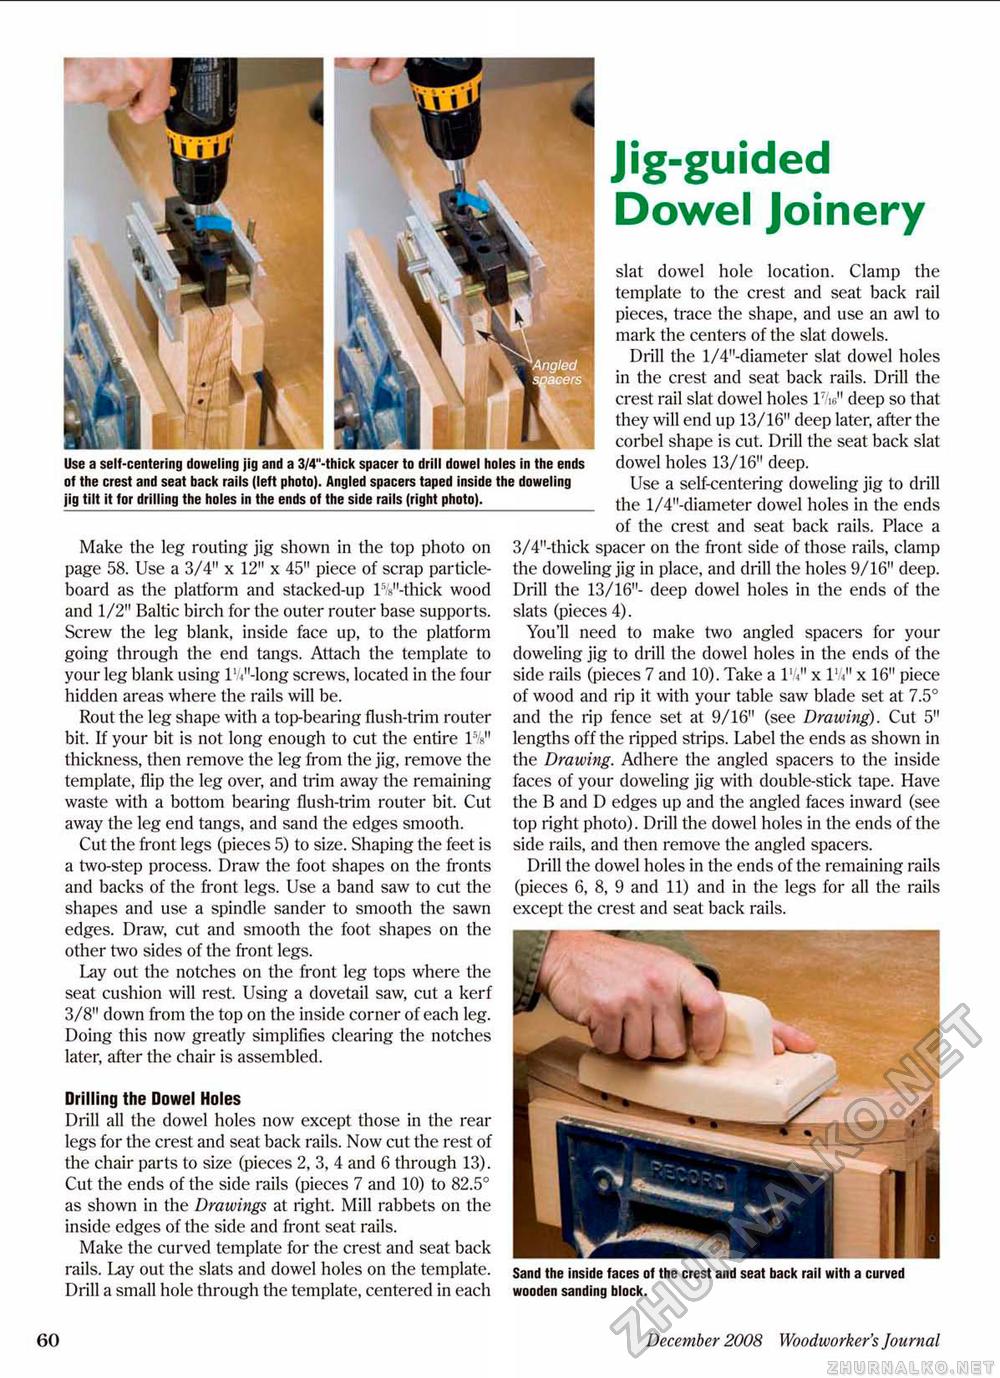
Use a self-centering doweling jig and a 3/4"-thlck spacer to drill dowel holes in the ends of the crest and seat back rails (left photo). Angled spacers taped inside the doweling jig tilt it tor drilling the holes in the ends of the side rails (right photo). Make the leg routing jig shown in the top photo on page 58. Use a 3/4" x 12" x 45" piece of scrap particle-board as the platform and stacked-up l%"-thick wood and 1/2" Baltic birch for the outer router base supports. Screw the leg blank, inside face up, to the platform going through the end tangs. Attach the template to your leg blank using lW-long screws, located in the four hidden areas where the rails will be. Rout the leg shape with a top-bearing flush-trim router bit. If your bit is not long enough to cut the entire TV thickness, then remove the teg from the jig, remove the template, flip the leg over, and trim away the remaining waste with a bottom bearing flush-trim router bit. Cut away the leg end tangs, and sand the edges smooth. Cut the front legs (pieces 5) to size. Shaping the feet is a two-step process. Draw the foot shapes on the fronts and backs of the front legs. Use a band saw to cut the shapes and use a spindle sander to smooth the sawn edges. Draw, cut and smooth the foot shapes on the other two sides of the front legs. lay out the notches on the front leg tops where the seat cushion will rest Using a dovetail saw, cut a kerf 3/8" down from the top on the inside corner of each leg. Doing this now greatly simplifies clearing the notches later, after the chair is assembled. slat dowel hole location. Clamp the template to the crest and seat back rail pieces, trace the shape, and use an aw] to mark the centers of the slat dowels. Drill the 1/4"-diameter slat dowel holes in the crest and seat back rails. Drill the crest rail slat dowel holes IV' deep so that they will end up 13/16" deep later, after the corbel shape is cut. Drill the seat back slat dowel holes 13/16" deep. Use a self-centering doweling jig to drill _ the l/4"-diameter dowel holes in the ends of the crest and seat back rails. Place a 3/4"-thick spacer on the front side of those rails, clamp the doweling jig in place, and drill the holes 9/16" deep. Drill the 13/16"- deep dowel holes in the ends of the slats (pieces 4). You'll need to make two angled spacers for your doweling jig to drill the dowel holes in the ends of the side rails (pieces 7 and 10). Take a 1V<" x 111" x 16" piece of wood and rip it with your table saw blade set at 7.5° and the rip fence set at 9/16" (see Drawing), Cut 5" lengths off the ripped strips. Label the ends as shown in the Drawing. Adhere the angled spacers to the inside faces of your doweling jig with double-stick tape. Have the B and D edges up and the angled faces inward (see top right photo). Drill the dowel holes in the ends of the side rails, and then remove the angled spacers. Drill the dowel holes in the ends of the remaining rails (pieces 6, 8, 9 and 11) and in the legs for all the rails except the crest and seat back rails. Jig-guided Dowel Joinery Drilling the Dowel Holes Drill all the dowel holes now except those in the rear legs for the crest and seat back rails. Now cut the rest of the chair parts to size (pieces 2, 3, 4 and 6 through 13). Cut the ends of the side rails (pieces 7 and 10) to 82.5° as shown in the Drawings at right Mill rabbets on the inside edges of the side and front seat rails. Make the curved template for the crest and seat back rails. Lay out the slats and dowel holes on the template. Drill a small hole through the template, centered in each Sand the inside faces of the crest and seat back rail with a curved wooden sanding block. 60 December 2008 Woodworker's Journal |


