Woodworker's Journal 2009-33-4, страница 18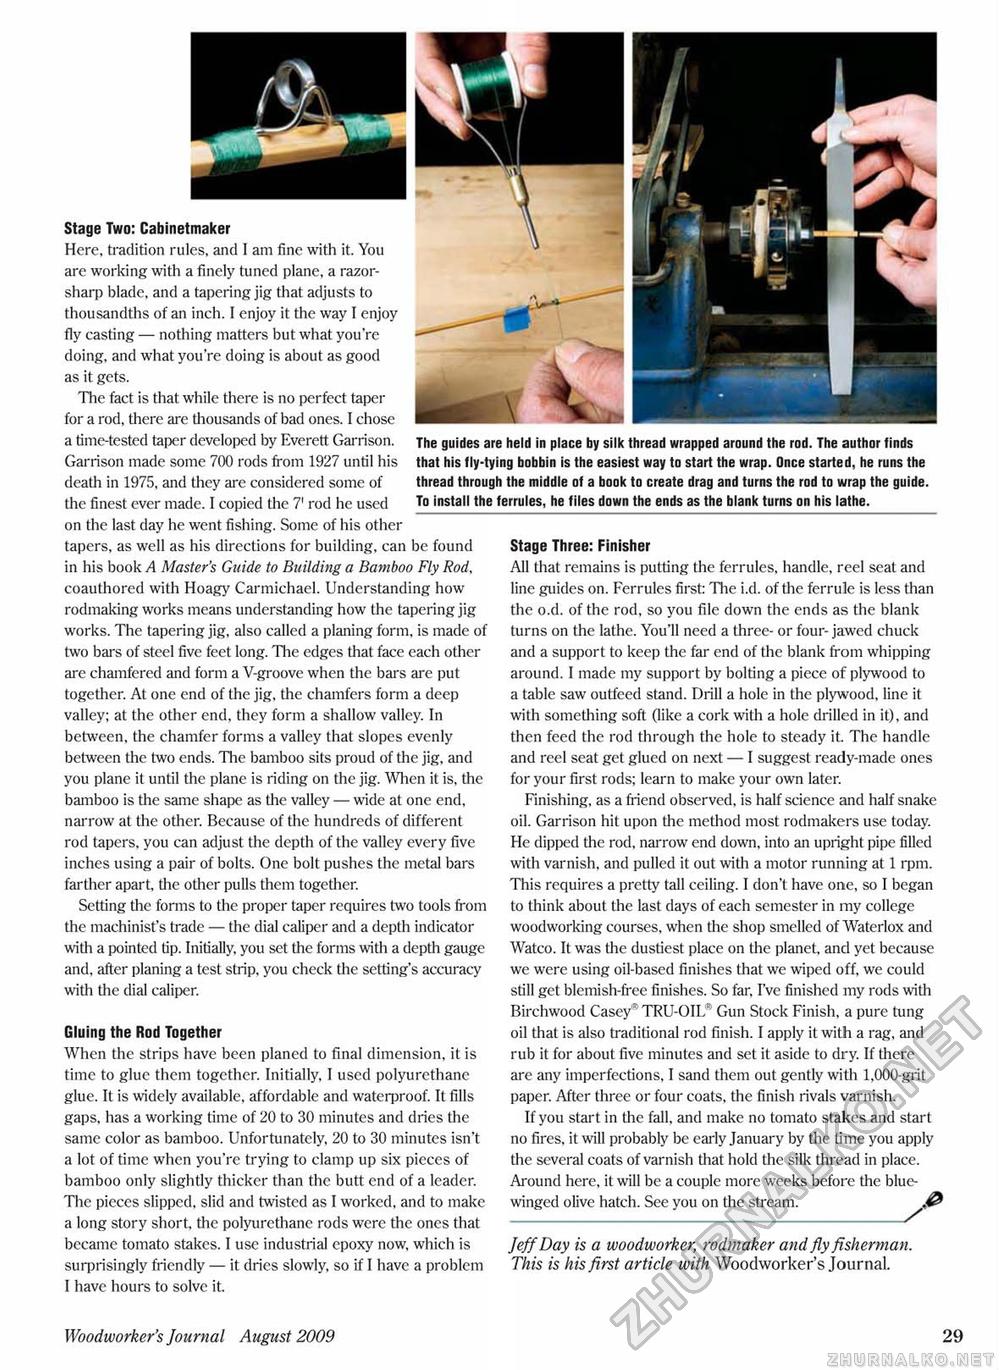
Stage Two: Cabinetmaker Here, tradition rules, and I am fine with it. You are working with a finely tuned plane, a razor-sharp blade, and a tapering jig that adjusts to thousandths of an inch. I enjoy it the way I enjoy fly casting — nothing matters but what you Ye doing, and what you Ye doing is about as good as it gets. The fact is that while there is no perfect taper for a rod, there are thousands of bad ones. I chose a time-tested taper developed by Everett Garrison. Garrison made some 700 rods from 1927 until his death in 1975, and they are considered some of the finest ever made. I copied the 7' rod he used _ on the last clay he went fishing. Some of his other tapers, as well as his directions for building, can be found in his book A Master's Guide to Building a Bamboo Fly Rod, coauthored with Hoagy Carmichael. Understanding how rodmaking works means understanding how the tapering jig works. The tapering jig, also called a planing form, is made of two bars of steel five feet long. The edges that face each other are chamfered and form a V-groove when the bars are put together. At one end of the jig, the chamfers form a deep valley; at the other end, they form a shallow valley. In between, the chamfer forms a valley that slopes evenly between the two ends. The bamboo sits proud of the jig, and you plane it until the plane is riding on the jig. When it is, the bamboo is the same shape as the valley — wide at one end, narrow at the other. Because of the hundreds of different rod tapers, you can adjust the depth of the valley every five inches using a pair of bolts. One bolt pushes the metal bars farther apart, the other pulls them together. Setting the forms to the proper taper requires two tools from the machinist's trade — the dial caliper and a depth indicator with a pointed tip. Initially, you set the forms with a depth gauge and, after planing a test strip, you check the setting's accuracy with the dial caliper. Gluing the Rod Together When the strips have been planed to final dimension, it is time to glue them together. Initially, I used polyurcthanc glue. It is widely available, affordable and waterproof. It fills gaps, has a working time of 20 to 30 minutes and dries the same color as bamboo. Unfortunately, 20 to 30 minutes isn't a lot of time when you're trying to clamp up six pieces of bamboo only slightly thicker than the butt end of a leader. The pieces slipped, slid and twisted as I worked, and to make a long story short, the polyurcthanc rods were the ones that became tomato stakes. I use industrial cpoxy now, which is surprisingly friendly — it dries slowly, so if I have a problem I have hours to solve it. The guides are held In place by silk thread wrapped around the rod. The author finds that his fly-tying bobbin is the easiest way to start the wrap. Once started, he runs the thread through the middle of a book to create drag and turns the rod to wrap the guide. To install the ferrules, he files down the ends as the blank turns on his lathe. Stage Three: Finisher All that remains is putting the ferrules, handle, reel seat and line guides on. Ferrules first: The i.d. of the ferrule is less than the o.d. of the rod, so you file down the ends as the blank turns on the lathe. You'll need a three- or four- jawed chuck and a support to keep the far end of the blank from whipping around. I made my support by bolting a piece of plywood to a table saw outl'eed stand. Drill a hole in the plywood, line it with something soft (like a cork with a hole drilled in it), and then feed the rod through the hole to steady it. The handle and reel seat get glued on next — I suggest ready-made ones for your first rods; learn to make your own later. Finishing, as a friend observed, is half science and half snake oil. Garrison hit upon the method most rodmakers use today. He dipped the rod. narrow end down, into an upright pipe filled with varnish, and pulled it out with a motor running at 1 rpm. This requires a pretty tall ceiling. I don't have one, so I began to think about the last days of each semester in my college woodworking courses, when the shop smelled of Waterlox and Watco. It was the dustiest place on the planet, and yet because we were using oil-based finishes that we wiped off. we could still get blemish-free finishes. So far, I've finished my rods with Birchwood Casey" TRU-OIL" Gun Stock Finish, a pure tung oil that is also traditional rod finish. I apply it with a rag, and rub it for about five minutes and set it aside to dry. If there are any imperfections, I sand them out gently with 1,000-grit paper. After three or four coats, the finish rivals varnish. If you start in the fall, and make no tomato stakes and start no fires, it will probably be early January by the time you apply the several coats of varnish that hold the silk thread in place. Around here, it will be a couple more weeks before the blue-winged olive hatch. See you on the stream._ Jeff Day is a woodworker, rodmaker and fly fisherman. This is his first article with Woodworker's Journal. Woodworker's Journal August 2009 29 |


