Woodworker's Journal 2010-34-1, страница 31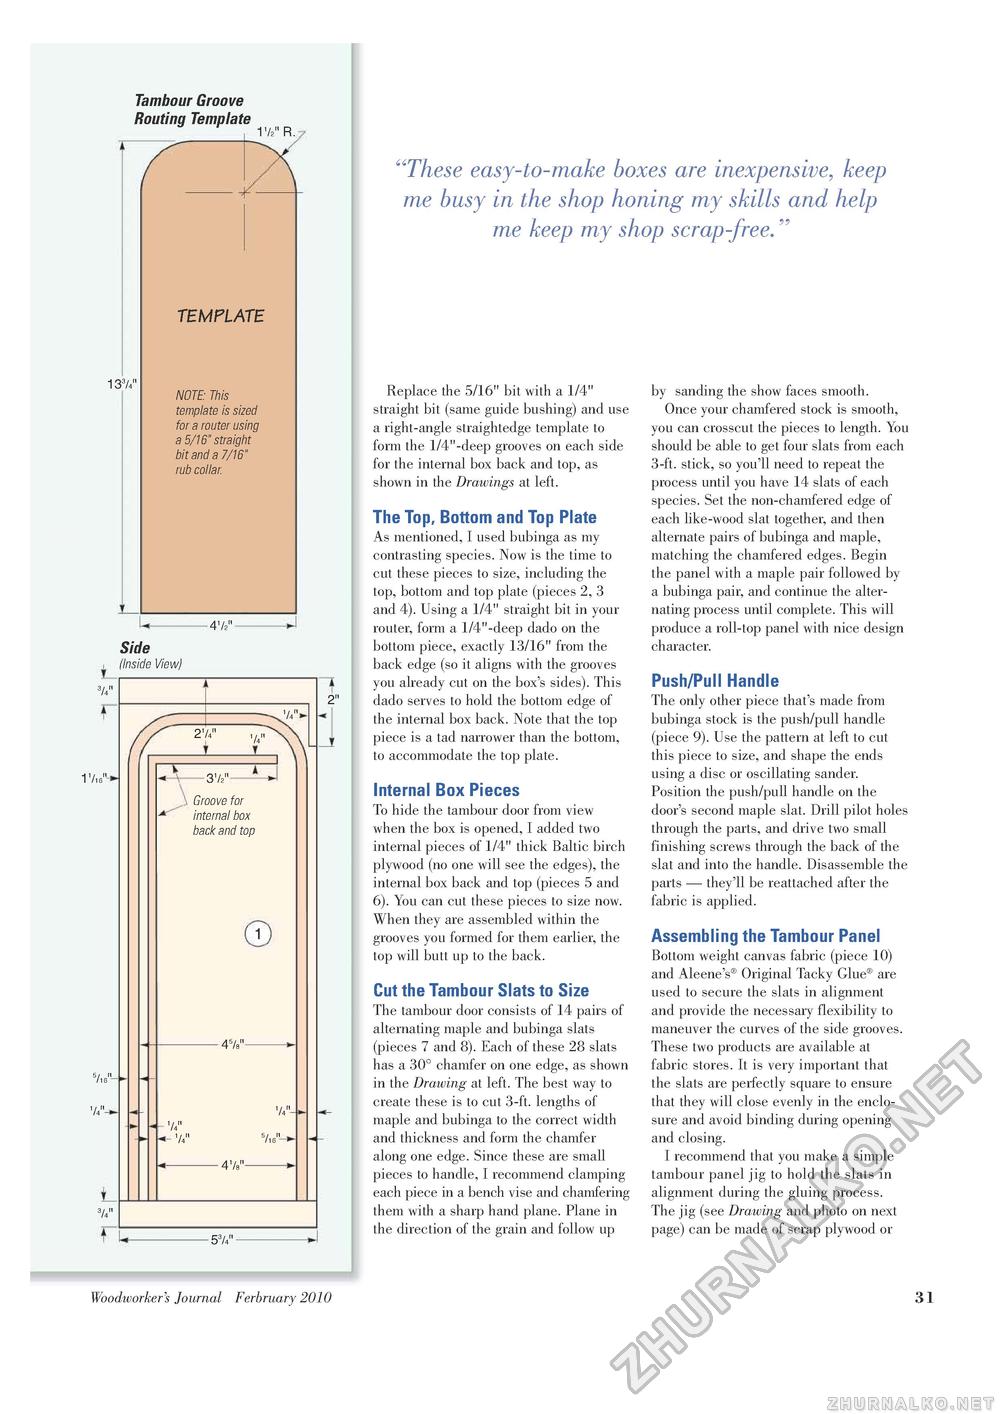
Tambour Groove Routing Template 1'/2" R. "These easy-to-make boxes are inexpensive, keep me busy in the shop honing my skills and help me keep my shop scrap-free TEMPLATE 133/4" NOTE: This template is sized for a router using a 5/16" straight bit and a 7/16" rub collar. 4'k" !_ 3/4" 11/16" : Side (Inside View) S/16' 1/4" L 3/4" 21/4" y :—■31/2"'—^ Groove for internal box back and top 45/8" 1/4" 1/4" 1/4" 5/l6" > 47s" r 53/4" Replace the 5/16" bit with a 1/4" straight bit (same guide bushing) and use a right-angle straightedge template to form the 1/4"-deep grooves on each side for the internal box back and top, as shown in the Drawings at left. The Top, Bottom and Top Plate As mentioned, I used bubinga as my contrasting species. Now is the time to cut these pieces to size, including the top, bottom and top plate (pieces 2, 3 and 4). Using a 1/4" straight bit in your router, form a 1/4"-deep dado on the bottom piece, exactly 13/16" from the back edge (so it aligns with the grooves you already cut on the box's sides). This 2" dado serves to hold the bottom edge of the internal box back. Note that the top piece is a tad narrower than the bottom, to accommodate the top plate. Internal Box Pieces To hide the tambour door from view when the box is opened, I added two internal pieces of 1/4" thick Baltic birch plywood (no one will see the edges), the internal box back and top (pieces 5 and 6). You can cut these pieces to size now. When they are assembled within the grooves you formed for them earlier, the top will butt up to the back. Cut the Tambour Slats to Size The tambour door consists of 14 pairs of alternating maple and bubinga slats (pieces 7 and 8). Each of these 28 slats has a 30° chamfer on one edge, as shown in the Drawing at left. The best way to create these is to cut 3-ft. lengths of maple and bubinga to the correct width and thickness and form the chamfer along one edge. Since these are small pieces to handle, I recommend clamping each piece in a bench vise and chamfering them with a sharp hand plane. Plane in the direction of the grain and follow up by sanding the show faces smooth. Once your chamfered stock is smooth, you can crosscut the pieces to length. You should be able to get four slats from each 3-ft. stick, so you'll need to repeat the process until you have 14 slats of each species. Set the non-chamfered edge of each like-wood slat together, and then alternate pairs of bubinga and maple, matching the chamfered edges. Begin the panel with a maple pair followed by a bubinga pair, and continue the alternating process until complete. This will produce a roll-top panel with nice design character. Push/Pull Handle The only other piece that's made from bubinga stock is the push/pull handle (piece 9). Use the pattern at left to cut this piece to size, and shape the ends using a disc or oscillating sander. Position the push/pull handle on the door's second maple slat. Drill pilot holes through the parts, and drive two small finishing screws through the back of the slat and into the handle. Disassemble the parts — they'll be reattached after the fabric is applied. Assembling the Tambour Panel Bottom weight canvas fabric (piece 10) and Aleene's® Original Tacky Glue® are used to secure the slats in alignment and provide the necessary flexibility to maneuver the curves of the side grooves. These two products are available at fabric stores. It is very important that the slats are perfectly square to ensure that they will close evenly in the enclosure and avoid binding during opening and closing. I recommend that you make a simple tambour panel jig to hold the slats in alignment during the gluing process. The jig (see Drawing and photo on next page) can be made of scrap plywood or Woodworker's Journal Ferbruary 2010 31 |


