Woodworker's Journal fall-2008, страница 32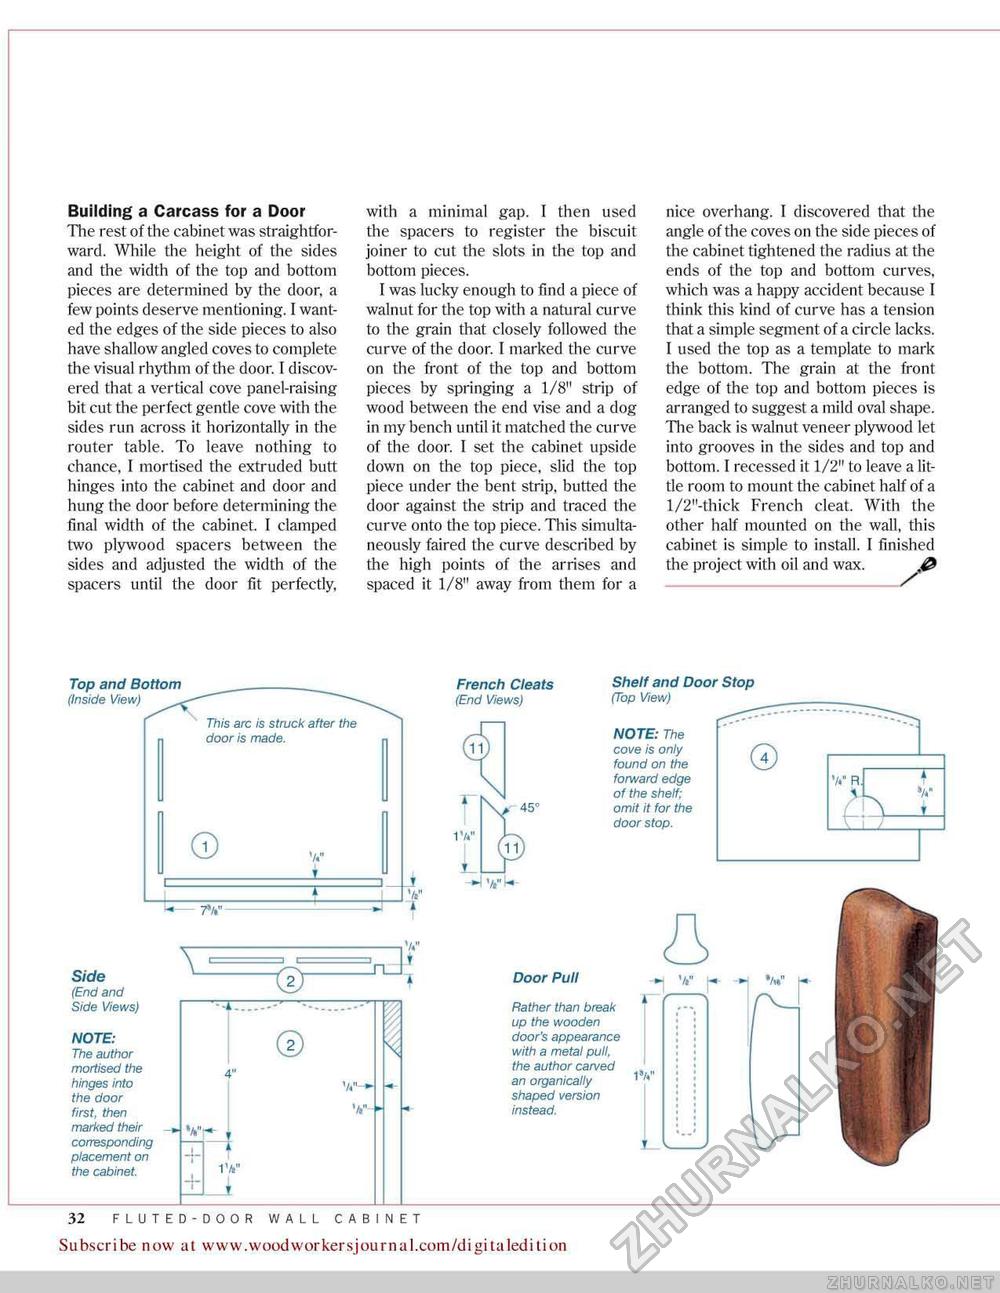
Building a Carcass for a Door The rest of the cabinet was straightforward. While the height of the sides and the width of the top and bottom pieces are determined by the door, a few points deserve mentioning. I wanted the edges of the side pieces to also have shallow angled coves to complete the visual rhythm of the door. I discovered that a vertical cove panel-raising bit cut the perfect gentle cove with the sides run across it horizontally in the router table. To leave nothing to chance, I mortised the extruded butt hinges into the cabinet and door and hung the door before determining the final width of the cabinet. I clamped two plywood spacers between the sides and adjusted the width of the spacers until the door fit perfectly, with a minimal gap. I then used the spacers to register the biscuit joiner to cut the slots in the top and bottom pieces. I was lucky enough to find a piece of walnut for the top with a natural curve to the grain that closely followed the curve of the door. I marked the curve on the front of the top and bottom pieces by springing a 1/8" strip of wood between the end vise and a dog in my bench until it matched the curve of the door, I set the cabinet upside down on the top piece, slid the top piece under the bent strip, hutted the door against the strip and traced the curve onto the top piece. This simultaneously faired the curve described by the high points of the arrises and spaced it 1/8" away from them for a nice overhang. I discovered that the angle of the coves on the side pieces of the cabinet tightened the radius at the ends of the top and bottom curves, which was a happy accident because I think this kind of curve has a tension that a simple segment of a circle lacks. 1 used the top as a template to mark the bottom. The grain at the front edge of the top and bottom pieces is arranged to suggest a mild oval shape. The back is walnut veneer plywood let into grooves in the sides and top and bottom, I recessed it 1/2" to leave a little room to mount the cabinet half of a l/2"-thick French cleat. With the other half mounted on the wall, this cabinet is simple to install. I finished the project with oil and wax. @ Top and Bottom (Inside View) Side (End and Side Views) NOTE: The author mortised the hinges into the door first, then marked their corresponding placement on the cabinet. This arc is struck after the door is made. © 7V I 4" Vr 4- 1V V." -@r © —i¥ V - French Cleats (End Views) Shelf and Door (Top View) NOTE: The cove is only found on the forward edge of the shelf; omit it for the door stop. Stop Door Pull Rather than break up the wooden door's appearance with a metal pull, the author carved an organically shaped version instead. IV © A W N- ► V r- U 32 EASY-TO-BUILD STORAGE CABINETS Subscribe now at www.wpodworkersjournal.com/digitaledition V RP |


