Woodworker's Journal fall-2008, страница 29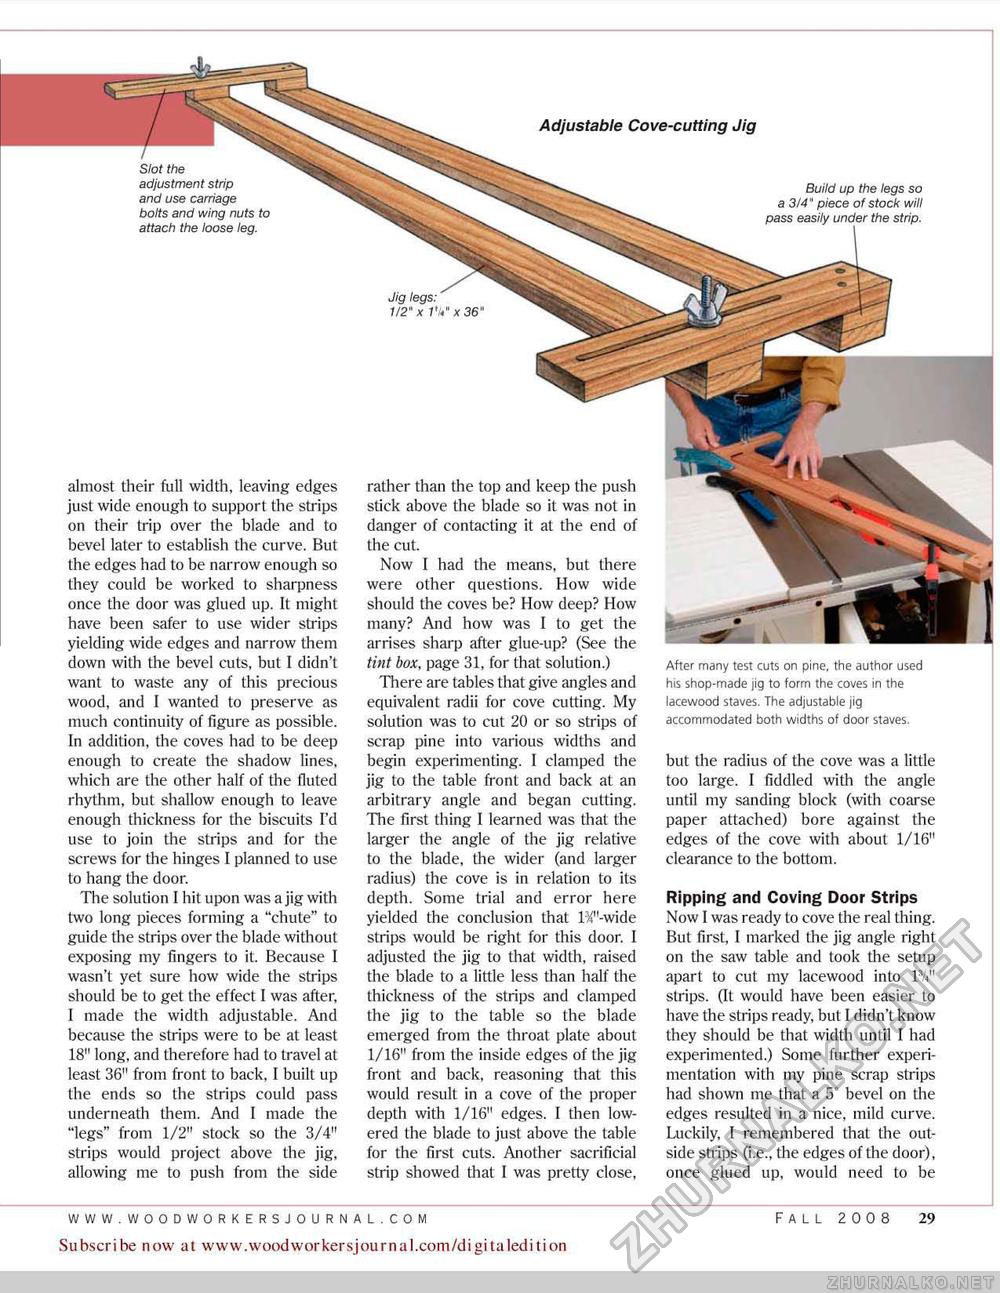
almost their full width, leaving edges just wide enough to support Hie strips on their trip over the blade and to bevel later to establish the curve. But the edges had to be narrow enough so they could be worked to sharpness once the door was glued up. It might have been safer to use wider ships yielding wide edges and narrow them down with the bevel cuts, but 1 didn't want to waste any of this precious wood, and I wanted to preserve as much continuity of figure as possible. In addition, the coves had to be deep enough to create the shadow lines, which are the other half of the fluted rhythm, but shallow enough to leave enough thickness for the biscuits I'd use to join the strips and for the screws for the hinges I planned to use to hang the door. The solution I hit upon was ajig with two long pieces forming a "chute" to guide the strips over the blade without exposing my fingers to it. Because I wasn't yet sure how wide the strips should be to get the effect I was after, I made the width adjustable. And because the strips were to be at least 18" long, and therefore had to travel at least 36" from front to back, I built up the ends so the strips could pass underneath them. And I made the "legs" from 1/2" stock so the 3/4" strips would project above the jig, allowing me to push from the side Slot the adjustment strip and use carriage bolts and wing nuts to attach the loose leg. rather than the top and keep the push stick above the blade so it was not in danger of contacting it at the end of the cut. Now I had the means, but there were other questions. How wide should the coves be? How deep? How many? And how was I to get the arrises sharp after glue-up? (See the tint box, page 31, for that solution.) There are tables that give angles and equivalent radii for cove cutting. My solution was to cut 20 or so strips of scrap pine into various widths and begin experimenting. 1 clamped the jig to the table front and back at an arbitrary angle and began cutting. The first thing I learned was that the larger the angle of the jig relative to the blade, the wider (and larger radius) the cove is in relation to its depth. Some trial and error here yielded the conclusion that l%"-wide strips would be right for this door. I adjusted the jig to that width, raised the blade to a little less than half the thickness of the strips and clamped the jig to the table so the blade emerged from the throat plate about 1/16" from the inside edges of the jig front and back, reasoning that this would result in a cove of the proper depth with 1/16" edges. I then lowered the blade to just above the table for the first cuts. Another sacrificial strip showed that I was pretty close, After many test cuts on pine, the author used his shop-made ;ig to form the coves in the lacewood staves. The adjustable jig accommodated both widths of door staves. but the radius of the cove was a little too large. I fiddled with the angle until my sanding block (with coarse paper attached) bore against the edges of the cove with about 1/16" clearance to the bottom. Ripping and Coving Door Strips Now 1 was ready to cove the real thing. But first, 1 marked the jig angle right on the saw table and took the setup apart to cut my lacewood into FA11 strips. (It would have been easier to have the strips ready, but I didn't know they should be that width until I had experimented,) Some further experimentation with my pine scrap strips had shown me that a 5* bevel on the edges resulted in a nice, mild curve. Luckily, I remembered that the outside strips (i.e., the edges of the door), once glued up, would need to be Adjustable Cove-cutting Jig Build up the legs so a 3/4" piece of stock wilt under the strip. Jig legs: 1/2" x 1 Vx36" Subscribe now at www.woodwoirkersjournal.com/digitaledition FALL 2008 29 |


