Woodworker's Journal fall-2008, страница 27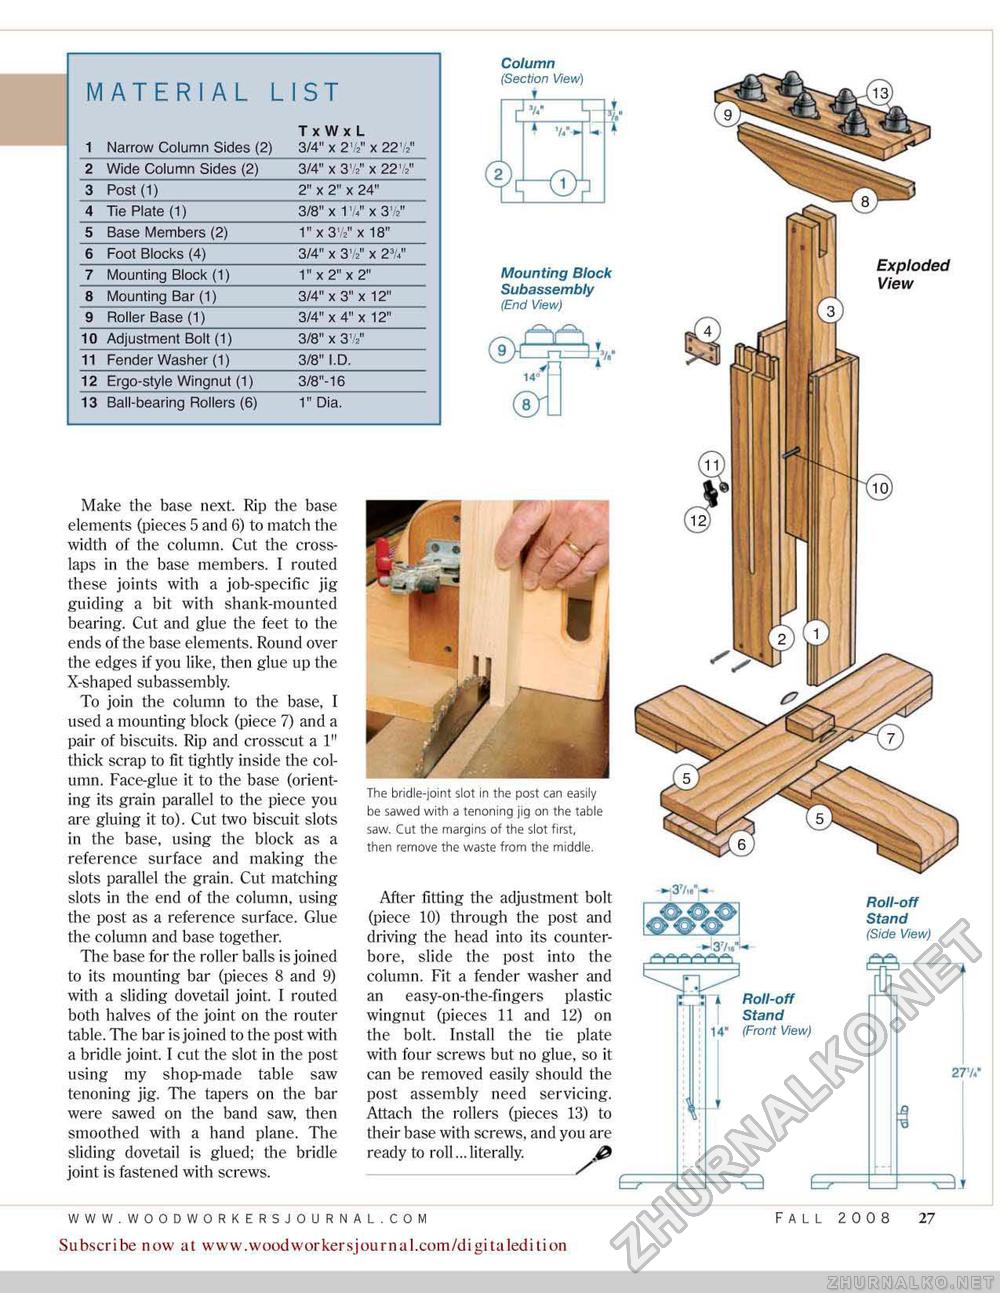
Column (Section Wew) TxWxL 1 Narrow Column Sides (2) 3/4" x 21 V x 22\-,' 2 Wide Column Sides (2) 3/4" x 3V x 22'^ 5 Base Members (2) 6 Foot Blocks (4) Exploded View Mounting Block Subassembly (End View) 7 Mounting Block (1) 8 Mounting Bar (1) 9 Roller Base (1) 10 Adjustment Bolt (1) 11 Fender Washer (1) 12 Ergo-style Wingnut (1) 13 Ball-bearing Rollers (6) Make the base next Rip the base elements (pieces 5 and 6) to match the width of the column. Cut the cross-laps in the base members. 1 routed these joints with a job-specific jig guiding a bit with shank-mounted bearing. Cut and glue the feet to the ends of the base elements. Round over the edges if you like, then glue up the X-shaped subassembly. To join the column to the base, I used a mounting block (piece 7) and a pair of biscuits. Rip and crosscut a 1" thick scrap to fit tightly inside the column. Face-glue it to the base (orienting its grain parallel to the piece you are gluing it to). Cut two biscuit slots in the base, using the block as a reference surface and making the slots parallel the grain. Cut matching slots in the end of the column, using the post as a reference surface. Glue the column and base together. The base for the roller balls is joined to its mounting bar (pieces 8 and 9) with a sliding dovetail joint. I routed The bridle-joint slot in the post can easily be sawed with a tenoning jig on the table saw. Cut the margins of the slot first, then remove the waste from the middle. After fitting the adjustment bolt (piece 10} through the post and driving the head into its counter-bore, slide the post into the column. Fit a fender washer and an easy-on-the-fingers plastic Roll-off Stand (Side View) both halves of the joint on the router table. The bar is joined to the post with a bridle joint. I cut the slot in the post using my shop-made table saw tenoning jig. The tapers on the bar were sawed on the band saw, then smoothed with a hand plane. The sliding dovetail is glued; the bridle joint is fastened with screws. wingnut (pieces 11 and \2) on the bolt. Install the tie plate with four screws hut no glue, so it can be removed easily should the post assembly need servicing. Attach the rollers (pieces 13) to their base with screws, and you are ready to roll... literally. @ \ Stand 14* (Front View) 2 FALL 2008 27 Subscribe now at www.woodworkersjournal.com/digitaledition |


