Woodworker's Journal fall-2010, страница 46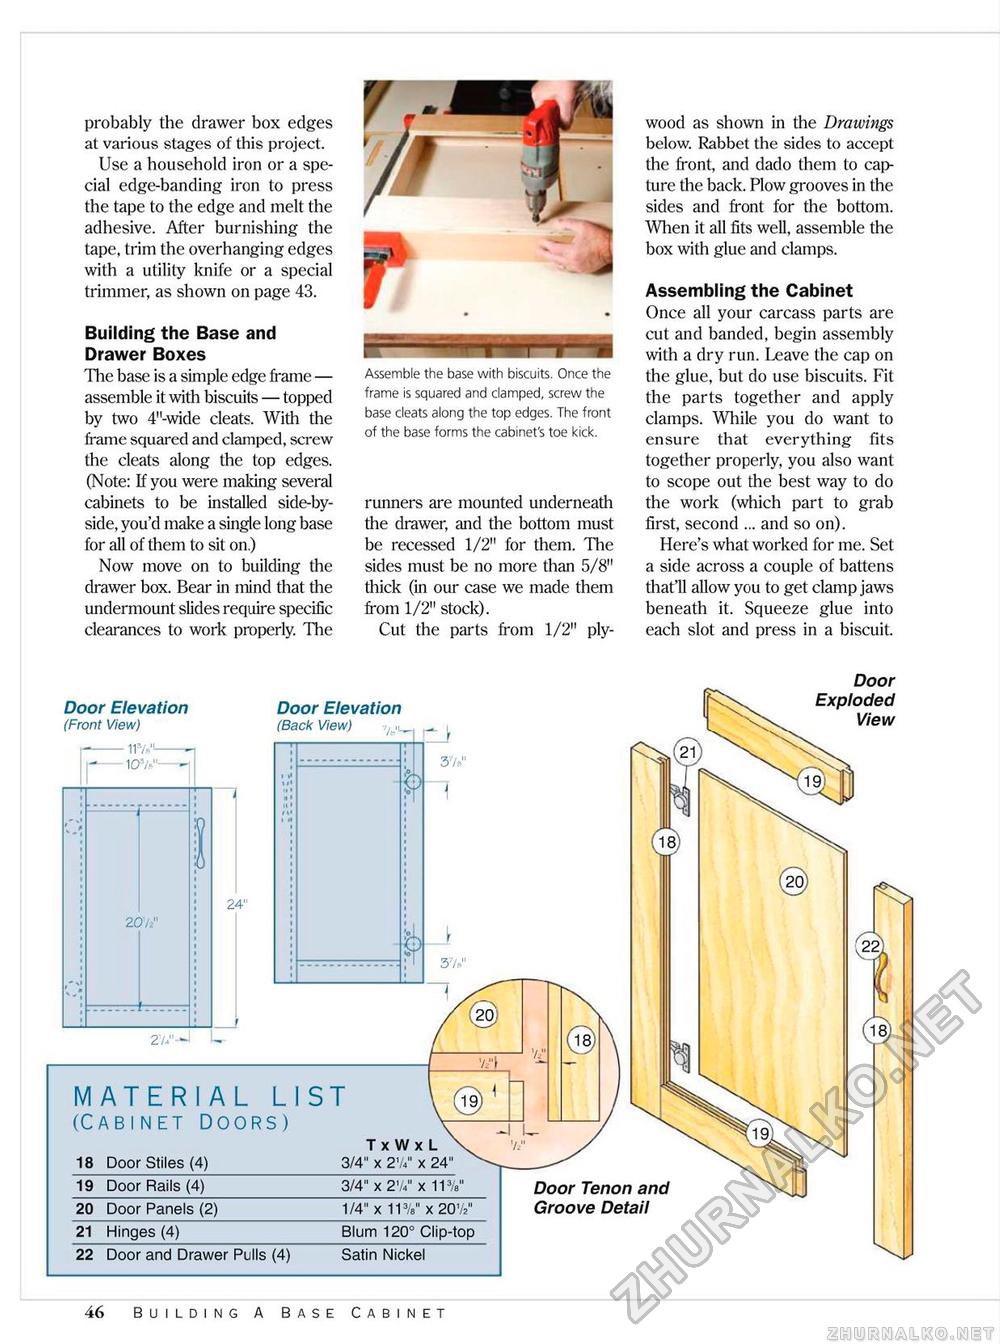
probably the drawer box edges at various stages of this project. Use a household iron or a special edge-banding iron to press the tape to the edge and melt the adhesive. After burnishing the tape, trim the overhanging edges with a utility knife or a special trimmer, as shown on page 43. Building the Base and Drawer Boxes The base is a simple edge frame — assemble it with biscuits — topped by two 4"-wide cleats. With the frame squared and damped, screw the cleats along the top edges. (Note: If you were making several cabinets to be installed side-by-side, you'd make a single long base for all of them to sit on.) Now move on to building the drawer box. Bear in mind that the undermount slides require specific clearances to work properly. The Assemble the base with biscuits. Once the frame is squared and clamped, screw the base cleats along the top edges. The front of the base forms the cabinet's toe kick. runners are mounted underneath the drawer, and the bottom must be recessed 1/2" for them. The sides must be no more than 5/8" thick (in our case we made them from 1/2" stock). Cut the parts from 1/2" ply wood as shown in the Draivings below. Rabbet the sides to accept the front, and dado them to capture the back. Plow grooves in the sides and front for the bottom. When it all fits well, assemble the box with glue and clamps. Assembling the Cabinet Once all your carcass parts are cut and banded, begin assembly with a dry run. Leave the cap on the glue, but do use biscuits. Fit the parts together and apply clamps. While you do want to ensure that everything fits together properly, you also want to scope out the best way to do the work (which part to grab first, second ... and so on). Here's what worked for me. Set a side across a couple of battens that'll allow you to get clamp jaws beneath it. Squeeze glue into each slot and press in a biscuit. Door Elevation (Front View) 113'-"- Door Elevation (Back View) 7/ IL Door Exploded View lb 103/l 9 20/2" 24" material l (Cabinet Doors) 18 Door Stiles (4) 1st T x W x L 3/4" x 2V4" x 24" 18 Door Stiles (4) T x W x L 3/4" x 2V4" x 24"
Door Tenon Groove Detail 46 Building A Base Cabinet |


