Woodworker's Journal winter-2010, страница 53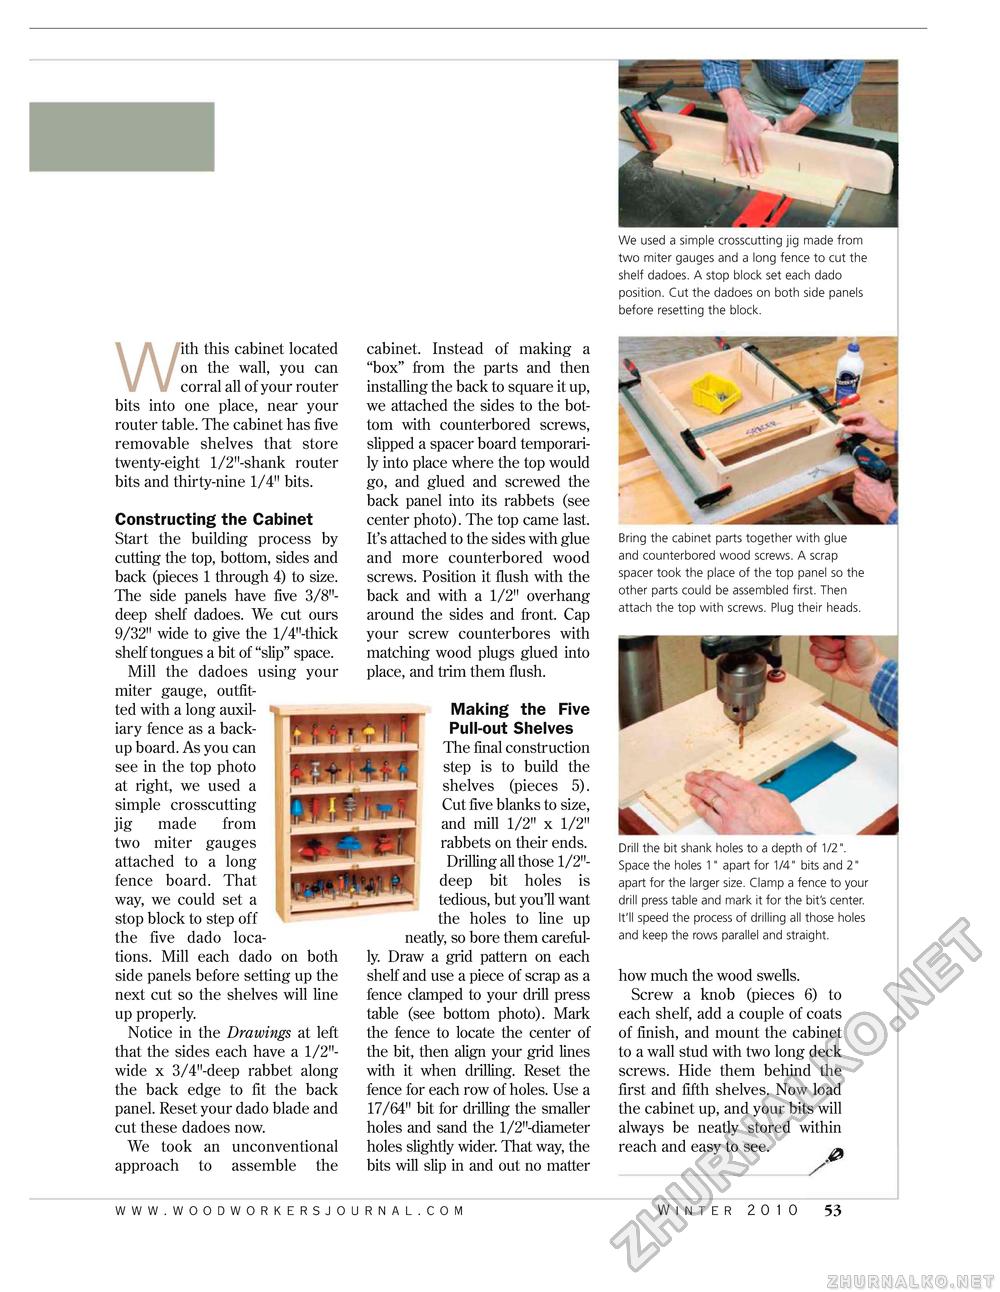
We used a simple crosscutting jig made from two miter gauges and a long fence to cut the shelf dadoes. A stop block set each dado position. Cut the dadoes on both side panels before resetting the block. ith this cabinet located on the wall, you can corral all of your router bits into one place, near your router table. The cabinet has five removable shelves that store twenty-eight l/2M-shank router bits and thirty-nine 1/4" bits. Constructing the Cabinet Start the building process by cutting the top, bottom, sides and back (pieces 1 through 4) to size. The side panels have five 3/8"-deep shelf dadoes. We cut ours 9/32" wide to give the l/4M-thick shelf tongues a bit of "slip" space. Mill the dadoes using your miter gauge, outfitted with a long auxiliary fence as a backup board. As you can see in the top photo at right, we used a simple crosscutting jig made from two miter gauges attached to a long fence board. That way, we could set a stop block to step off the five dado locations. Mill each dado on both side panels before setting up the next cut so the shelves will line up properly. Notice in the Drawings at left that the sides each have a 1/2"-wide x 3/4M-deep rabbet along the back edge to fit the back panel. Reset your dado blade and cut these dadoes now. We took an unconventional approach to assemble the WfWiJ IffWWF cabinet. Instead of making a "box" from the parts and then installing the back to square it up, we attached the sides to the bottom with counterbored screws, slipped a spacer board temporarily into place where the top would go, and glued and screwed the back panel into its rabbets (see center photo). The top came last. It's attached to the sides with glue and more counterbored wood screws. Position it flush with the back and with a 1/2" overhang around the sides and front. Cap your screw counterbores with matching wood plugs glued into place, and trim them flush. Making the Five Pull-out Shelves The final construction step is to build the shelves (pieces 5). Cut five blanks to size, and mill 1/2" x 1/2" rabbets on their ends. Drilling all those 1/2"-deep bit holes is tedious, but you'll want the holes to line up neatly, so bore them carefully. Draw a grid pattern on each shelf and use a piece of scrap as a fence clamped to your drill press table (see bottom photo). Mark the fence to locate the center of the bit, then align your grid lines with it when drilling. Reset the fence for each row of holes. Use a 17/64" bit for drilling the smaller holes and sand the l/2"-diameter holes slightly wider. That way, the bits will slip in and out no matter Bring the cabinet parts together with glue and counterbored wood screws. A scrap spacer took the place of the top panel so the other parts could be assembled first. Then attach the top with screws. Plug their heads. Drill the bit shank holes to a depth of 1/2". Space the holes 1" apart for 1/4" bits and 2" apart for the larger size. Clamp a fence to your drill press table and mark it for the bit's center. It'll speed the process of drilling all those holes and keep the rows parallel and straight. how much the wood swells. Screw a knob (pieces 6) to each shelf, add a couple of coats of finish, and mount the cabinet to a wall stud with two long deck screws. Hide them behind the first and fifth shelves. Now load the cabinet up, and your bits will always be neatly stored within reach and easy to see. / Winter 2010 53 |


