Woodworker's Journal winter-2010, страница 51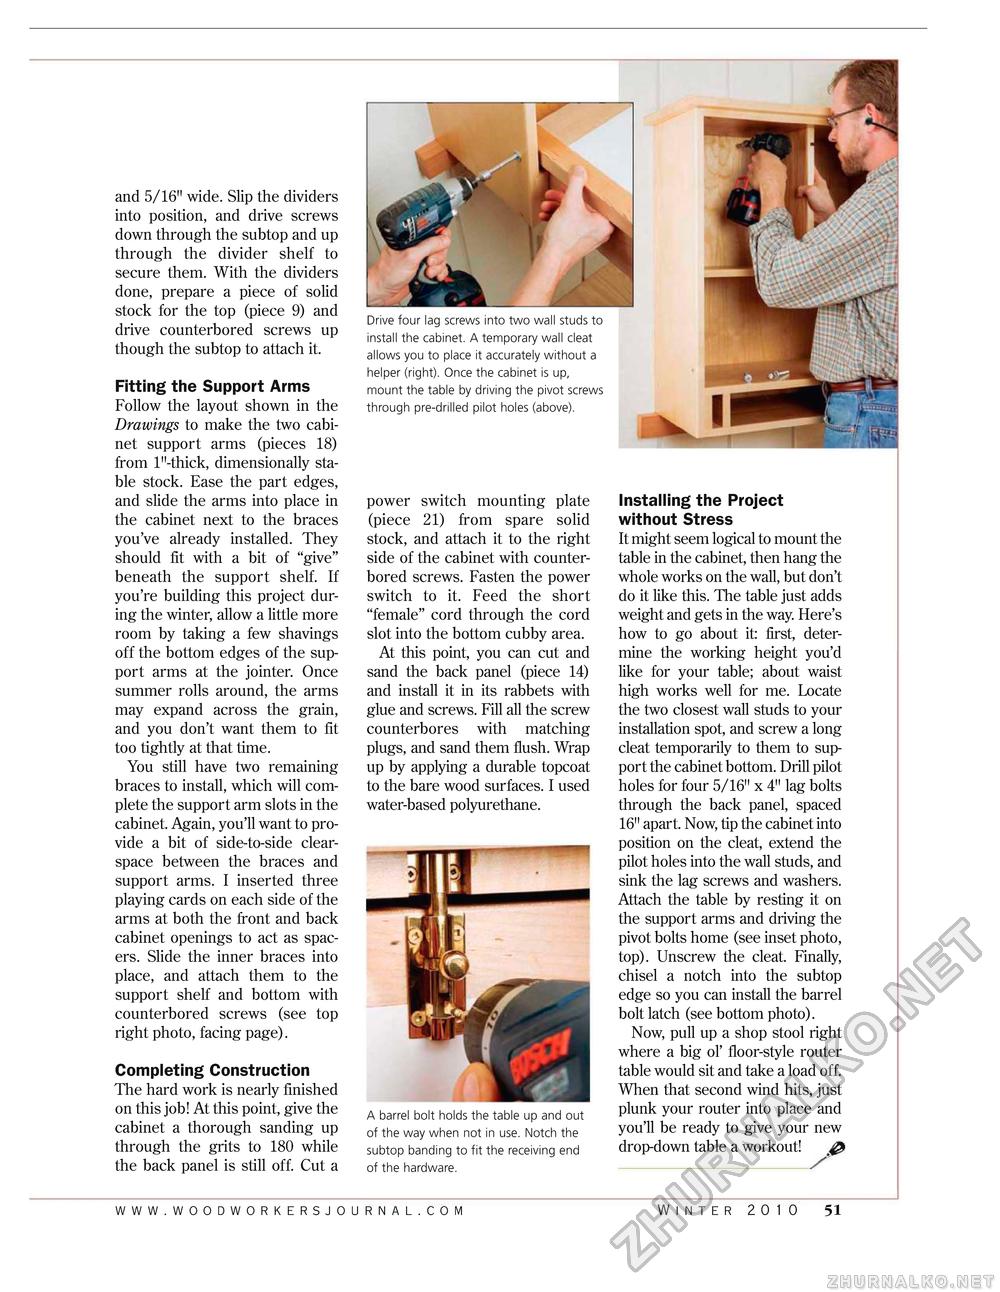
and 5/16" wide. Slip the dividers into position, and drive screws down through the subtop and up through the divider shelf to secure them. With the dividers done, prepare a piece of solid stock for the top (piece 9) and drive counterbored screws up though the subtop to attach it. Fitting the Support Arms Follow the layout shown in the Drawings to make the two cabinet support arms (pieces 18) from lM-thick, dimensionally stable stock. Ease the part edges, and slide the arms into place in the cabinet next to the braces you've already installed. They should fit with a bit of "give" beneath the support shelf. If you're building this project during the winter, allow a little more room by taking a few shavings off the bottom edges of the support arms at the jointer. Once summer rolls around, the arms may expand across the grain, and you don't want them to fit too tightly at that time. You still have two remaining braces to install, which will complete the support arm slots in the cabinet. Again, you'll want to provide a bit of side-to-side clear-space between the braces and support arms. I inserted three playing cards on each side of the arms at both the front and back cabinet openings to act as spacers. Slide the inner braces into place, and attach them to the support shelf and bottom with counterbored screws (see top right photo, facing page). Completing Construction The hard work is nearly finished on this job! At this point, give the cabinet a thorough sanding up through the grits to 180 while the back panel is still off. Cut a Drive four lag screws into two wall studs to install the cabinet. A temporary wall cleat allows you to place it accurately without a helper (right). Once the cabinet is up, mount the table by driving the pivot screws through pre-drilled pilot holes (above). power switch mounting plate (piece 21) from spare solid stock, and attach it to the right side of the cabinet with counterbored screws. Fasten the power switch to it. Feed the short "female" cord through the cord slot into the bottom cubby area. At this point, you can cut and sand the back panel (piece 14) and install it in its rabbets with glue and screws. Fill all the screw counterbores with matching plugs, and sand them flush. Wrap up by applying a durable topcoat to the bare wood surfaces. I used water-based polyurethane. A barrel bolt holds the table up and out of the way when not in use. Notch the subtop banding to fit the receiving end of the hardware. Installing the Project without Stress It might seem logical to mount the table in the cabinet, then hang the whole works on the wall, but don't do it like this. The table just adds weight and gets in the way. Here's how to go about it: first, determine the working height you'd like for your table; about waist high works well for me. Locate the two closest wall studs to your installation spot, and screw a long cleat temporarily to them to support the cabinet bottom. Drill pilot holes for four 5/16" x 4" lag bolts through the back panel, spaced 16" apart. Now, tip the cabinet into position on the cleat, extend the pilot holes into the wall studs, and sink the lag screws and washers. Attach the table by resting it on the support arms and driving the pivot bolts home (see inset photo, top). Unscrew the cleat. Finally, chisel a notch into the subtop edge so you can install the barrel bolt latch (see bottom photo). Now, pull up a shop stool right where a big ol' floor-style router table would sit and take a load off. When that second wind hits, just plunk your router into place and you'll be ready to give your new drop-down table a workout! & ___/ winter 2010 51 |


