Woodworker's Journal winter-2010, страница 48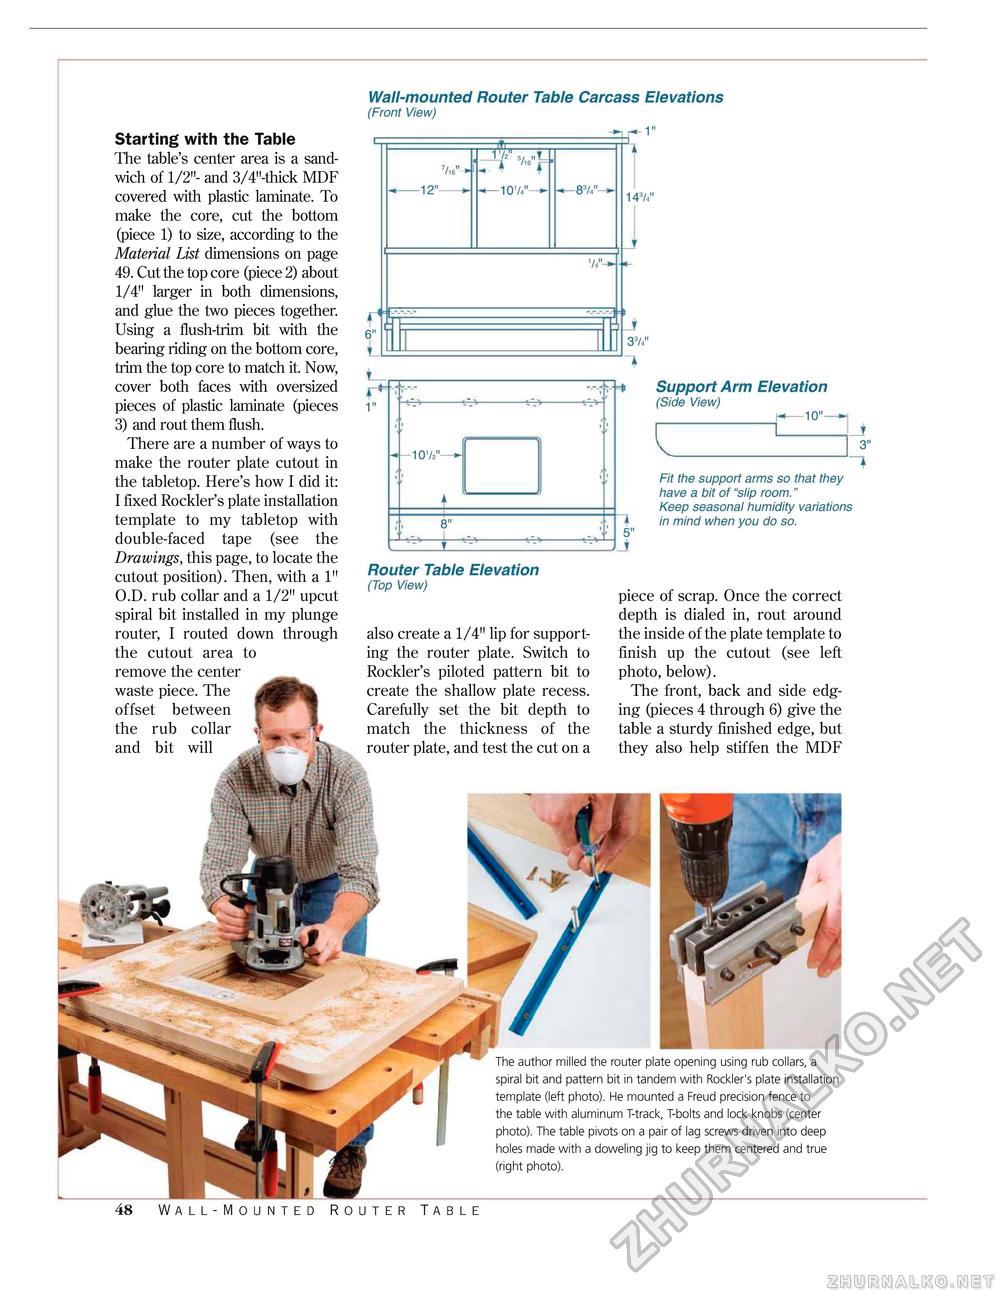
Wall-mounted Router Table Carcass Elevations (Front View) 7/l6" * -10V4"—^ 6" rn- 1" Support Arm Elevation (Side View) _h*—10"- Fit the support arms so that they have a bit of "slip room." Keep seasonal humidity variations in mind when you do so. author milled the router plate opening using rub collars, a spiral bit and pattern bit in tandem with Rockler's plate installation template (left photo). He mounted a Freud precision fence to the table with aluminum T-track, T-bolts and lock knobs (center photo). The table pivots on a pair of lag screws driven into deep holes made with a doweling jig to keep them centered and true (right photo). Starting with the Table The table's center area is a sandwich of 1/2"- and 3/4M-thick MDF covered with plastic laminate. To make the core, cut the bottom (piece 1) to size, according to the Material List dimensions on page 49. Cut the top core (piece 2) about 1/4" larger in both dimensions, and glue the two pieces together. Using a flush-trim bit with the bearing riding on the bottom core, trim the top core to match it. Now, cover both faces with oversized pieces of plastic laminate (pieces 3) and rout them flush. There are a number of ways to make the router plate cutout in the tabletop. Here's how I did it: I fixed Rockler's plate installation template to my tabletop with double-faced tape (see the Drawings, this page, to locate the cutout position). Then, with a 1" O.D. rub collar and a 1/2" upcut spiral bit installed in my plunge router, I routed down through the cutout area to remove the center waste piece. The offset between the rub collar and bit will Router Table Elevation (Top View) also create a 1/4" lip for supporting the router plate. Switch to Rockler's piloted pattern bit to create the shallow plate recess. Carefully set the bit depth to match the thickness of the router plate, and test the cut on a piece of scrap. Once the correct depth is dialed in, rout around the inside of the plate template to finish up the cutout (see left photo, below). The front, back and side edging (pieces 4 through 6) give the table a sturdy finished edge, but they also help stiffen the MDF |


