Creative Woodworks & crafts 1997-08, страница 18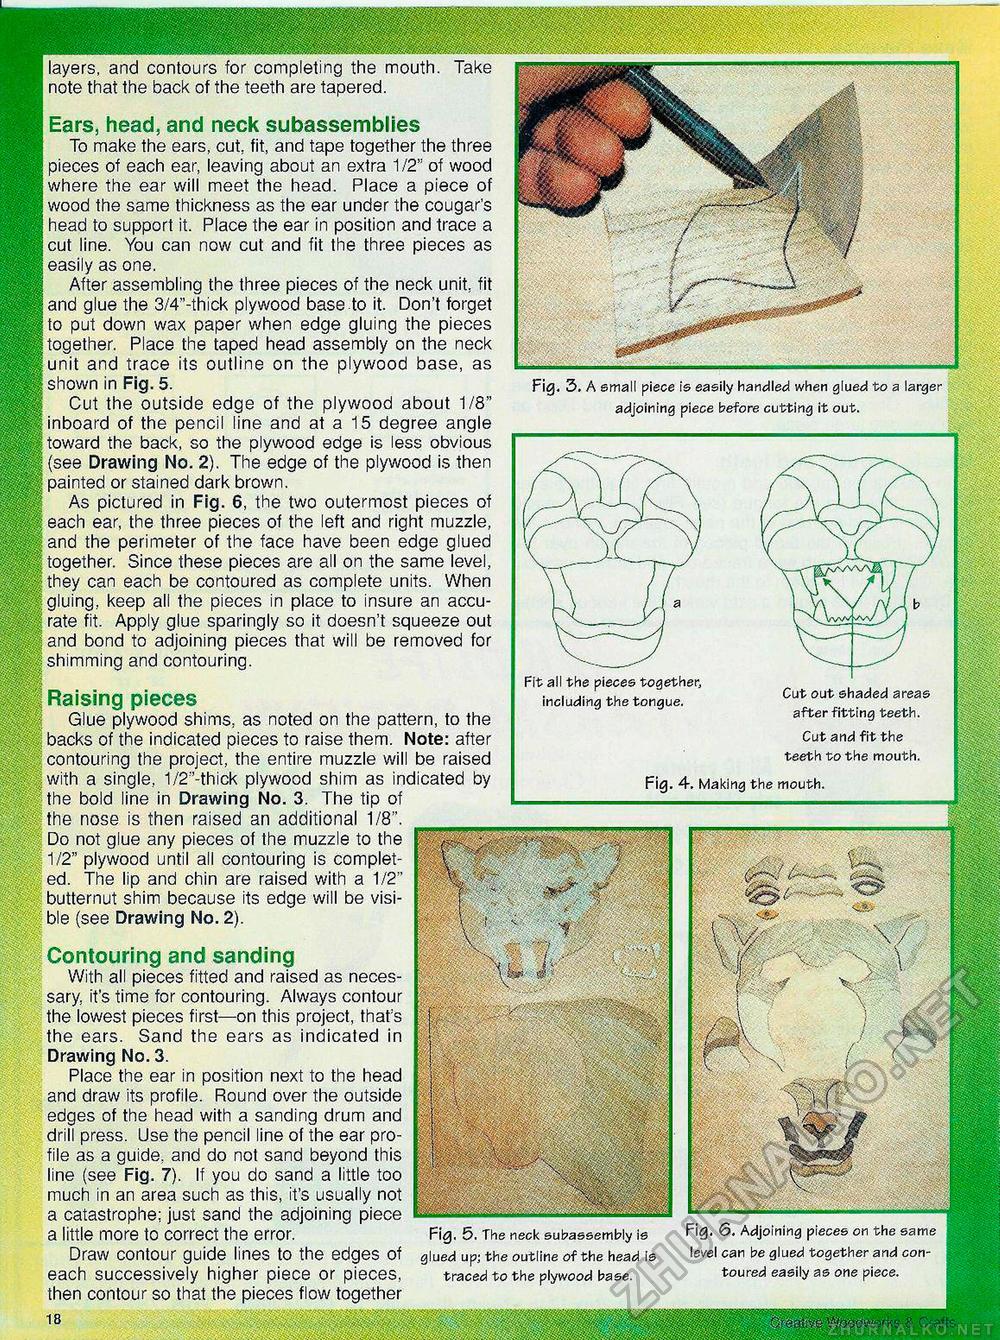
ng the mouth. Take note that the back of the teeth are tapered. Contouring and sanding With ail pieces fitted and raised as necessary, it's time for contouring. Always contour the lowest pieces first—on this project, that's the ears. Sand the ears as indicated in Drawing No, 3. Place the ear in position next to the head and draw its profile. Round over the outside edges of the head with a sanding drum and drill press. Use the pencil line of the ear profile as a guide, and do not sand beyond this line (see Fig. 7). If you do sand a little too much in an area such as this, it's usually not a catastrophe; just sand the adjoining piece a little more to correct the error. Draw contour guide lines to the edges of each successively higher piece or pieces, then contour so that the pieces flow together Fig. 5. The neck subassembly is glued up; the outline of the head is traced to the plywood base. Fig. 6. Adjoining pieces on the same level can be glued together and contoured easily as one piece. Ears, head, and neck subassemblies To make the ears, cut, fit, and tape together the three pieces of each ear, leaving about an extra 1/2" of wood where the ear will meet the head. Place a piece of wood the same thickness as the ear under the cougar's head to support it. Place the ear in position and trace a cut line. You can now cut and fit the three pieces as easily as one. After assembling the three pieces of the neck unit, fit and glue the 3/4"-thick plywood base to it. Don't forget to put down wax paper when edge gluing the pieces together. Place the taped head assembly on the neck unit and trace its outline on the plywood base, as in Fig. 5. Cut the outside edge of the plywood about 1/8" inboard of the pencil line and at a 15 degree angle toward the back, so the plywood edge is less obvious (see Drawing No. 2). The edge of the plywood is then painted or stained dark brown. As pictured in Fig. 6, the two outermost pieces of each ear, the three pieces of the left and right muzzle, and the perimeter of the face have been edge glued together. Since these pieces are all on the same level, they can each be contoured as complete units. When gluing, keep all the pieces in place to insure an accurate fit. Apply glue sparingly so it doesn't squeeze out and bond to adjoining pieces that will be removed for shimming and contouring. Raising pieces Glue plywood shims, as noted on the pattern, to the backs of the indicated pieces to raise them. Note: after contouring the project, the entire muzzle will be raised with a single, 1/2"-thick plywood shim as indicated by the bold line in Drawing No. 3. The tip of the nose is then raised an additional 1/8". Do not glue any pieces of the muzzle to the 1/2" plywood until all contouring is completed. The lip and chin are raised with a 1/2" butternut shim because its edge will be visi-(see Drawing No. 2). Fig. 3. A small piece is easily handled when glued to a larger adjoining piece before cutting it out. Fig. 4. Making the mouth. Fit all the pieces together, including the tongue. Cut out shaded area© after fitting teeth. Cut and fit the teeth to the mouth. |


