Creative Woodworks & crafts 1997-08, страница 64
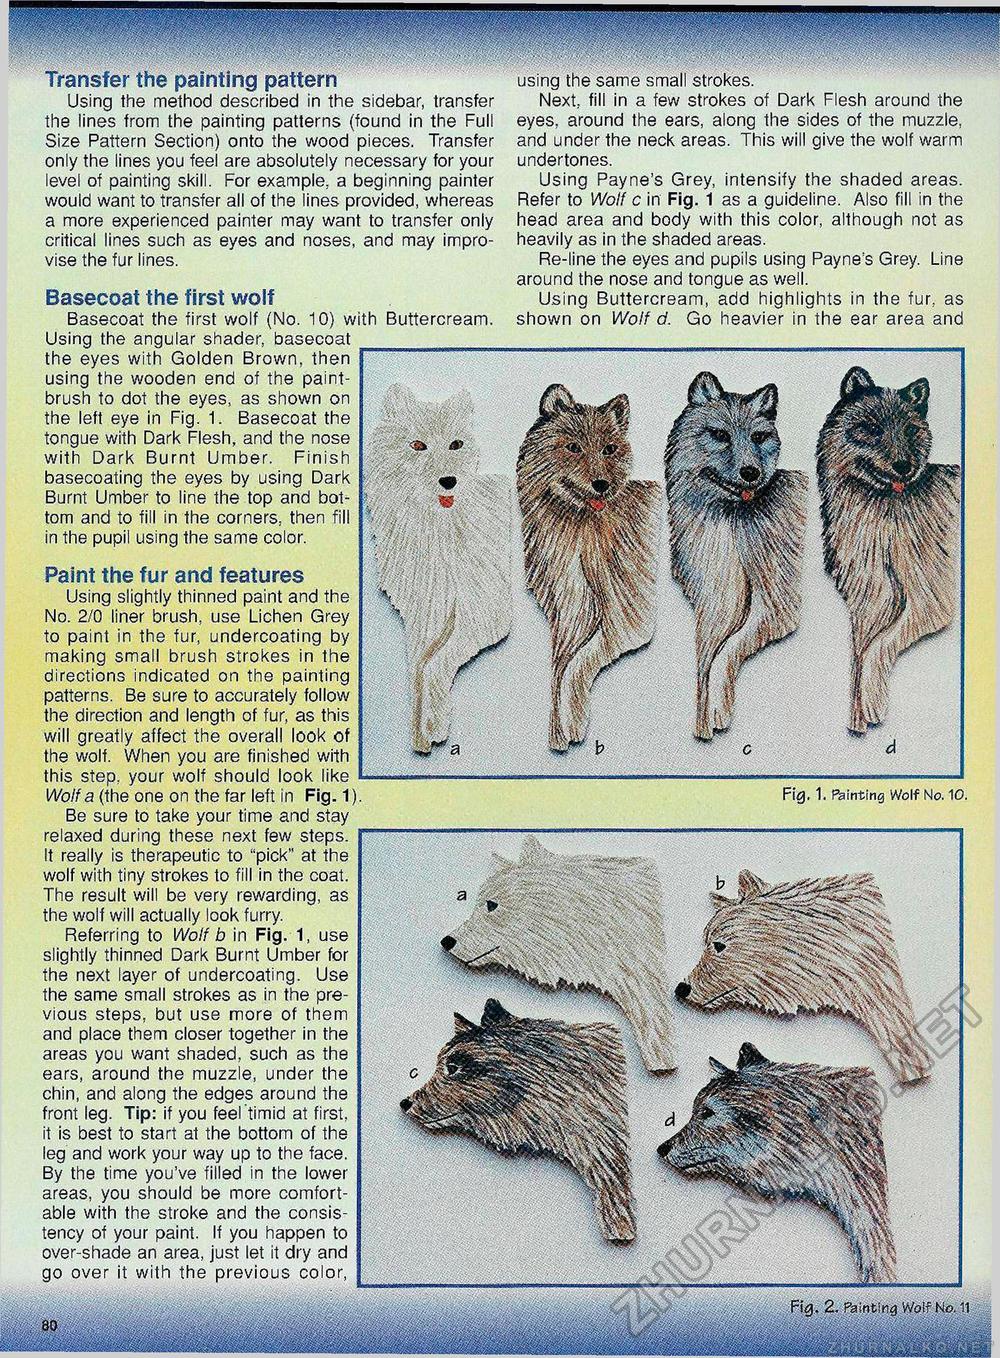
Paint the fur and features Using slightly thinned paint and the No. 2/0 liner brush, use Lichen Grey to paint in the fur, undercoating by making small brush strokes in the directions indicated on the painting patterns. Be sure to accurately follow the direction and length of fur, as this will greatly affect the overall look of the wolf. When you are finished with this step, your wolf should look like Wolf a (the one on the far left in Fig. 1) Be sure to take your time and stay relaxed during these next few steps. It really is therapeutic to "pick" at the wolf with tiny strokes to fill in the coat. The result will be very rewarding, as the wolf will actually look furry. Referring to Wolf b in Fig. 1, use slightly thinned Dark Burnt Umber for the next layer of undercoating. Use the same small strokes as in the previous steps, but use more of them and place them closer together in the areas you want shaded, such as the ears, around the muzzle, under the chin, and along the edges around the front leg. Tip: if you feel timid at first, it is best to start at the bottom of the leg and work your way up to the face. By the time you've filled in the lower areas, you should be more comfortable with the stroke and the consistency of your paint. If you over-shade an area, just let Fig, 1. Painting Wolf No. 10. Transfer the painting pattern Using the method described in the sidebar, transfer the lines from the painting patterns (found in the Full Size Pattern Section) onto the wood pieces. Transfer only the lines you feel are absolutely necessary for your level of painting skill. For example, a beginning painter would want to transfer all of the lines provided, whereas a more experienced painter may want to transfer only critical lines such as eyes and noses, and may improvise the fur lines. Basecoat the first wolf Basecoat the first wolf (No. 10) with Buttercream. Using the angular shader, basecoat the eyes with Golden Brown, then using the wooden end of the paintbrush to dot the eyes, as shown on the left eye in Fig. 1. Basecoat the tongue with Dark Flesh, and the nose with Dark Burnt Umber. Finish basecoating the eyes by using Dark Burnt Umber to line the top and bottom and to fill in the corners, then fill in the pupil using the same color. using the same small strokes. Next, fill in a few strokes of Dark Flesh around the eyes, around the ears, along the sides of the muzzle, and under the neck areas. This will give the wolf warm undertones. Using Payne's Grey, intensify the shaded areas. Refer to Wolf c in Fig. 1 as a guideline. Also fill in the head area and body with this color, although not as heavily as in the shaded areas. Re-line the eyes and pupils using Payne:s Grey. Line around the nose and tongue as well. Using Buttercream, add highlights in the fur, as shown on Wolf d. Go heavier in the ear area and |


