Creative Woodworks & crafts 1998-09, страница 39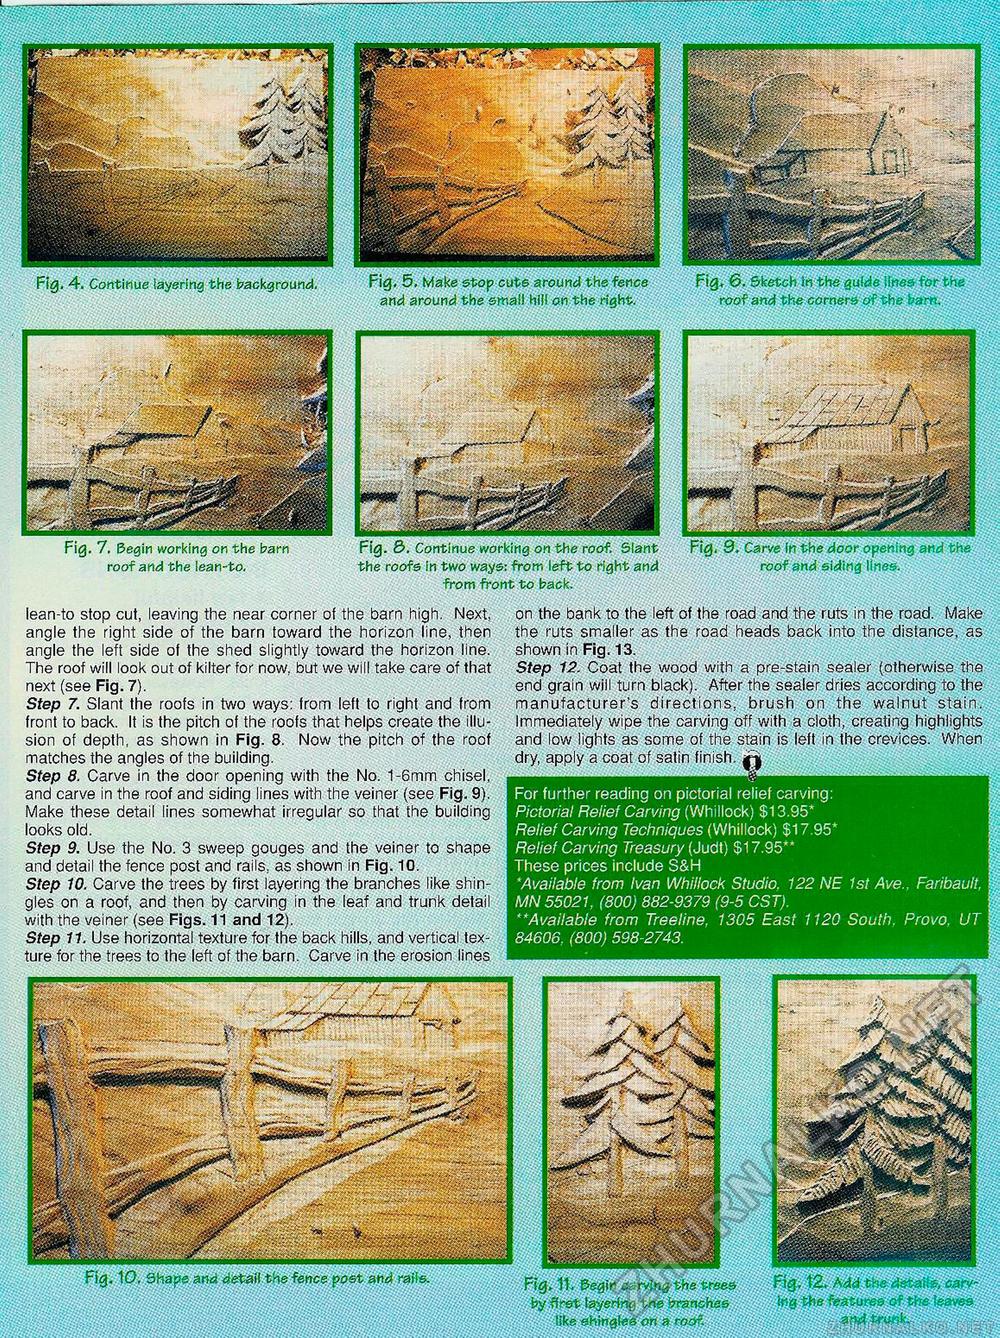
For further reading on pictorial relief carving: Pictorial Relief Carving (Whillock) $13.95* Relief Carving Techniques (Whillock) $17.95* Relief Carving Treasury (Judt) $17.95** These prices include S&H *Available from Ivan Whillock Studio. 122 NE 1st Ave., Faribault, MN 55021, (800) 882-9379 (9-5 CST). **Available from Treeline, 1305 East 1120 South. Provo, UT 84606, (800) 598-2743. mi Fig. 6. Sketch ta the guMe litres for th roof and the corners of the barn.. Fig. 5, Make stop cuts arourrd the fence and around the small hill on the right. Fig. 4. Continue layering the background. Fig. 7. Begin working on the barn roof and the lean-to, Fig. 3. Continue working on the roof. Slant the roofs in two ways: from left to right and from front to back. on the bank to the left of the road and the ruts in the road. Make the ruts smaller as the road heads back into the distance, as shown in Fig. 13. Step 12. Coat the wood with a pre-stain sealer (otherwise the end grain will turn black). After the sealer dries according to the manufacturer's directions, brush on the walnut stain. Immediately wipe the carving off with a cloth, creating highlights and low lights as some of the stain is left in the crevices. When dry, apply a coat of satin finish. jf| lean-to stop cut, leaving the near corner of the barn high. Next, angle the right side of the barn toward the horizon line, then angle the left side of the shed slightly toward the horizon line. The roof will look out of kilter for now, but we will take care of that next (see Fig. 7). Step 7. Slant the roofs in two ways: from left to right and from front to back. It is the pitch of the roofs that helps create the illusion of depth, as shown in Fig. 8. Now the pitch of the roof matches the angles of the building. Step 8. Carve in the door opening with the No. 1-6mm chisel, and carve in the roof and siding lines with the veiner (see Fig. 9). Make these detail lines somewhat irregular so that the building looks old. Step 9. Use the No. 3 sweep gouges and the veiner to shape and detail the fence post and rails, as shown in Fig. 10. Step 10. Carve the trees by first layering the branches like shingles on a roof, and then by carving in the leaf and trunk detail with the veiner (see Figs. 11 and 12). Step 11. Use horizontal texture for the back hills, and vertical texture for the trees to the left of the barn. Carve in the erosion lines Fig. 10, Shape and detail the fence post and rails. Fig, Add the (tetaite, caly-tiie features of the leaves a^wlt Fig. 11. Begin carving the trees by first layering the branches tike shingles en a roof. |


