Creative Woodworks & crafts 1998-09, страница 42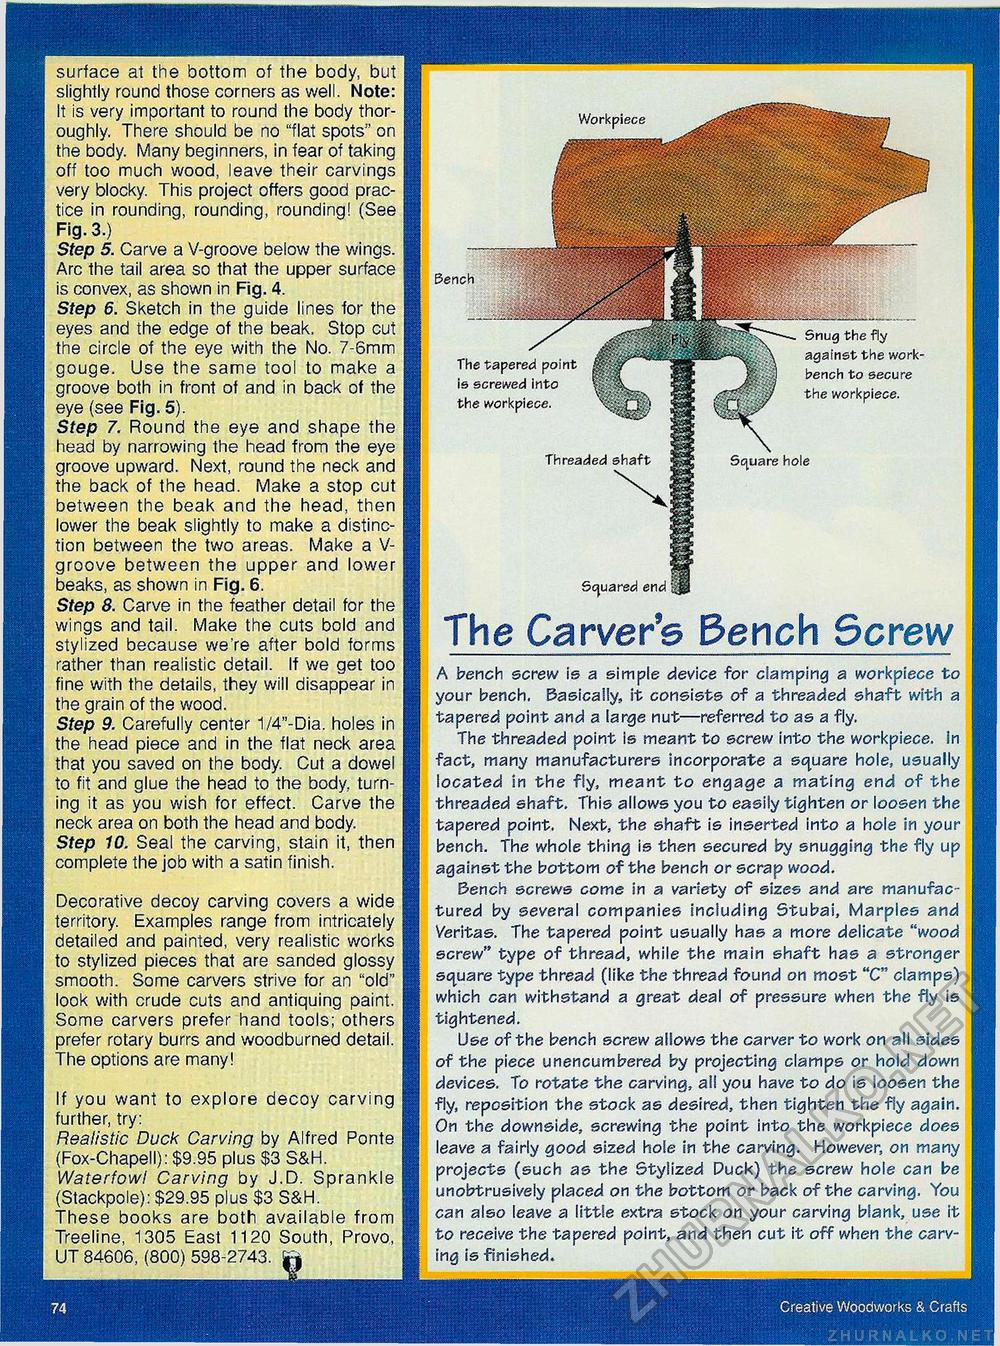
surface at the bottom of the body, but slightly round those corners as well. Note: It is very important to round the body thoroughly. There should be no "flat spots" on the body. Many beginners, in fear of taking off too much wood, leave their carvings very blocky. This project offers good practice in rounding, rounding, rounding! (See Fig. 3.) Step 5. Carve a V-groove below the wings. Arc the tail area so that the upper surface is convex, as shown in Fig. 4. Step 6. Sketch in the guide lines for the eyes and the edge of the beak. Stop cut the circle of the eye with the No. 7-6mm gouge. Use the same tool to make a groove both in front of and in back of the eye (see Fig. 5). Step 7. Round the eye and shape the head by narrowing the head from the eye groove upward. Next, round the neck and the back of the head. Make a stop cut between the beak and the head, then lower the beak slightly to make a distinction between the two areas. Make a V-groove between the upper and lower beaks, as shown in Fig. 6. Step 8. Carve in the feather detail for the wings and tail. Make the cuts bold and stylized because we're after bold forms rather than realistic detail. If we get too fine with the details, they will disappear in the grain of the wood. Step 9. Carefully center 1/4"-Dia. holes in the head piece and in the flat neck area that you saved on the body. Cut a dowel to fit and glue the head to the body, turning it as you wish for effect. Carve the neck area on both the head and body. Step 10. Seal the carving, stain it, then complete the job with a satin finish. Decorative decoy carving covers a wide territory. Examples range from intricately detailed and painted, very realistic works to stylized pieces that are sanded glossy smooth. Some carvers strive for an "old" look with crude cuts and antiquing paint. Some carvers prefer hand tools; others prefer rotary burrs and woodburned detail. The options are many! If you want to explore decoy carving further, try: Realistic Duck Carving by Alfred Ponte (Fox-Chapell): $9.95 plus $3 S&H. Waterfowl Carving by J.D. Sprankle (Stackpole): $29.95 plus $3 S&H. These books are both available from Treeline, 1305 East 1120 South, Provo, UT 84606, (800) 598-2743. A bench screw is a simple device for clamping a workpiece to your bench, Basically, it consists of a threaded shaft with a tapered point and a large nut—referred to as a fly. The threaded point is meant to screw into the workpiece. In fact, many manufacturers incorporate a square hole, usually located in the fly, meant to engage a mating end of the threaded shaft. This allows you to easily tighten or loosen the tapered point. Next, the shaft is inserted into a hole in your bench. The whole thing is then secured by snugging the fly up against the bottom of the bench or scrap wood. Bench screws come in a variety of sizes and are manufactured by several companies including Stubai, Marples and Veritas. The tapered point usually has a more delicate "wood screw" type of thread, while the main shaft has a stronger square type thread (like the thread found on most "C" clamps) which can withstand a great deal of pressure when the fly is tightened. Use of the bench screw allows the carver to work on all sides of the piece unencumbered by projecting clamps or hold down devices. To rotate the carving, all you have to do is loosen the fly, reposition the stock as desired, then tighten the fly again. On the downside, screwing the point into the workpiece does leave a fairly good sized hole in the carving. However, on many projects (such as the Stylized Puck) the screw hole can be unobtrusively placed on the bottom or back of the carving. You can also leave a little extra stock on your carving blank, use it to receive the tapered point, and then cut it off when the carving is finished. Squared end The Carver's Bench 5crew Workpiece Bench The tapered point is screwed into the workpiece. Threaded shaft Snug the fly against the workbench to secure the workpiece. Square hole 74 Creative Woodworks & Crafts |


