Creative Woodworks & crafts 1998-09, страница 63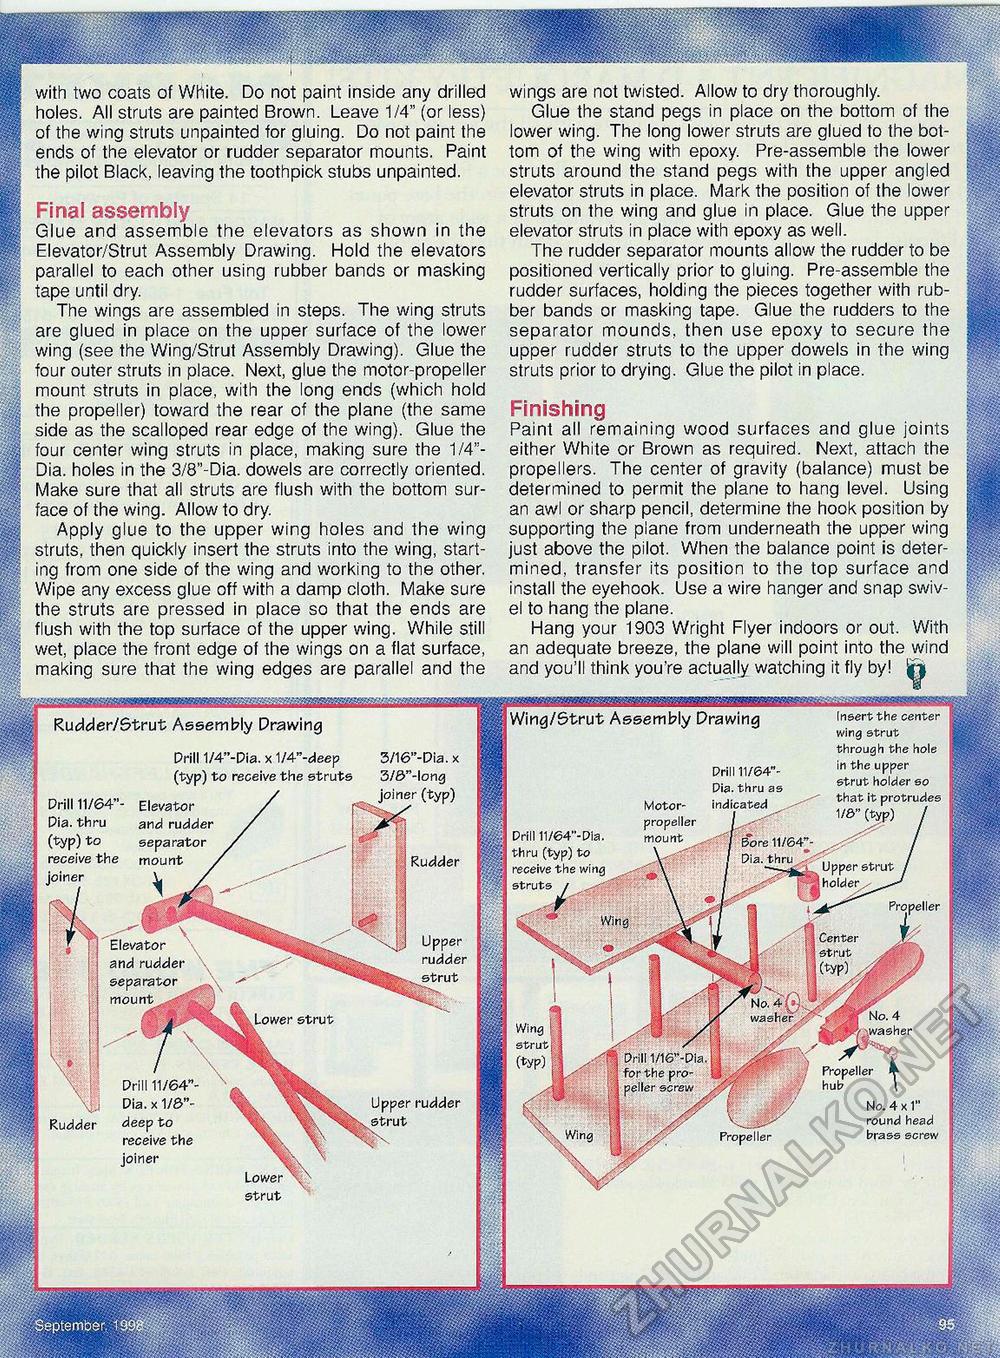
wings are not twisted. Allow to dry thoroughly. Glue the stand pegs in place on the bottom of the lower wing. The long lower struts are glued to the bottom of the wing with epoxy. Pre-assemble the lower struts around the stand pegs with the upper angled elevator struts in place. Mark the position of the lower struts on the wing and glue in place. Glue the upper elevator struts in place with epoxy as well. The rudder separator mounts allow the rudder to be positioned vertically prior to gluing. Pre-assemble the rudder surfaces, holding the pieces together with rubber bands or masking tape. Glue the rudders to the separator mounds, then use epoxy to secure the upper rudder struts to the upper dowels in the wing struts prior to drying. Glue the pilot in place. Finishing Paint all remaining wood surfaces and glue joints either White or Brown as required. Next, attach the propellers. The center of gravity (balance) must be determined to permit the plane to hang level. Using an awl or sharp pencil, determine the hook position by supporting the plane from underneath the upper wing just above the pilot. When the balance point is determined, transfer its position to the top surface and install the eyehook. Use a wire hanger and snap swivel to hang the plane. Hang your 1903 Wright Flyer indoors or out. With an adequate breeze, the plane will point into the wind and you'll think you're actually watching it fly by! jrj| with two coats of White. Do not paint inside any drilled holes. All struts are painted Brown. Leave 1/4" (or less) of the wing struts unpainted for gluing. Do not paint the ends of the elevator or rudder separator mounts. Paint the pilot Black, leaving the toothpick stubs unpainted. Final assembly Glue and assemble the elevators as shown in the Elevator/Strut Assembly Drawing. Hold the elevators parallel to each other using rubber bands or masking tape until dry. The wings are assembled in steps. The wing struts are glued in place on the upper surface of the lower wing (see the Wing/Strut Assembly Drawing). Glue the four outer struts in place. Next, glue the motor-propeller mount struts in place, with the long ends (which hold the propeller) toward the rear of the plane (the same side as the scalloped rear edge of the wing). Glue the four center wing struts in place, making sure the 1/4"-Dia. holes in the 3/8"-Dia. dowels are correctly oriented. Make sure that all struts are flush with the bottom surface of the wing. Allow to dry. Apply glue to the upper wing holes and the wing struts, then quickly insert the struts into the wing, starting from one side of the wing and working to the other. Wipe any excess glue off with a damp cloth. Make sure the struts are pressed in place so that the ends are flush with the top surface of the upper wing. While still wet, place the front edge of the wings on a flat surface, making sure that the wing edges are parallel and the tm^/^mmmse Wing/Strut Assembly Drawing Insert the center wing strut through the hole in the upper strut holder so that it protrudes 1/8" (typ) / Rudder/Strut Assembly Drawing Drill 1/4"-Dia. x 1/4"-deep 3/16"-Dia. x (typ) to receive the struts 3/8"-!ong / joiner (typ) Elevator / f and rudder / ^ separator / ' mount / ^^ Rudder Prill 11/64"-Pia. thru as Motor- indicated propeller I mount I 11/64; V I Dia. thru Drill 11/64" Dia. thru (typ) to receive the joiner Prill 11/64"-Pia. thru (typ) to receive the wing struts / Upper strut holder^- Propeller Center strut (typ) , Upper rudder strut Elevator and rudder separator mount . No. 4 washer No. 4 washer Lower strut Wing I strut Drill 1/16"-Dia. for the propeller screw Propeller hub Drill 11/64" Dia. x 1/8"-deep to receive the joiner Upper rudder strut No. 4 x 1" round head brass screw Rudder Propeller Lower strut |


