Creative Woodworks & crafts 1999-11, страница 42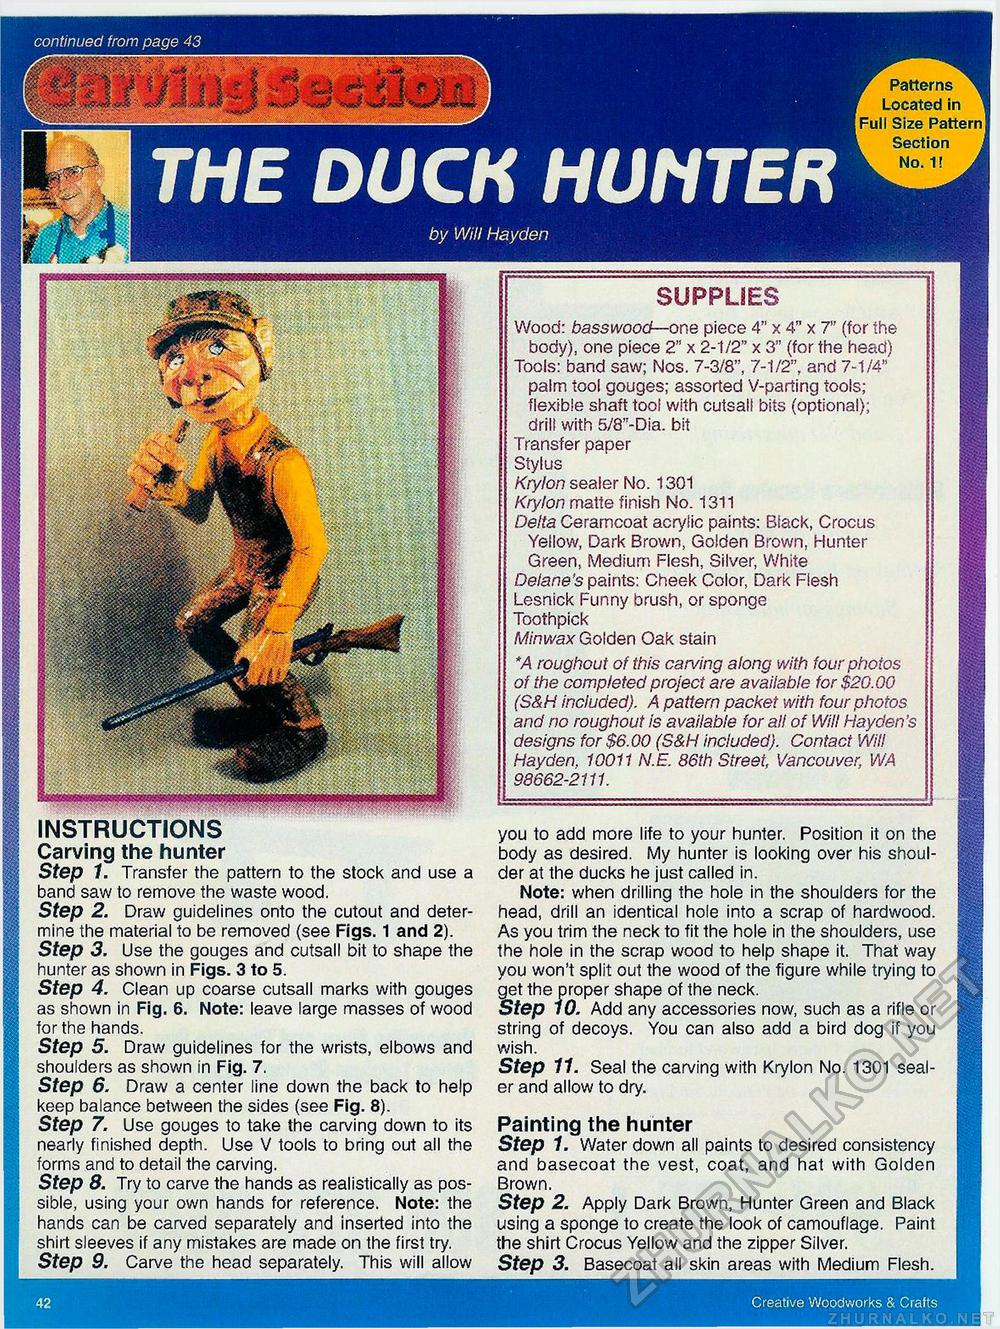
continued from page 43 THE DOCK HUNTERby Will Hayden Creative Woodworks & Crafts W Patterns ^ ' Located in ' Full Size Pattern i Section i k No. 1! A SUPPLIES Wood: basswood— one piece 4" x 4" x 7" (for the body), one piece 2" x 2-1/2" x 3" (for the head) Tools: band saw; Nos. 7-3/8", 7-1/2", and 7-1/4" palm tool gouges; assorted V-parting tools; flexible shaft tool with cutsall bits (optional); drill with 5/8"-Dia. bit Transfer paper Stylus Krylon sealer No. 1301 Krylon matte finish No. 1311 Delta Ceramcoat acrylic paints: Black, Crocus Yeliow, Dark Brown, Golden Brown, Hunter Green, Medium Flesh, Silver, White Delane's paints: Cheek Color, Dark Flesh Lesnick Funny brush, or sponge Toothpick Minwax Golden Oak stain *A roughout of this carving along with four photos of the completed project are available for $20.00 (S&H included). A pattern packet with four photos and no roughout is available for all of Will Hay den's designs for $6.00 (S&H included). Contact Will Hayden, 10011 N.E. 86th Street, Vancouver, WA 98662-2111. Hi iH| instructions you to add more life to your hunter. Position it on the Carving the hunter body as desired. My hunter is looking over his shoul- Step 1. Transfer the pattern to the stock and use a der at the ducks he just called in. band saw to remove the waste wood. Note: when drilling the hole in the shoulders for the Step 2. Draw guidelines onto the cutout and deter- head, drill an identical hole into a scrap of hardwood, mine the material to be removed (see Figs. 1 and 2). As you trim the neck to fit the hole in the shoulders, use Step 3. Use the gouges and cutsall bit to shape the the hole in the scrap wood to help shape it. That way hunter as shown in Figs. 3 to 5. you won't split out the wood of the figure while trying to Step 4. Clean up coarse cutsall marks with gouges get the proper shape of the neck, as shown in Fig. 6. Note: leave large masses of wood Step 10. Add any accessories now, such as a rifle or for the hands. string of decoys. You can also add a bird dog if you Step 5. Draw guidelines for the wrists, elbows and wish. shoulders as shown in Fig. 7. Step 11. Seal the carving with Krylon No. 1301 seal- Step 6. Draw a center line down the back to help er and allow to dry. keep balance between the sides (see Fig. 8). Step 7. Use gouges to take the carving down to its Painting the hunter nearly finished depth. Use V tools to bring out all the Step 1. Water down all paints to desired consistency forms and to detail the carving. and basecoat the vest, coat, and hat with Golden Step 8. Try to carve the hands as realistically as pos- Brown. sible, using your own hands for reference. Note: the Step 2. Apply Dark Brown, Hunter Green and Black hands can be carved separately and inserted into the using a sponge to create the look of camouflage. Paint shirt sleeves if any mistakes are made on the first try. the shirt Crocus Yellow and the zipper Silver. Step 9. Carve the head separately. This will allow Step 3. Basecoat all skin areas with Medium Flesh. |


